HTML tables allow web designers and developers to arrange data into rows and columns. Based on different UI for Angulars like Angular material, ng-bootstrap, and other UI, we can create an angular table in different approaches and we’ll learn and demonstrate few example on it.
We have few objectives in this tutorial, three main objective in this tutorial is
- Learn different available libraries to implment table in Angular.
- Demonstrate Table using Native HTML table element along with search filter.
- Demonstrate example of Table using Material and Bootstrap Libraries.
- Example of Angular Table using angular-datable with filter and pagination.
Some of the most popular Angular table libraries
There are plenty of third parties libraries for making Angular tables. These libraries provide extra and advanced features which we will not get from normal HTML tables. These advanced features include sorting, pagination, responsiveness, and filtering features. Here I have listed some popular Angular table libraries.
| Libraries Name | Pros | Notes |
| angular-datatables | Add datatable directive to your <table> element to enable DataTables features, zero configurationand easy to used. | It has weekly download of around 23,329 and size of 97.3 kB. This library has dependency on JQuery. |
| Angular material tables | Is one of the most popular libraries that provide material design UI for our angular project. The angular material table is a component of the material library and provides all the table features we needed for our project as we discussed earlier. | The deep learning curve and, if you are using material design for your UI, then is ok. The size of the libraries package is 11.3MB if you are using these libraries only for tables, then is big. |
| Bootstrap table | Is also one of the most popular UI design for angular project like material design and have all the table features you needed. | The size of the libraries is 3.87 MB. |
| ngx-datatable | Have all table features and is good for presenting large and complex data. | This library is not updated for the last four years. |
| @swimlane/ngx-datatable | Have all table features and is good for presenting large and complex data. Built specifically for Angular tables. | The size of the libraries is 3.98 MB. |
| primeng table | PrimeNG is a collection of rich UI components for Angular and is open source. Have all features needed for an angular table. | The size of the libraries is 24.4 MB. |
| ag-grid-angular | AG Grid is a fully-featured and highly customizable JavaScript data grid. No third-party dependencies. It has both free and | The size of the libraries is 1.6 MB. |
Prerequisites:
To create and run an Angular project, We need Nodejs and Angular CLI already install in our system, if not then check how to install Nodejs and angular in Ubuntu. Angular CLI allows us to create an Angular project, generate application and library code, and perform a variety of ongoing development tasks such as testing, bundling, and deployment. To install the Angular CLI, open a terminal and run the following command:
npm install -g @angular/cliHow do you use Angular Table ?
In this tutorial, we have few exaxmple of Table using Native HTML or any other libraries but in most of case setting up and configure Table project is almost same but differents in import coresspoinding Module from particular library. Here is the abstract steps, we are going to use to implement Table in Angular project.
- Create a Angular project for Table example
- Install particular library for table if needed, but for native Table we don’t need any third party library.
- Import third party library module in the app.module.ts file, if you use any third party library.
- Demonstrate example of Table.
Example of the Angular table filter using regular HTML Table
If you are not using any UI library, then the regular HTML table is enough to display and arrange data in rows and columns. With table tag, we can define HTML table, tr tag for table row, th to define a table heading cell and each table data/cell is defined with a td tag.
We need to fetch data first from the source, the source can be a server or local static data. Angular 4.3 introduces an Angular httpClient module to request a call to the HTTP request. In this example, we are using fetch API. The Fetch API is a newer built-in feature of JavaScript that makes working with requests and responses easier. We also add an Angular table search filter using a custom search pipe on the name and country data. Let’s create a custom pipe by running the following command.
ng g pipe pipes/search-nameThe custom pipe allows us to filter table data based on employee name and country name. Let’s add the following code in the pipes/search-name.pipe.ts
import { Pipe, PipeTransform } from '@angular/core';

@Pipe({ name: 'searchName' })
export class SearchNamePipe implements PipeTransform {
  transform(value: any, args?: any): any {
    if (!args) {
      return value;
    }
    return value.filter((value: any) => {
      return (value.name.toLocaleLowerCase().includes(args)) || (value.country.toLocaleLowerCase().includes(args));
    })
  }
}
We have form input for typing Angular table search filter word, thus we need to import FormsModule in the app.module.ts file.
import { NgModule } from '@angular/core';
import { BrowserModule } from '@angular/platform-browser';

import { AppRoutingModule } from './app-routing.module';
import { AppComponent } from './app.component';
import { RegularTableComponent } from './components/regular-table/regular-table.component';
import { MaterialComponent } from './components/material/material.component';
import { BrowserAnimationsModule } from '@angular/platform-browser/animations';
import { SearchNamePipe } from './pipes/search-name.pipe';
import { FormsModule } from '@angular/forms';

@NgModule({
  declarations: [
    AppComponent,
    RegularTableComponent,
    MaterialComponent,
    SearchNamePipe
  ],
  imports: [
    BrowserModule,
    AppRoutingModule,
    BrowserAnimationsModule,
    FormsModule
  ],
  providers: [],
  bootstrap: [AppComponent]
})
export class AppModule { }
Edit regular-table.component.ts to fetch our dummy data and we have searchString set to null, this content search word which we type.
import { Component, OnInit } from '@angular/core';

export interface IStudent {
  name: string;
  gender: string;
  country: string;
}

@Component({
  selector: 'app-regular-table',
  templateUrl: './regular-table.component.html',
  styleUrls: ['./regular-table.component.scss']
})
export class RegularTableComponent implements OnInit {
  students: IStudent[] = [];
  searchString = '';

  ngOnInit(): void {
    fetch('./assets/data/students.json').then(res => res.json())
      .then(json => {
        this.students = json;
      });
  }
}
Once we have our data in hand, we can display data in our component template. Edit regular-table.component.html file to display data in tables.
<div style="margin: 30px">
  <input
    type="text"
    [(ngModel)]="searchString"
    placeholder="Search by name or country"
  />
  <h2>Regular HTML Table</h2>
  <table>
    <tr>
      <th>S.no</th>
      <th>Name</th>
      <th>Gender</th>
      <th>Country</th>
    </tr>
    <tr
      *ngFor="let student of students | searchName: searchString; let i = index"
    >
      <td>{{ i + 1 }}</td>
      <td>{{ student.name }}</td>
      <td>{{ student.gender }}</td>
      <td>{{ student.country }}</td>
    </tr>
  </table>
</div>
We have applied style in our table, for the table header row, we have a red background and all even rows have a grey background. Let’s add style for our angular table in the regular-table.component.scss file.
input {
  width: 60%;
  padding: 8px 2px;
}

table {
    font-family: arial, sans-serif;
    border-collapse: collapse;
    width: 60%;
  }

  th {
    background-color: red;
    border: 1px solid red;
  }
  td {
    border: 1px solid #dddddd;
  }
  td, th {
    text-align: left;
    padding: 8px;
  }

  tr:nth-child(even) {
    background-color: #dddddd;
  }
I added the above angular table search filter code in stackblitz.com
Angular Datatables using angular-datatables library
We can use angular-datatable library to implement Angular Datatables in table format, with pagination, search filter, sorting and quering. The Angular-datatable libray has dependent on JQuery, if you are using Material, Bootstrap or any other UI library then first implment using your UI library table component.
Here is screenshot of our Angular datatables example.

How to implement Angular Datatables ?
Implementing Angular Datatables is straight forward, here is step you need to follow, first add the angular-datatables library.
ng add angular-datatables Step 2: Add angular-datatables css CDN in style.scss as follow
@import url("https://cdn.datatables.net/1.11.3/css/jquery.dataTables.min.css");Step 3: Import DataTablesModule in the app.module.ts file, also import FormsModule.
import { NgModule } from '@angular/core';
import { FormsModule } from '@angular/forms';
import { BrowserModule } from '@angular/platform-browser';
import { AppRoutingModule } from './app-routing.module';
import { AppComponent } from './app.component';
import { DataTablesModule } from 'angular-datatables';

@NgModule({
  declarations: [AppComponent],
  imports: [
      BrowserModule,
     AppRoutingModule,
     FormsModule,
     DataTablesModule
   ],
  providers: [],
  bootstrap: [AppComponent],
})
export class AppModule {}
Step 4: Retrieve table data from remote server in the app.component.ts file, we need to import DataTableDirective from the angular-datatables
import { Component, OnDestroy, OnInit, ViewChild } from '@angular/core';
import { DataTableDirective } from 'angular-datatables';
@Component({
  selector: 'app-root',
  templateUrl: './app.component.html',
  styleUrls: ['./app.component.scss'],
})
export class AppComponent implements OnDestroy, OnInit {
  dtOptions: DataTables.Settings = {};

  @ViewChild(DataTableDirective) datatableElement: DataTableDirective | undefined;
  min: number | undefined;
  max: number | undefined;

  filterById(): void {
    this.datatableElement?.dtInstance.then((dtInstance: DataTables.Api) => {
      dtInstance.draw();
    });
  }

  ngOnInit(): void {
    const dataUrl =
      'https://raw.githubusercontent.com/l-lin/angular-datatables/master/demo/src/data/data.json';

    this.dtOptions = {
      ajax: dataUrl,
      columns: [
        {
          title: 'ID',
          data: 'id',
        },
        {
          title: 'First name',
          data: 'firstName',
        },
        {
          title: 'Last name',
          data: 'lastName',
        },
      ],
    };
  }

ngOnDestroy(): void {
    $.fn['dataTable'].ext.search.pop();
  }
}
Step 5: Add datatable directive from the angular-datatable on table to make it into datatable with pagination, sort and quering option.
<section class="container">
  <form (submit)="filterById()">
    <label>
      Min
      <input type="number" name="min" id="min" [(ngModel)]="min" />
    </label>
    <label>
      Max
      <input type="number" name="max" id="max" [(ngModel)]="max" />
    </label>
    <button class="btn btn-primary" type="submit">Filter by ID</button>
  </form>

  <table datatable [dtOptions]="dtOptions" class="row-border hover"></table>
</section>

<router-outlet></router-outlet>
Angular table Apps using Material UI library
Let’s create our angular project for angular table apps, and name the project angularTables. We need to create and add two components, one for example of regular HTML and the other for an Angular material.le
ng start angularTables
cd angularTables
ng generate component regular-table
ng generate component material
In our app.component.html file, we have two buttons to route to our two components. Edit app.component.html file.
<div class="example-button-row">
    <button mat-button color="success" routerLink="/regular-table">
      HTML Table
     </button>
    <button mat-button color="success" routerLink="/material">
      Material Table
    </button>
</div>
<router-outlet></router-outlet>
We need dummy data, we’ll first create dummy student’s data so that we can use it in our angular table example. Create a folder called data in the assets folder and add a file called students.json inside the data folder.
[
    {
        "name": "Jackline Joy",
        "gender": "Female",
        "country": "Sri Lanak"
    },
    {
        "name": "Arjun",
        "gender": "Male",
        "country": "India"
    },
    {
        "name": "Kavitha Kumar",
        "gender": "Female",
        "country": "India"
    },
    {
        "name": "John Snow",
        "gender": "Male",
        "country": "United Kingdom"
    },
    {
        "name": "Priya kanana",
        "gender": "Female",
        "country": "India"
    },
    {
        "name": "Shri Devi",
        "gender": "Female",
        "country": "Sri Lanka"
    },
    {
        "name": "Richard Roy",
        "gender": "Male",
        "country": "France"
    },
    {
        "name": "Sonu Nigam",
        "gender": "Male",
        "country": "India"
    },
    {
        "name": "Priya Dutt",
        "gender": "Female",
        "country": "USA"
    }
]
Angular table example using Angular material
If you’re using Angular material UI for your project, then it’s the best choice to use an Material table to display our data in rows and columns.
Install and configure angular material in our project
To use the angular material table we need to add Angular Material to our project. Use the Angular CLI’s install schematic to set up your Angular Material project by running the following command:
ng add @angular/material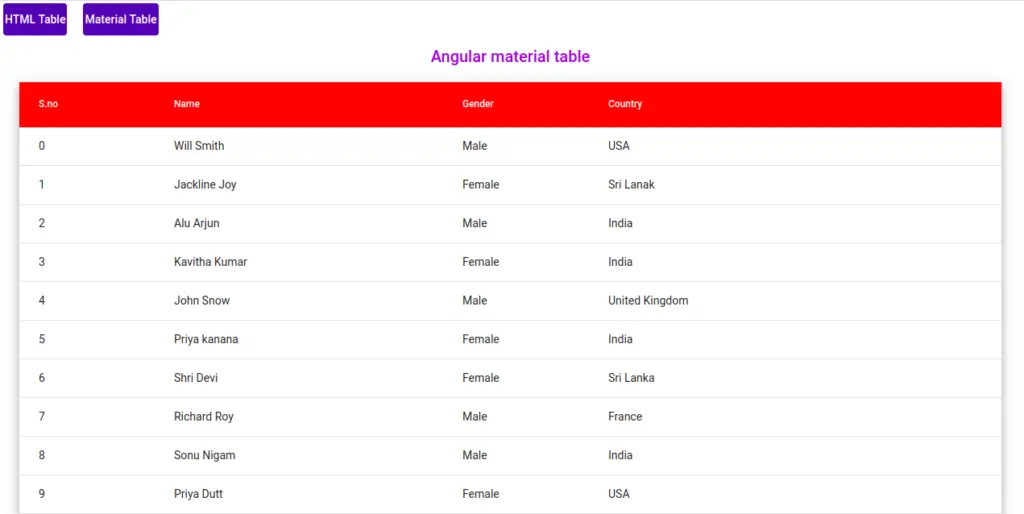
We have to import the Material table and button in our app.module.ts file.
import { BrowserModule } from '@angular/platform-browser';
import { NgModule } from '@angular/core';
import { AppRoutingModule } from './app-routing.module';
import { AppComponent } from './app.component';
import { MatButtonModule } from '@angular/material/button';
import { MatTableModule } from '@angular/material/table';
import { BrowserAnimationsModule } from '@angular/platform-browser/animations';
import { RegularTableComponent } from './regular-table/regular-table.component';
import { MaterialComponent } from './material/material.component';

@NgModule({
  declarations: [
    AppComponent,
    RegularTableComponent,
    MaterialComponent
  ],
  imports: [
    BrowserModule,
    AppRoutingModule,
    MatButtonModule,
    MatTableModule,
    BrowserAnimationsModule
  ],
  providers: [],
  bootstrap: [AppComponent]
})
export class AppModule { }
Angular material allows us to create a responsive table that is fully compatible with PC, tablets, and mobile devices. For data for the table, we are using the same students’ dummy data. Let edit the material.component.ts file to retrieve data from our source, in real projects data can be from the server, but in our case is from static JSON data.
import { Component, OnInit } from '@angular/core';

export interface IStudent {
  name: string;
  gender: string;
  country: string;
}

@Component({
  selector: 'app-material',
  templateUrl: './material.component.html',
  styleUrls: ['./mat.component.scss']
})
export class MaterialComponent implements OnInit {
  displayedColumns = ['SNo', 'name', 'gender', 'country'];
  dataSource: IStudent[];

  ngOnInit(): void {
    fetch('./assets/data/students.json').then(res => res.json())
      .then(json => {
        this.dataSource = json;
      });
  }
}
Once we have our data in hand, we can display data in our material component template. Edit material.component.html file to display data in tables.
<div style="margin:0 30px;">
    <h2 style="text-align: center; color:blueviolet;">Material table</h2>
    <table mat-table [dataSource]="dataSource" class="mat-elevation-z8">
        <ng-container matColumnDef="SNo">
            <th mat-header-cell *matHeaderCellDef> S.no </th>
            <td mat-cell *matCellDef="let element; let i = index;">{{ i + 1 }}</td>
        </ng-container>

        <!-- Name Column -->
        <ng-container matColumnDef="name">
            <th mat-header-cell *matHeaderCellDef> Name </th>
            <td mat-cell *matCellDef="let element"> {{ element.name }} </td>
        </ng-container>

        <!-- Weight Column -->
        <ng-container matColumnDef="gender">
            <th mat-header-cell *matHeaderCellDef> Gender</th>
            <td mat-cell *matCellDef="let element"> {{ element.gender }} </td>
        </ng-container>

        <!-- Symbol Column -->
        <ng-container matColumnDef="country">
            <th mat-header-cell *matHeaderCellDef> Country </th>
            <td mat-cell *matCellDef="let element"> {{ element.country }} </td>
        </ng-container>

        <tr mat-header-row *matHeaderRowDef="displayedColumns"></tr>
        <tr mat-row *matRowDef="let row; columns: displayedColumns; let i = index"></tr>
    </table>
</div>
Edit material.component.scss to make table width full and apply a background to table header using style.
table.mat-table {
    display: table;
    width: 100%;
    th {
        background-color: red;
        color: white;
    }
}
Angular bootstrap table
Angular Bootstrap table component is responsive tables that allow us to filter, pagination, and table can have nice UI by using bootstrap style class name. In our previous example, we have a complete example of the Angular bootstrap table with filter and pagination. Check here our example on it.
I had added GitHub on the Angular bootstrap table with pagination and the search filter on Latest Angular 14. If you want to check here is the Github link. Please if you like it then please share it with others and on social networking, this will encourage me to add more details content.
Conclusion
In this tutorial, we have demonstrated two ways to create an Angular table using a regular HTLM table and an Angular material table.
Related Articles
- How to implement an Angular bootstrap table with pagination and filter
- Angular Radio button |angular material radio button?
- How to install Angular material?
- Angular Material input components and directives
- Angular material autocomplete example
- How to implement Angular material dropdown | select .?
- Angular material checkbox: color, label direction
- Angular material button: Color, Size, toggle button
- How to implement Angular material tabs?
- How to implement angular material snackbar | toast in Angular?