Rich Text Editors, also known as WYSIWYG (What You See Is What You Get) editors, are essential components in modern web applications. They allow users to create formatted content easily, making them ideal for forms, comments, messaging applications, and blogs. In this comprehensive guide, we’ll explore the top React Rich Text Editors and demonstrate how to implement them in your projects.
Table of Contents
Objectives
- List the 5 most popular React Rich Text Editors
- Provide an example implementation using React-Quill
- Demonstrate the usage of TinyMCE in a React application
- Showcase a Rich Text Editor example using React Draft WYSIWYG
5 Best React Rich Text Editor libraries
There are plenty of third parties libraries to implement React WYSIWYG editor in React project. I had listed here some of them based on their popularity and usage, If you know some good Rich Text editors for React please let me know in the comments section.
The content in the Rich Text editor can be formatted easily and displayed content on the browser. Allows the user to use a wide variety of tools to edit and format rich content and returns valid HTML markup content. Here are some popular Rich Text editor libraries in React.
| Name | Description |
| @tinymce/tinymce-react | TinyMCE is a rich-text editor that allows users to create formatted content within a user-friendly interface. It has a weekly download of around 151,581 and 91.8 kB. |
| react-draft-wysiwyg | A Wysiwyg editor built using ReactJS and DraftJS libraries. This library has a weekly download of around 239,047 and 299 kB. |
| @monaco-editor/react | Monaco editor wrapper for easy/one-line integration with any React application without needing to use webpack (or any other module bundler) configuration files/plugins. It has weekly downloads of around 182,502 and 1.06 MB |
| react-contenteditable | React component for a div with editable contents, and a weekly download of around 129,093 and 48.4 KB. |
Setup and configure React Rich Text Editor project
Let’s first create our Rich Text Editor project and we have three examples of Rich Text Editor using different libraries. Before starting an angular project you need to install Nodejs and Angular CLI in your system.
ng new richText-app
cd richText-app
Free React Rich Text Editor Example using the react-quill library
We’ll demonstrate Rich Text Editor using the third-party library the react-quill. The react-quill has three pre-built themes, as follows.
- Quill Snow: Quill’s standard theme appearance.
- Quill Bubble: Similar to the inline editor on Medium.
- Core theme: The core theme must be included for modules like toolbars or tooltips to work.
To add react-quill successfully on React, we have to follow these steps.
- Create a React project, and install react-quill and all its dependency libraries.
- Import selected quilljs CSS in the component where we want to use the react-quill library
- Used the <ReactQuill> component and added all the configurations for the component.
Here is a screenshot of our Angular Rich Text Editor example and we can React Rich text editor with image upload.
Let’s create a project, and install the react-quill
npx create-react-app rich-text-editor-app
cd rich-text-editor-app
npm i react-quill
Let’s import the ReactQuill component from the react-quill and quill snow CSS theme. We can configure what tools to display on the react-quill editor.
import React, { useState } from "react";
import ReactQuill from "react-quill";
import "react-quill/dist/quill.snow.css";
import './App.css'

function App() {
  const [value, setValue] = useState("");
  const modules = {
    toolbar: [
      [{ header: [1, 2, 3, false] }],
      [{ font: [] }],
      [
        "bold",
        "italic",
        "underline",
        "strike",
        "blockquote",
        "link",
        "header",
        "font",
        "size",
        "list",
        "bullet",
        "indent",
        "link",
        "image",
        "color",
        { align: [] },
      ],
    ],
  };
  return (
    <div className="quillContainer">
      <ReactQuill
        theme="snow"
        placeholder="Enter your rich text edtior"
        modules={modules}
        value={value}
        onChange={setValue}
      />
    </div>
  );
}

export default App;
I also add React rich Text editor typescript example using react-quill in stackblitz.com, if you take reference then check here.
React Rich Text Editor example using TinyMCE-react
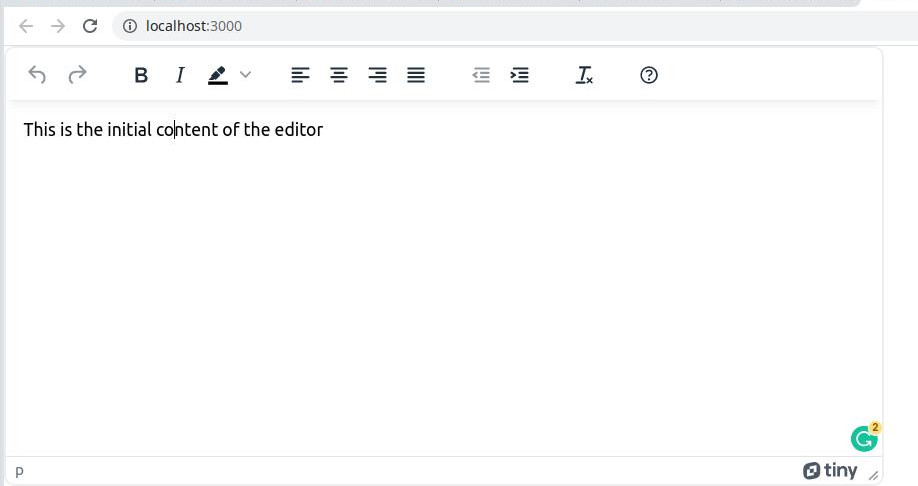
Let’s demonstrate the second React WYSIWYG using the TinyMCE-react library. TinyMCE is a rich-text editor that allows users to create formatted content within a user-friendly interface. We can easily Integration with TinyMCE in React using the @tinymce/tinymce-react package.
Here is the screenshot of our React WYSIWG examples.
Let’s create React project and install react TinyMCE library.
npx create-react-app rich-text-editor-app
cd rich-text-editor-app
npm i @tinymce/tinymce-react save
Let’s import the Editor component from the React Tinymce and you need to add the TinyMCE API key. I had kept the API key blank and please replace it with your API key from TinyMCE.
import "./App.css";
import { Editor } from "@tinymce/tinymce-react";

function App() {
  const handleEditorChange = (content, editor) => {
    console.log("Content was updated:", content);
  };

  return (
    <Editor
      apiKey={" YOUR KEY "}
      initialValue="<p>This is the initial content of the editor</p>"
      init={{
        height: 400,
        width: 800,
        menubar: false,
        plugins: [
          "advlist autolink lists link image charmap print preview anchor",
          "searchreplace visualblocks code fullscreen",
          "insertdatetime media table paste code help wordcount",
        ],
        toolbar:
          "undo redo | formatselect | bold italic backcolor | \
        alignleft aligncenter alignright alignjustify | \
        bullist numlist outdent indent | removeformat | help",
      }}
      onEditorChange={handleEditorChange}
    />
  );
}

export default App;
React WYSIWYG using React Draft Wysiwyg
In our last example, we’ll demonstrate Rich Text Editor using React Draft WYSIWYG library. A Wysiwyg editor built using ReactJS and DraftJS libraries. This library has other library dependencies, let’s configure and set up the project first.
npx create-react-app react-draft-app
cd react-draft-app
npm install react-draft-wysiwyg
npm install draft-js draftjs-to-html
Here is our screenshot of React Draft WYSIWYG example.
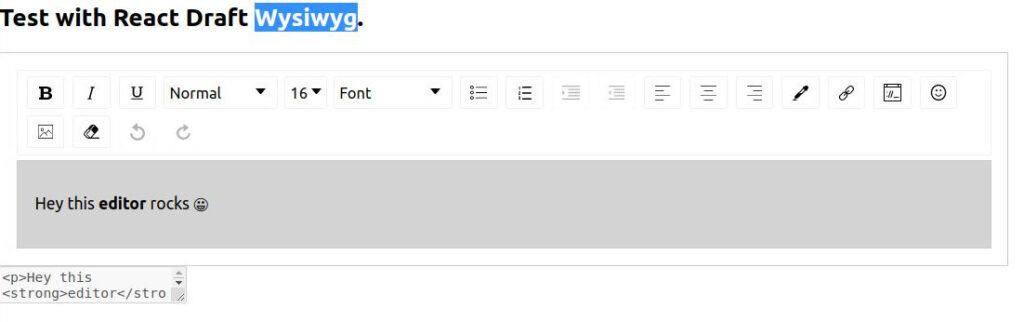
We have the option to select different colors, different fonts, different color picker options, and image upload via link.
Let’s create separate components for React Draft WYSIWYG called EditorContainer.jsx and add the following code.
import React, { Component } from "react";
import { EditorState, convertToRaw, ContentState } from "draft-js";
import { Editor } from "react-draft-wysiwyg";
import draftToHtml from "draftjs-to-html";
import htmlToDraft from "html-to-draftjs";
import "react-draft-wysiwyg/dist/react-draft-wysiwyg.css";
import './EditorContainer.css';

const toolbar = {
  inline: {
    options: ["bold", "italic", "underline"],
  },
  fontSize: {
    options: [8, 9, 10, 11, 12, 14, 16, 18, 24, 30, 36, 48, 60, 72, 96],
    className: undefined,
    component: undefined,
    dropdownClassName: undefined,
  },
  textAlign: {
    inDropdown: false,
    className: undefined,
    component: undefined,
    dropdownClassName: undefined,
    options: ["left", "center", "right"],
  },
  link: {
    inDropdown: false,
    className: undefined,
    component: undefined,
    popupClassName: undefined,
    dropdownClassName: undefined,
    showOpenOptionOnHover: true,
    defaultTargetOption: "_self",
    options: ["link"],
    linkCallback: undefined,
  },
  colorPicker: {
    className: undefined,
    component: undefined,
    popupClassName: undefined,
  },
  emoji: {
    inDropdown: true,
    className: undefined,
    component: undefined,
    popupClassName: undefined,
  },
};

export default class EditorContainer extends Component {
  constructor(props) {
    super(props);
    this.state = {
      editorState: null,
    };
  }

  componentWillMount() {
    const html = "<p>Hey this <strong>editor</strong> rocks 😀</p>";
    const contentBlock = htmlToDraft(html);
    if (contentBlock) {
      const contentState = ContentState.createFromBlockArray(
        contentBlock.contentBlocks
      );
      const editorState = EditorState.createWithContent(contentState);
      this.setState({
        editorState,
      });
    }
  }

  onEditorStateChange = (editorState) => {
    this.setState({
      editorState,
    });
  };

  render() {
    const { editorState } = this.state;
    return (
      <div className="mainContainer">
        <Editor
          editorState={editorState}
          wrapperClassName="wrapperClassName"
          editorClassName="editorClassName"
          onEditorStateChange={this.onEditorStateChange}
          toolbar={toolbar}
        />
        <textarea
          disabled
          value={draftToHtml(convertToRaw(editorState.getCurrentContent()))}
        />
      </div>
    );
  }
}
We added some styles for the EditorContainer class component in the EditorContainer.css file
.mainContainer {
  width: 80%;
}

.wrapperClassName {
  padding: 1rem;
  border: 1px solid #ccc;
}

.editorClassName {
  background-color:lightgray;
  padding: 1rem;
  border: 1px solid #ccc;
}
.toolbar-class {
  border: 1px solid #ccc;
}
Our EditorContainer is a class component and you can change it to a function component. At last, we need to import this component inside the App.js file as below.
import EditorContainer from "./EditorContainer";

function App() {
  return (
    <div>
      <h2>Test with React Draft Wysiwyg.</h2>
      <EditorContainer />
    </div>
  );
}

export default App;
In React 18, font size, font family, and all picker related are not working in React Draft WYSIWYG, we need to replace render in the index.js file. With changing render source all pickup options are not working. I guess React Draft needs to fix this issue in the latest React.
import React from "react";
import ReactDOM from "react-dom";
import "./index.css";
import App from "./App";
import reportWebVitals from "./reportWebVitals";

ReactDOM.render(
  <React.StrictMode>
    <App />
  </React.StrictMode>,
  document.getElementById("root")
);

reportWebVitals();
Conclusion
Each of these React Rich Text Editors has its strengths:
- TinyMCE offers a wide range of features and customization options. I willl prefere as it had update latest and some of these libraries hasn’t updated from last few years.
- React-Quill is lightweight and easy to implement.
- React Draft WYSIWYG provides a good balance of features and flexibility.
When choosing a Rich Text Editor for your React project, consider factors such as required features, ease of implementation, and performance impact. Always test the editor thoroughly in your specific use case to ensure it meets your needs.
Remember to style your editors to match your application’s design and to handle the output appropriately when saving or displaying the rich text content.
By understanding these top React Rich Text Editors and how to implement them, you’re well-equipped to enhance the user experience in your React applications with powerful content creation capabilities. Follow me on my GitHub collection, I had code on Angular, react, and Ionic frameworks.
Related React Tutorial
- Guide to Using and Creating React material UI grid.
- React material UI App Bar in detail with y
- How to implement React table and its component?
- When and how to use React Context API?
- React Axios for HTTP method with REST API
- React router navigates outside component.
- How to implement React routing using react-router-dom?