React Context provides a way to pass data through the component tree without having to pass props down manually at every level. The Context API was introduced with React 16, even the previous version of context exist before it, in React 16 context was revamped or we got a new version of the context system.
In this tutorial, we have a few objectives as follows
- Learn what is Context API, when, and how to use it.
- Different approaches of adding and reading data from context objects.
- Demonstrate an example of context API. Let’s get started.
What is the purpose of React Context API?
The main purpose of Contex API is to avoid props drilling. The props (properties) are used for passing data from parent to React child components. The context system is about sharing information from parents to arbitrarily nested child components. React context API is an interface for sharing information with parent and nested child components without explicitly passing the data as props.
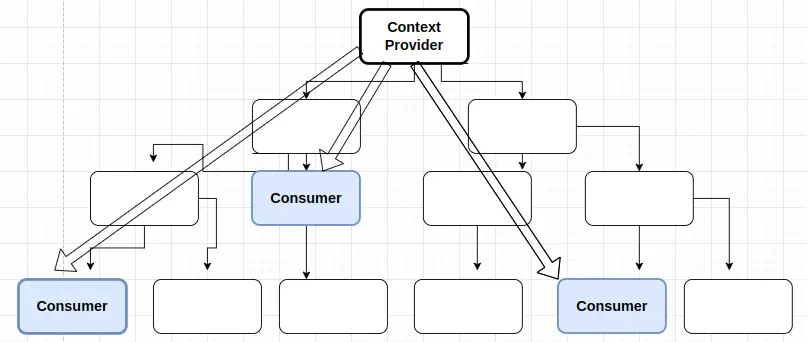
The purpose of the context system is all about sharing data between parents and some nested child components and in core context is just like props.
If we used props to send data from top to bottom of the nested child component. To do this without Context, we will need to pass the state as “props” through each nested component until it reaches the consumer component of props. This is called “prop drilling”.
Secondly, not all React applications need a state management library like Redux. When applications grow big and in complexity, then Redux state management may be critical to maintaining data integrity. The React Context is a lightweight alternative to Redux by creating a context store that manages data and methods to change it. Context API is flexible enough to use as a centralized state management system for small or medium size react applications by creating a context store to manage and state of an application.
React context API is built-in state management from React and we don’t need to install any third-party packages.
When to use React Context API?
There are different ways of sharing data between parent and nested child components, in React we can use
- props (properties)
- Composition
- Context API
It is important to know when and where to use Context API. In some situations, we may need to access the same data at different levels of the nesting children component. The context is easy to use and it lets us broadcast such data, and changes it, to all components below. We can use React context in the following situation.
- UI Theme
- Locale or Language preference
- Data cache
- Currently authenticated user
If you only want to avoid the Props Drilling problem, the component composition is often a simpler solution than context.
React context vs redux
The context API is not a replacement for redux, because Redux provides a way to share data throughout our component hierarchy and gives us a way to centralize all our data inside the common store. Also, provide a mechanism for changing the data store.
The Redux is a state management library and it makes complex applications easier to write and manage. Keep in mind each of these two has different usage and we can use both based on our needs.
| Context API | Redux |
| Is part of React library and no need to install any third-party library. Is built specifically for React. | The redux is predictable state management for Javascript. We need to install redux, which adds an additional bundle to our code. |
| Easy to share data between parents and nested children but difficult to build store components. | Excellent documentation. Redux is much more powerful and provides a large number of features that the Context API doesn’t provide. |
| Specifically designed for static data, that is not often refreshed or updated | Can use with both static and dynamic data. |
| Don’t have any specific dev tools and debugging can be hard in the highly nested components. | We can use the powerful Redux Dev Tools browser extension for ease of debugging. |
React Context example
Let’s demonstrate a simple react context example, we have the colorContext, changing the color in the Color component will change the Text component text font color, which in turn is nested inside the card component. Here is our React context example project structure.
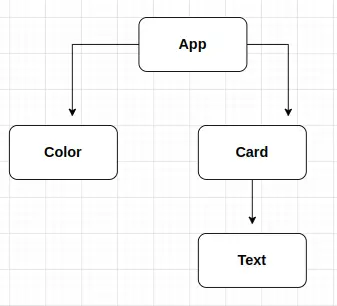
We have an App component containing two child components and a Card component has one Text Component.
Using Context API, the change color name is passed from App directly to the nested Text component without passing it through its parent Card component.
Here is a screenshot of our color context example.
Step for implementing React context system
We have above a screenshot example of our project, we learn how to implement react context system. Here we had listed the abstract steps on how to use the Contex system in React project.
- Step 1: Create React project to demonstrate Context Example
- Step 2: Create a context file name end with <your context name>Context.js in our case for the color context you can have this name in the context folder src/context/ColorContext.js and call createContext() from React to create context.
- Step 3: Create or use the parent component to wrap its children component with the Provider component of our Context object. In the Provider component, we can use value props to pass data to the children component.
- Consume our context value inside children’s components either through useContext or context objects.
Step 1-2: Create context
We have to create of React project first, once we have React project, now let’s create context, in our case we have Color Context in src/context/ColorContext.js
import React from 'react';
export default React.createContext();
There are two ways to assign a state to our context.
- By assigning default values when our context object is created.
- Use of Provider component in parent component by using value to set state in our context object.
For the first steps we can assign a default value while creating our context, above example, we can assign a default color value.
import React from 'react';
export default React.createContext('#5731d7');
Step 2: Used Provider component to pass state or data in the parent component
The app component is the parent component to both the Color and nested Text components. We need to wrap our consumer component inside the Provider component. Every Context object comes with a Provider React component that allows consuming components to subscribe to context changes. Let’s import the colorContext inside our App component and wrapped both the Color and Card components inside it.
The Provider component has value props, we can use these special props to set data to our consumer component. In our case, we are passing the current selected color and method to change its color inside value props.
import { useState } from 'react';
import ColorContext from './context/ColorContext';
import Color from './components/Color';
import Card from './components/Card';

function App() {
  const [color, setColor] = useState('#aabbcc');

  const onColorChange = (color) => {
    setColor(color);
  };

  return (
    <div className='ui container'>
      <ColorContext.Provider value={{ color, onColorChange }}>
        <div className='ui grid'>
          <div className='four wide column'>
            <Color />
          </div>
          <div className='four wide column'>
            <Card />
          </div>
        </div>
      </ColorContext.Provider>
    </div>
  );
}
export default App;
Our App component is the parent component it manages context data and methods to change its value. In the App component, we have the onColorChange function to change color and it will set the newly selected color in the value props of the Provider component. We can create a context store where it manages both Context data and business logic to change its values.
Step 3 Consume context data in a nested child component
We can read the Context system state in our nested child component. There are different ways of reading Context data inside our component.
- Using context objects inside the Class component and for only one single context system in our application.
- useContext() for access context state inside function component.
- Using the Consumer component to read from multiple context objects.
In our example we have only one context which is ColorContext, we can use a context object to read data from it. In our Color component, which is class-based we can use context to access the state (data or function) of context.
static contextType = ColorContext;
....
this.context.color or this.context.onColorChange(
//To access color or onColorChange function from Provid
Let’s edit the src/components/Color.js and import ColorContext and react-colorful library for color input.
import React, { Component } from 'react';
import { HexColorPicker } from 'react-colorful';
import ColorContext from '../context/ColorContext';

export class Color extends Component {
  state = { color: '#aabbcc' };
  static contextType = ColorContext;

  onSetColorChanged = (color) => {
    this.setState({color});
    this.context.onColorChange(this.state.color);
  }

  render() {
    return (
      <div className='ui field color-container'>
        <h3>React color picker using react-colorful</h3>
        <HexColorPicker
          color={this.state.color}
          onChange={this.onSetColorChanged}
        />
      </div>
    );
  }
}

export default Color;
When we change the color of the HexColorPicker component it invokes the onSetColorChange function which inturns change the color data of the App using the context object.
Once we have a newly selected color we can consume its value inside our nested children component of App that is the Text component. The Text component is a child of our Card component. Let’s edit the src/components/Card.js we need to import the Text component.
import React from 'react';
import Text from './Text';

const Card = () => {
  return (
    <div className='ui card' style={{ marginTop: '50px'}} >
      <div className='content'>
        <div className='description'>
            <Text />
        </div>
      </div>
    </div>
  );
};

export default Card;
Let’s edit the src/components/Text.js file to access the newly selected color from the context object.
import React, { Component } from "react";
import ColorContext from "../context/ColorContext";
import "../App.css";

export class Text extends Component {
  static contextType = ColorContext;

  render() {
    return (
      <div className="ui text-container">
        <h3>Change text color: {this.context.color}</h3>
        <h4 style={{ color: this.context.color }}>
         React context example</h4>
      </div>
    );
  }
}

export default Text;
We have used a class-based component for the Text component. If we want to use the useContext function then we have to convert the component to a functional component as below.
import React, { useContext } from "react";
import ColorContext from '../context/ColorContext';
import "../App.css";

const Text = () => {
  const { color } = useContext(ColorContext);

  return (
    <div className="ui text-container">
      <h3>Change text color: {color}</h3>
      <h4 style={{ color: color }}>React context example</h4>
    </div>
  );
};

export default Text;
In useContext we have to give the name of Context and we can restructure its value, in the Text component we only need color value to dynamic change the font color of the Text component.
I uploaded React Context API on stackblitz.com, if you want to take live code reference, you can check it.
Consuming Multiple Contexts
The contextType with context object can consume data or state from a single Context API. Sometimes components may need data from multiple Contexts then we can’t use context objects. The Consumer component allows us to access data from multiple source contexts. Edit our Text component to read data using the Consumer component.
import React from 'react';
import ColorContext from '../context/ColorContext';

const Text = () => {

  const renderText = (color) => {
    return (
      <div className='ui text-container'>
        <h3>Change text color: {color}</h3>
        <h4 style={{ color: color }}>React context example</h4>
      </div>
    );
  };

  return (
    <ColorContext.Consumer>
      {({ color }) => renderText(color)}
    </ColorContext.Consumer>
  );
};

export default Text;
The Consumer component takes only one argument which is a function as a child. In this function, we can access state data from a particular context object. We can use destructuring of an object to retrieve only color value from our Color context object.
React Context API Example 2 with fetch API
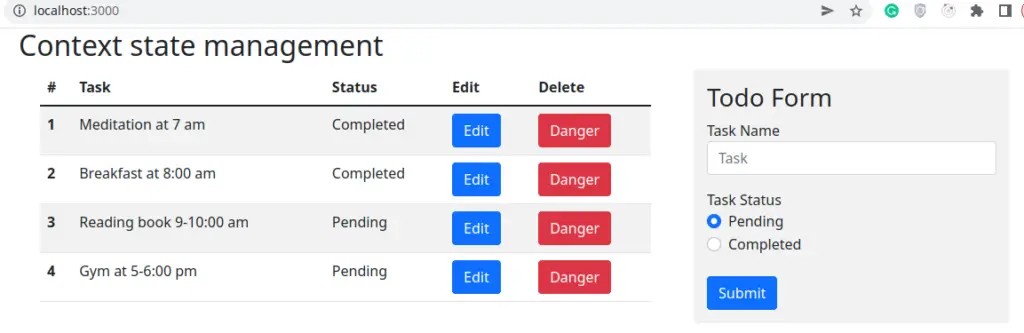
Let’s demonstrate the second example of context API with CRUD operation, we used a JSON server to make API call. Let’s first install JSON Server, it is up to you whether you want to install locally or globally, I added it as global. Here is how to install it in our system.
json-server -gobal installAll the HTTP requests to JSON Server are the same as Node-based express-js. Here is a screenshot of our example, here we make Todo APPs using react with Context API. We have used Bootstrap CDN for our React UI.
Step 1: Create Dummy data for HTTP Request
First, we need to create our React app, then create dummy data todos.json in your root project folder and add the following data.
{
  "todos": [
    {
      "task": "Meditation at 7 am",
      "status": "Completed",
      "id": "1"
    },
    {
      "task": "Breakfast at  8:00 am",
      "status": "Completed",
      "id": "2"
    },
    {
      "task": "Reading book 9-10:00 am",
      "status": "Pending",
      "id": "3"
    }
  ]
}
To request or access dummy data, we need to run our fake server using the following command in our project folder on the terminal.
npx json-server --watch todos.json --port 3001Now we can access our JSON data in URL on port number 3001
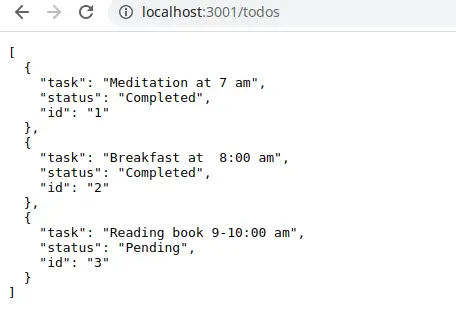
Step 2: Create Context for HTTP request
Let’s create a context folder and here we create our TodoContext.js, in this file we are managing our todos data, and performing CRUD operations on it. Let’s add code for our context in src/context/TodoContext.js
import { createContext, useState, useEffect } from "react";

const TodoContext = createContext();

const URL = "http://localhost:3001";

export const TodoProvider = ({ children }) => {
  const [todos, setTodos] = useState([]);
  const [isLoading, setIsLoading] = useState(true);
  const [todoEdit, setTodoEdit] = useState({ todo: {}, isEdit: false });

  useEffect(() => {
    fetchTodos();
  }, []);

  const fetchTodos = async () => {
    const response = await fetch(`${URL}/todos`);
    const data = await response.json();

    setTodos(data);
    setIsLoading(false);
  };

  const addTodo = async (newTodo) => {
    const response = await fetch(`${URL}/todos`, {
      method: "POST",
      headers: {
        "Content-Type": "application/json",
        Accept: "application/json",
      },
      body: JSON.stringify(newTodo),
    });
    const data = await response.json();

    setTodos([data, ...todos]);
  };

  const updateTodo = async (id, todo) => {
    const response = await fetch(`${URL}/todos/${id}`, {
      method: "PUT",
      headers: {
        "Content-Type": "application/json",
        Accept: "application/json",
      },
      body: JSON.stringify(todo),
    });
    const data = await response.json();

    setTodos(
      todos.map((todo) => (todo.id === id ? { ...todo, ...data } : todo))
    );
  };

  const deleteTodo = async (id) => {
    await fetch(`${URL}/todos/${id}`, { method: "DELETE" });

    setTodos(todos.filter((todo) => todo.id !== id));
  };

  const editTodoFnc = (todo) => {
    setTodoEdit({ todo, isEdit: true });
  };

  return (
    <TodoContext.Provider
      value={{
        todos,
        isLoading,
        todoEdit,
        addTodo,
        updateTodo,
        deleteTodo,
        editTodoFnc,
      }}
    >
      {children}
    </TodoContext.Provider>
  );
};

export default TodoContext;
In our context file, we have 3 data, todos are a list of all todo, isLoading, and todoEdit for setting edit mode with todo data to modify. We need to pass all our CRUD functions and data inside Provider component value props.
HTTP requests are asynchronous, they return promises, we can use async-await with a promise to handle our HTTP request.
Step 3: Create components and wrapped them with TodoContext
Our App.js is the parent component to all other components, let’s create two components, we Todos and Todo components. In our App.js we need to import TodoProvider, Todo, and Todos components.
import { TodoProvider } from "./context/TodoContext";
import Todo from "./components/todo/Todo";
import Todos from "./components/todos/Todos";
import "./App.css";

function App() {
  return (
    <TodoProvider>
      <div className="container">
        <h2>Context state management</h2>
        <div className="row">
          <div className="col-8"><Todos /></div>
          <div className="col-4"><Todo /></div>
        </div>
      </div>
    </TodoProvider>
  );
}

export default App;
Wrapping Todo and Todos with TodoProvider make underneath component can access data and method from TodoContext.
React context hooks to access Context data and function
In our Todos.jsx we can now use react context hooks, and the useContext to access data and function from the context. In our Todos component, we have to fetch todos and delete functions from the TodoContext by using useContext(). We are performing delete on the todo and adding the following code in the src/components/todos/Todos.jsx
import { useContext } from 'react';
import TodoContext from '../../context/TodoContext';
import './todos.css';

const Todos = () => {
  const { todos, isLoading, deleteTodo, editTodoFnc } = useContext(TodoContext);

  const handleDelete = (id) => {
    if (window.confirm('Are you sure want to delete')) {
      deleteTodo(id);
    }
  }

  if (!isLoading && !todos && todos.length === 0) {
    return <p>No todos yet!</p>;
  }

  return isLoading ? (
    <h1>Loading ...</h1>
  ) : (
    <div className='container'>
      <table className='table table-striped'>
        <thead>
          <tr>
            <th scope='col'>#</th>
            <th scope='col'>Task</th>
            <th scope='col'>Status</th>
            <th scope='col'>Edit</th>
            <th scope='col'>Delete</th>
          </tr>
        </thead>
        <tbody>
          { todos.map((todo, index) => (
            <tr key={todo.id}>
              <th scope='row'>{index + 1}</th>
              <td>{todo.task}</td>
              <td>
                <span>
                  {todo.status === 'Completed' ? 'Completed' : 'Pending'}
                </span>
              </td>
              <td>
                <button type='button' className='btn btn-primary'
                 onClick={() => editTodoFnc(todo)}>
                  Edit
                </button>
              </td>
              <td>
                <button type='button' className='btn btn-danger'
                    onClick={() => handleDelete(todo.id)}>
                  Danger
                </button>
              </td>
            </tr>
          ))}
        </tbody>
      </table>
    </div>
  );
};

export default Todos;
Context API usecontext() with HTTP POST and PUT
In the Todo.js we use the useContext() function to access addTodo, updateTodo functions, and editTodo data. In the Todo component, we are performing adding new Todo and editing existing Todo. We can use the editTodo to check if is an edit or new Todo operation by accessing editTodo.isEdit true or null. Let’s add the following code in the src/todo/Todo.jsx
import { useContext, useEffect, useState } from 'react';
import TodoContext from '../../context/TodoContext';
import './todo.css';

const Todo = () => {
  const [task, setTask] = useState('');
  const [status, setStatus] = useState('');
  const { todoEdit, addTodo, updateTodo } = useContext(TodoContext);

  useEffect(() => {
    if (todoEdit.isEdit) {
      setTask(todoEdit.todo.task);
      setStatus(todoEdit.todo.status);
    }
  }, [todoEdit]);

  const handleInputChange = (e) => {
    e.target.name === 'task'
      ? setTask(e.target.value)
      : setStatus(e.target.value);
  };

  const handleSubmit = (e) => {
    e.preventDefault();
    if (task.length < 5) {
      alert('Task name should be minimum 5 character');
      return;
    }
    const todo = { task, status };
    if (todoEdit.isEdit) {
      updateTodo(todoEdit.todo.id, todo);
    } else {
      addTodo(todo);
    }
  };

  return (
    <div className='form-container'>
      <h3>Todo Form</h3>
      <form onSubmit={handleSubmit}>
        <div className='form-group'>
          <label>Task Name</label>
          <input
            className='form-control'
            id='taskId'
            placeholder='Task'
            onChange={handleInputChange}
            name='task'
            value={task}
          />
        </div>
        <div className='form-group mt-3 mb-4'>
          <label>Task Status</label>
          <div className='form-check'>
            <input
              className='form-check-input'
              type='radio'
              name='status'
              value='Pending'
              checked = {status === 'Pending' ? true : false }
              onChange={handleInputChange}
            />
            <label className='form-check-label'>Pending</label>
          </div>
          <div className='form-check'>
            <input
              className='form-check-input'
              type='radio'
              name='status'
              value='Completed'
              checked = {status === 'Completed' ? true : false }
              onChange={handleInputChange}
            />
            <label className='form-check-label'>Completed</label>
          </div>
        </div>

        <button type='submit' className='btn btn-primary'>
          Submit
        </button>
      </form>
    </div>
  );
};

export default Todo;
Conclusion:
Context API is not a replacement for Redux, each of these two has a different usage, we already discuss when and where to use Context API. I hope you had learned something, if so then please share it with others and on social networks, this will encourage me to add more content. Follow me on my GitHub collection, I had code on Angular, react, and Ionic framework.
Related Articles
- What is React redux Example in React 18 ?
- React router navigates outside component.
- How to implement React routing using react-router-dom?
- Guide to Using and Creating React material UI grid.
- React material UI App Bar in detail with examples
- How to implement React table and its component?
- React Axios for HTTP method with REST API
- React router navigates outside component.