In this tutorial, we’ll learn how to use React Axios with REST API operation. Axios is a simple promise-based HTTP client for the browser and node.js. Axios provides a simple to use a library in a small package with a very extensible interface.
In this tutorial, we’ll learn what is Axios library, and how to use it with the HTTP method. We’ll demonstrate an example of Axios with different HTTP methods and query params with request.
What is the purpose of React Axios library?
React is one of the most popular front-end frameworks, we need to access data from a remote source that can be rendered into a component. To communicate with the remote servers we have different API interfaces like REST API, GraphQL API, and more. They set a ruleset that defines best practices for sharing data between clients and the server.
The REST API is one of the most popular, we can consume REST API in React apps with a different approach and some of the most popular are.
- fetch API: In-built browser fetch API.
- Axios: Promise based HTTP client for the browser and node.js
There are many other libraries for making HTTP client request. Axios is promise-based, which gives us the ability to take advantage of JavaScript’s async and await for more readable asynchronous code. Here are the following advantages of Axios as follows.
- Make XMLHttpRequests from the browser
- Make http requests from node.js
- Supports the Promise API
- Intercept request and response
- Transform request and response data
- Cancel requests
- Automatic transforms for JSON data
- Client-side support for protecting against XSRF
React Axios example
Now let’s demonstrate how to use Axios react, we have articles on how to use fetch HTTP requests in one of our previous examples.
React Axios basic example
Let’s demonstrate a simple example of Axios with get a request to display a list of posts from https://jsonplaceholder.typicode.com/posts
We have to follow the below step to configure our React Axios example.
Step1: Create react app to demonstrate Axios react example
npx create-react-app axios-example
cd axios-example
Step 2: Install Axios library
npm install axios --save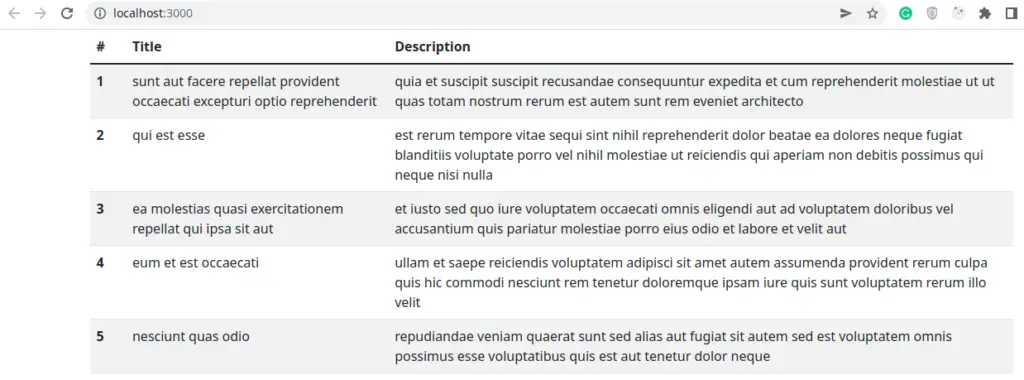
Here is the screenshot of our react Axios basic example. We need to import Axios from the Axios. Let edit the app.js file to retrieve post data through Axios get method.
import { useEffect, useState } from "react";
import axios from "axios";

function App() {
  const [posts, setPosts] = useState([]);
  const [isLoading, setIsLoading] = useState(true);

  useEffect(() => {
    const getPosts = async () => {
      const response = await axios.get(
        "https://jsonplaceholder.typicode.com/posts"
      );

      setPosts(response.data);
      setIsLoading(false);
    };

    getPosts();
  }, [posts]);

  return isLoading ? (
    <h1>Loading ...</h1>
  ) : (
    <div className='container'>
      <table className='table table-striped'>
        <thead>
          <tr>
            <th scope='col'>#</th>
            <th scope='col'>Title</th>
            <th scope='col'>Description</th>
          </tr>
        </thead>
        <tbody>
          { posts.map((post, index) => (
            <tr key={post.id}>
              <th scope='row'>{index + 1}</th>
              <td>{post.title}</td>
              <td>
                {post.body}
              </td>
            </tr>
          ))}
        </tbody>
      </table>
    </div>
  );
};

export default App;
We set the posts data we received as a component state from jsonplaceholder.typicode.com, so we can access it inside the render method. The posts variable is an array of objects, we loop through the posts using the map.
React Axios example with POST, PUT, DELETE method
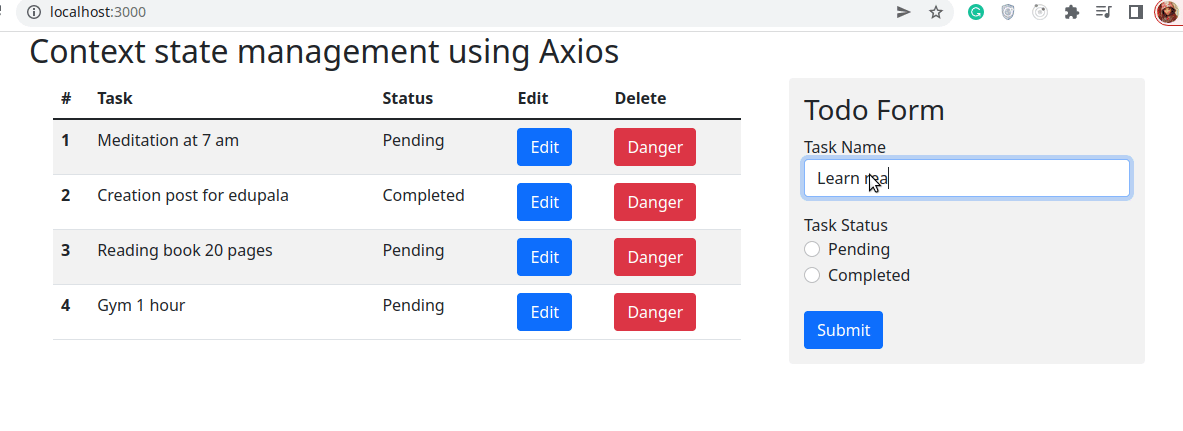
In this tutorial, we will be focusing on CRUD operation using Axios with React context system. Let’s first create react apps, install Axios and create 2 more components. The Todos component displays a list of todo and Todo components to add new todo or edit existing todo.
Here is a screenshot of our React Axios with Context API
Let’s demonstrate the second example of React axios CRUD operation, we used a JSON server to make an API call. Let’s first install JSON Server, it is up to you whether you want to install locally or global, I added as global. Here is how to install it in our system.
json-server -gobal installAll the HTTP requests to JSON Server are the same as Node-based express-js.
Step 1: Create Dummy data for HTTP Request
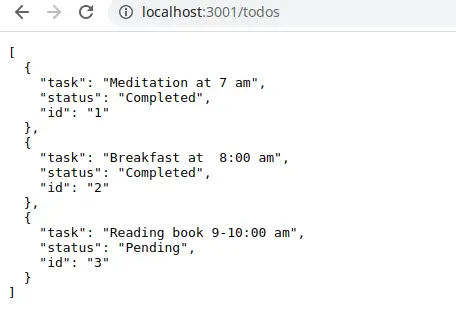
First, we need to create our React app, then create dummy data todos.json in your root project folder and add the following data.
{
  "todos": [
    {
      "task": "Meditation at 7 am",
      "status": "Completed",
      "id": "1"
    },
    {
      "task": "Breakfast at  8:00 am",
      "status": "Completed",
      "id": "2"
    },
    {
      "task": "Reading book 9-10:00 am",
      "status": "Pending",
      "id": "3"
    }
  ]
}
To request or access dummy data, we need to run our fake server using the following command in our project folder on the terminal.
npx json-server --watch todos.json --port 3001Now we can access our JSON data in URL on port number 3001
Step 2: Create API file
Let’s create a folder called src/api/someAPI.js, the someAPI you can give your server name like youtube.js or a name of your choice. Add the following code to it.
import axios from 'axios';

export default axios.create({
    baseURL: "http://localhost:3001",
})
Creating this file will allow us to reduce code, we don’t have to type the whole URL request for each Axios request method.
Step 3: Create Context for HTTP request
Let’s create a context folder and here we create our TodoContext.js, in this file we are managing our todos data, and performing CRUD operations on it. Let’s add code for our context in src/context/TodoContext.js
import { createContext, useState, useEffect } from "react";
import someAPI from "../api/someAPI";

const TodoContext = createContext();

export const TodoProvider = ({ children }) => {
  const [todos, setTodos] = useState([]);
  const [isLoading, setIsLoading] = useState(true);
  const [todoEdit, setTodoEdit] = useState({ todo: {}, isEdit: false });

  useEffect(() => {
    fetchTodos();
  }, []);

  // react axios get method
  const fetchTodos = async () => {
    const response = await someAPI.get('/todos');
    setTodos(response.data);
    setIsLoading(false);
  };

  // react axios post method
  const addTodo = async (newTodo) => {
    const response = await someAPI.post('/todos', newTodo);
    const data = response.data;
    debugger

    setTodos([data, ...todos]);
  };

   // react axios put method
  const updateTodo = async (id, todo) => {
    const response = await someAPI.put(`/todos/${id}`, todo);
    const data = response.data;
    debugger

    setTodos(
      todos.map((todo) => (todo.id === id ? { ...todo, ...data } : todo))
    );
  };

  // react axios delete method
  const deleteTodo = async (id) => {
    await someAPI.delete(`/todos/${id}`);
    setTodos(todos.filter((todo) => todo.id !== id));
  };

  const editTodoFnc = (todo) => {
    setTodoEdit({ todo, isEdit: true });
  };

  return (
    <TodoContext.Provider
      value={{
        todos,
        isLoading,
        todoEdit,
        addTodo,
        updateTodo,
        deleteTodo,
        editTodoFnc,
      }}
    >
      {children}
    </TodoContext.Provider>
  );
};

export default TodoContext;
In our context file, we have 3 data, todos are a list of all todo, isLoading, and todoEdit for setting edit mode with todo data to modify. We need to pass all our CRUD functions and data inside Provider component value props.
Step 4: Create components and wrapped them with TodoContext
In our App.js is the parent component to all other components, let’s create two components, we have Todos and Todo component. In our App.js we need to import TodoProvider, Todo, and Todos components.
import { TodoProvider } from "./context/TodoContext";
import Todo from "./components/todo/Todo";
import Todos from "./components/todos/Todos";
import "./App.css";

function App() {
  return (
    <TodoProvider>
      <div className="container">
        <h2>Context state management</h2>
        <div className="row">
          <div className="col-8"><Todos /></div>
          <div className="col-4"><Todo /></div>
        </div>
      </div>
    </TodoProvider>
  );
}

export default App;
Wrapping Todo and Todos with TodoProvider make underneath component can access data and method from TodoContext.
Step 5 React context hooks to access Context data and function
In our Todos.jsx we can now use react context hooks, the useContext to access data and function from the context. In our Todos component, we have to fetch todos and delete functions from the TodoContext by using the useContext. We are performing delete on the todo and adding the following code in the src/components/todos/Todos.jsx
import { useContext } from 'react';
import TodoContext from '../../context/TodoContext';
import './todos.css';

const Todos = () => {
  const { todos, isLoading, deleteTodo, editTodoFnc } = useContext(TodoContext);

  const handleDelete = (id) => {
    if (window.confirm('Are you sure want to delete')) {
      deleteTodo(id);
    }
  }
  if (!isLoading && !todos && todos.length === 0) {
    return <p>No todos yet!</p>;
  }
  return isLoading ? (
    <h1>Loading ...</h1>
  ) : (
    <div className='container'>
      <table className='table table-striped'>
        <thead>
          <tr>
            <th scope='col'>#</th>
            <th scope='col'>Task</th>
            <th scope='col'>Status</th>
            <th scope='col'>Edit</th>
            <th scope='col'>Delete</th>
          </tr>
        </thead>
        <tbody>
          { todos.map((todo, index) => (
            <tr key={todo.id}>
              <th scope='row'>{index + 1}</th>
              <td>{todo.task}</td>
              <td>
                <span>
                  {todo.status === 'Completed' ? 'Completed' : 'Pending'}
                </span>
              </td>
              <td>
                <button type='button' className='btn btn-primary' onClick={() => editTodoFnc(todo)}>
                  Edit
                </button>
              </td>
              <td>
                <button type='button' className='btn btn-danger' onClick={() => handleDelete(todo.id)}>
                  Danger
                </button>
              </td>
            </tr>
          ))}
        </tbody>
      </table>
    </div>
  );
};

export default Todos;
Step 6 Context API to perform React Axios POST and PUT
In the Todo.js we use the useContext function to access addTodo, updateTodo functions, and the editTodo data. In the Todo component, we are performing adding new Todo and editing existing Todo. We can use the editTodo to check if is an edit or new Todo operation by accessing editTodo.isEdit true or null.
Let’s add the following code in the src/todo/Todo.jsx
import { useContext, useEffect, useState } from 'react';
import TodoContext from '../../context/TodoContext';
import './todo.css';

const Todo = () => {
  const [task, setTask] = useState('');
  const [status, setStatus] = useState('');
  const { todoEdit, addTodo, updateTodo } = useContext(TodoContext);

  useEffect(() => {
    if (todoEdit.isEdit) { // check edit or new todo mode
      setTask(todoEdit.todo.task);
      setStatus(todoEdit.todo.status);
    }
  }, [todoEdit]);

  const handleInputChange = (e) => {
    e.target.name === 'task'
      ? setTask(e.target.value)
      : setStatus(e.target.value);
  };

  const handleSubmit = (e) => {
    e.preventDefault();
    if (task.length < 5) {
      alert('Task name should be minimum 5 character');
      return;
    }
    const todo = { task, status };
    if (todoEdit.isEdit) {
      updateTodo(todoEdit.todo.id, todo);
    } else {
      addTodo(todo);
    }
  };
  return (
    <div className='form-container'>
      <h3>Todo Form</h3>
      <form onSubmit={handleSubmit}>
        <div className='form-group'>
          <label>Task Name</label>
          <input
            className='form-control'
            id='taskId'
            placeholder='Task'
            onChange={handleInputChange}
            name='task'
            value={task}
          />
        </div>
        <div className='form-group mt-3 mb-4'>
          <label>Task Status</label>
          <div className='form-check'>
            <input
              className='form-check-input'
              type='radio'
              name='status'
              value='Pending'
              checked = {status === 'Pending' ? true : false }
              onChange={handleInputChange}
            />
            <label className='form-check-label'>Pending</label>
          </div>
          <div className='form-check'>
            <input
              className='form-check-input'
              type='radio'
              name='status'
              value='Completed'
              checked = {status === 'Completed' ? true : false }
              onChange={handleInputChange}
            />
            <label className='form-check-label'>Completed</label>
          </div>
        </div>

        <button type='submit' className='btn btn-primary'>
          Submit
        </button>
      </form>
    </div>
  );
};

export default Todo;
Error handling in Axios with async-await
Handling errors in Javascript promise with async-await is easy, we can use the try and catch statement as follows.
  const fetchTodos = async () => {
    try {
      const response = await someAPI.get("/todos");
      setTodos(response.data);
      setIsLoading(false);
    } catch (err) {
      console.log(err.message);
    }
  };
Axios React request with params and headers
In this section, we’ll demonstrate a few abstract examples where we can pass params in our react Axios params. Here is a simple example of the React Axios params query.
const axios = require('axios');

// Equivalent to axios.get('https://somedomain.com/search?category=electronic')
const res = await axios.get('https://somedomain.com/search',
{ params: { category: 'electronic' }
});
The second example is Axios with a header with token Authorization and searches param query.
import axios from 'axios';

const SOMESERVER_URL = process.env.REACT_APP_SOMESERVER_URL;
const SOMESERVER_TOKEN = process.env.REACT_APP_TOKEN;

const somesite = axios.create({
   baseURL: SOMESERVER_URL,
   headers: { Authorization: token ${SOMESERVER_TOKEN}});


....
// searchTerm is user query
const params = new URLSearchParams({
   q: searchTerm
});

try {

      const response = await somesite.get(`/search/categories/${params}`);
     return response.data;
} catch (err) {
  // some error handling
}

// No need to call json() for Axios
Axios with context API, we can pass params as follows. First, we need to create API with Axios create. To access the following search URL.
https://www.somedomain.com/search?part=snippet&type=video&maxResults=5&key=.....&q=import axios from "axios";
const KEY = ".....API KEY ......";
export default axios.create({
baseURL: "https://www.somedomain.com/",
params: {
part: "snippet",
type: "video",
maxResults: 5,
key: KEY,
},
});
....
const search = async (searchTerm) => {
const response = await someadomainName.get("/search", {
params: {
q: searchTerm,
},
});
....
};To add a limit number of response data we can use limit inside params.
export default axios.create({
    baseURL: 'https://someaAPI',
    params: {
        _limit: 10
    }
});Conclusion: We learned how to use Axios simple promise-based client to make HTTP requests. We demonstrated a few examples of how to use Axios in React application. The Axios is one of the most used and popular libraries for making HTTP requests.
Related Post