The table is an important HTML element that allows us to display our data in a tabular format containing (such as text, images, links, other tables, etc.) in a two-dimensional table with rows and columns of cells. The ionic framework doesn’t have a prebuilt component like a card for the Ionic table. But we create an ionic table using the following ways.
- Using Ionic grid component.
- Native HTML table.
- For Angular material UI then use the material table.
- For bootstrap, UI uses the table component.
Prerequisites:
To create and run an Ionic project, We need Node js and Ionic CLI already install in our system, if not then check how to install Node js and Ionic in Ubuntu. Ionic CLI allows us to create an Ionic project, generate application and library code, and perform a variety of ongoing development tasks such as testing, bundling, and deployment. To install the Ionic CLI, open a terminal, and run the following command:
npm install -g @ionic/cliSetting up and configure our Ionic table project
With the release of ionic version 4, the Ionic framework is no longer limited to angular, we can create the ionic projects in different front-end frameworks like Angular, Vue, and React. Let first create a blank Ionic Angular project.
ionic start ionicTable --type=angularIn a real application, we are retrieving data from the server, to demonstrate the Ionic skeleton example we have some dummy data. We will retrieve data using the HTTP client module. Let’s add our dummy data, in the assets folder create a data folder and countries.json
[
    {
      "name": "India",
      "flag": "4/41/Flag_of_India.svg",
      "area": 3287263,
      "population": 1324171354
    },
    {
      "name": "France",
      "flag": "c/c3/Flag_of_France.svg",
      "area": 640679,
      "population": 64979548
    },
    {
      "name": "United States",
      "flag": "a/a4/Flag_of_the_United_States.svg",
      "area": 9629091,
      "population": 324459463
    },
    {
      "name": "Russia",
      "flag": "f/f3/Flag_of_Russia.svg",
      "area": 17075200,
      "population": 146989754
    },
    {
      "name": "Germany",
      "flag": "b/ba/Flag_of_Germany.svg",
      "area": 357114,
      "population": 82114224
    },
    {
      "name": "Canada",
      "flag": "c/cf/Flag_of_Canada.svg",
      "area": 9976140,
      "population": 36624199
    },
    {
      "name": "Vietnam",
      "flag": "2/21/Flag_of_Vietnam.svg",
      "area": 331212,
      "population": 95540800
    },
    {
      "name": "Mexico",
      "flag": "f/fc/Flag_of_Mexico.svg",
      "area": 1964375,
      "population": 129163276
    }
  ]
We have to import the HTTClient module to retrieve data from source data.
import { NgModule } from '@angular/core';
import { CommonModule } from '@angular/common';
import { IonicModule } from '@ionic/angular';
import { FormsModule } from '@angular/forms';
import { HomePage } from './home.page';
import { HomePageRoutingModule } from './home-routing.module';

@NgModule({
  imports: [
    CommonModule,
    FormsModule,
    IonicModule,
    HomePageRoutingModule
  ],
  declarations: [HomePage]
})
export class HomePageModule {}
Ionic table using the native HTML table element
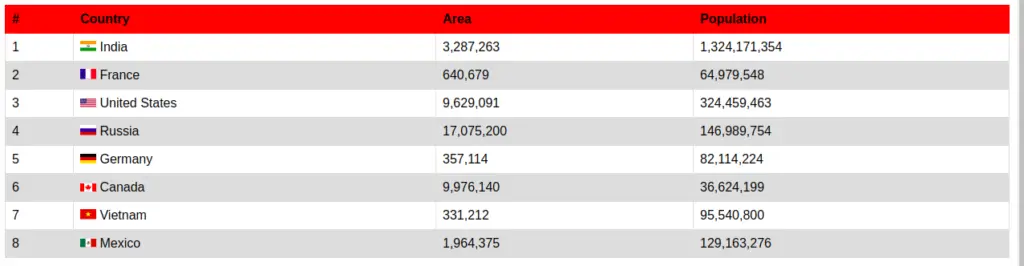
We can create an Ionic table using a regular HTML table element. The HTML table consists of different sub-elements like tr for table row, th for table heading, and td for the table data cell. For the Ionic table using HTM table, we need to add CSS style for table responsiveness.
Here’s a quick screenshot of what we’ll be building.
Edit home.page.ts file, we need to first retrieve our data from API, in our case we have dummy data and we are using the HttpClient GET method to retrieve our data.
import { HttpClient } from '@angular/common/http';
import { Component, OnInit } from '@angular/core';
import { ICountry } from '../models/country';

interface ICountry {
  name: string;
  flag: string;
  area: number;
  population: number;
}

@Component({
  selector: 'app-home',
  templateUrl: 'home.page.html',
  styleUrls: ['home.page.scss'],
})
export class HomePage implements OnInit {
  countries: ICountry[];

  constructor(private http: HttpClient) { }

  ngOnInit(): void {
    this.http.get('./assets/data/countries.json').subscribe((data: any[]) => {
      this.countries = data;
    });
  }
}
Once we have our data in hand, we can display data in our component template. Edit home.page template to display data in tables.
<ion-header [translucent]="true">
  <ion-toolbar color="primary">
    <ion-title>
      Ionic table
    </ion-title>
  </ion-toolbar>
</ion-header>

<ion-content [fullscreen]="true">
  <table class="table table-striped ion-margin">
    <thead>
      <tr>
        <th scope="col">#</th>
        <th scope="col">Country</th>
        <th scope="col">Area</th>
        <th scope="col">Population</th>
      </tr>
    </thead>
    <tbody>
      <tr *ngFor="let country of countries index as i">
        <td scope="row">{{ i + 1 }}</td>
        <td>
          <img [src]="'https://upload.wikimedia.org/wikipedia/commons/' + country.flag" class="mr-2"
            style="width: 20px">
          {{ country.name }}
        </td>
        <td>{{ country.area | number }}</td>
        <td>{{ country.population | number }}</td>
      </tr>
    </tbody>
  </table>
</ion-content>
For the Ionic table using the native HTML, the table has drawbacks, we need to write our own CSS style to make the Ionic table design responsive. Let’s add style to make table design by making the table header red background and table striped design.
table {
  font-family: arial, sans-serif;
  border-collapse: collapse;
  width: 98%;

  th {
    background-color: red;
    border: 1px solid red;
  }
  td {
    border: 1px solid #dddddd;
  }
  td, th {
    text-align: left;
    padding: 8px;
  }

  tr:nth-child(even) {
    background-color: #dddddd;
  }
}
Setup and configure Ionic table using Ionic grid
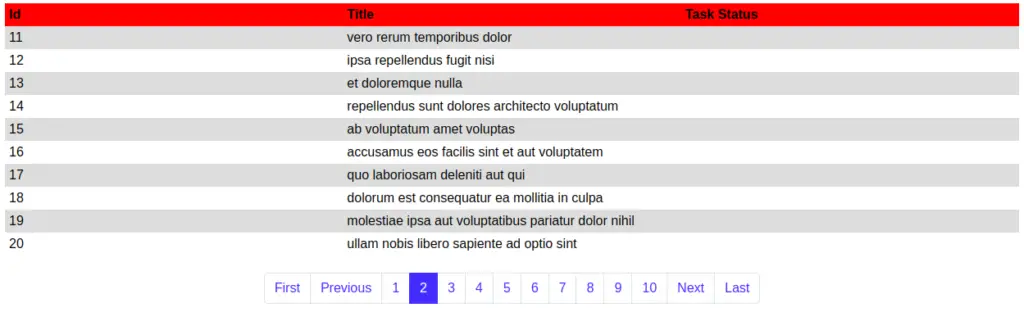
Ionic grid component is a powerful mobile-first flexbox system for building custom layouts like tables and we can easily create an Ionic responsive table using an Ionic grid. The ionic grid component consists of two sub-components ion-row for creating rows and ion-col for creating columns. Columns will expand to fill the rows we can have 12-column layouts with different breakpoints based on the screen size. The number of columns can be customized using CSS.
Here’s a quick screenshot of what we’ll be building.
Ionic table with pagination
If you are using Ionic angular then there are different ways of adding Ionic table pagination.
- ngx-pagination: Popular and most download, but for adding Ionic Angular table pagination, this plugin is not updated a more then a year.
- mat-paginator for Ionic angular material UI
- jw-angular-pagination for Ionic angular
We have listed a few, but there are many more ways of adding Ionic table pagination. In our case, we are using jw-angular-pagination as a third-party Angular pagination component, and let’s add it to our project.
npm i jw-angular-paginationWe need to import the jw-angular-pagination module in our component, where we want to use Ionic table pagination. Let’s edit the home.module.ts file to add the pagination module.
import { NgModule } from '@angular/core';
import { CommonModule } from '@angular/common';
import { IonicModule } from '@ionic/angular';
import { FormsModule } from '@angular/forms';
import { HomePage } from './home.page';
import { HomePageRoutingModule } from './home-routing.module';
import { JwPaginationModule } from 'jw-angular-pagination';

@NgModule({
  imports: [
    CommonModule,
    FormsModule,
    IonicModule,
    HomePageRoutingModule,
    JwPaginationModule
  ],
  declarations: [HomePage]
})
export class HomePageModule {}
Edit home.page.ts file, we need to data and in our case, we have todos data API from jsonplaceholder.typicode.com using HttpClient GET method to retrieve our data as.
import { HttpClient } from '@angular/common/http';
import { Component, OnInit } from '@angular/core';

@Component({
  selector: 'app-home',
  templateUrl: 'home.page.html',
  styleUrls: ['home.page.scss'],
})
export class HomePage implements OnInit {
  todos: any;
  currentPage = 1;
  pageOfItems: Array<any>;

  constructor(private http: HttpClient) { }

  ngOnInit(): void {
    this.http.get('https://jsonplaceholder.typicode.com/todos').subscribe((data: any[]) => {
      this.todos = data;
    });
  }

  onChangePage(pageOfItems: Array<any>) {
    // update current page of items
    this.pageOfItems = pageOfItems;
  }
}
Once we have our data in our hands, we can add an Ionic grid and pagination element to display the table and pagination. Edit home.page.ts file.
<ion-header [translucent]="true">
  <ion-toolbar color="primary">
    <ion-title>
      Ionic table
    </ion-title>
  </ion-toolbar>
</ion-header>

<ion-content [fullscreen]="true">
  <div class="ion-margin">
    <ion-text color="primary" class="ion-margin-left">
      <h2>Ionic table using Ionic grid</h2>
    </ion-text>
    <ion-grid>
      <ion-row>
        <ion-col size-xs="4">Id</ion-col>
        <ion-col size-xs="4">Title</ion-col>
        <ion-col size-xs="4">Task Status</ion-col>
      </ion-row>
      <ion-row *ngFor="let todo of pageOfItems">
        <ion-col size-xs="4">{{ todo.id }}</ion-col>
        <ion-col size-xs="4">
          {{ todo.title }}
        </ion-col>
        <ion-col size-xs="4">{{ todos.completed }}</ion-col>
      </ion-row>
    </ion-grid>
  </div>
  <jw-pagination [items]="todos" (changePage)="onChangePage($event)"  [pageSize]="10"></jw-pagination>
</ion-content>
We need to add CSS style for making the table header background red and even the column with a grey background. Edit home.page.scss file.
 ion-grid {
  ion-row:first-child {
    background-color: red;
    font-weight: bold;
  }
  ion-row:nth-child(even) {
    background: #dddddd;
  }
}
Styling the Ionic table pagination Component
The JW Angular pagination component is unstyled by default, you can use the below CSS selectors to add your own custom styles. If you have to install bootstrap using ng-bootstrap in your Ionic project, then no need to style Ionic table pagination. But in our case we have not used bootstrap, we need to add the following custom style for pagination in global.scss as pagination can be used in many components.
.pagination {
    justify-content: center;
    flex-wrap: wrap;
}

.pagination {
  display: -ms-flexbox;
  display: flex;
  padding-left: 0;
  list-style: none;
  border-radius: .25rem;
}
.page-link {
    position: relative;
    display: block;
    padding: 0.5rem 0.75rem;
    margin-left: -1px;
    line-height: 1.25;
    color: #007bff;
    background-color: #fff;
    border: 1px solid #dee2e6;
  }

  .page-link:hover {
    z-index: 2;
    color: #0056b3;
    text-decoration: none;
    background-color: #e9ecef;
    border-color: #dee2e6;
  }

  .page-link:focus {
    z-index: 3;
    outline: 0;
    box-shadow: 0 0 0 0.2rem rgba(0, 123, 255, 0.25);
  }

  .page-item:first-child .page-link {
    margin-left: 0;
    border-top-left-radius: 0.25rem;
    border-bottom-left-radius: 0.25rem;
  }

  .page-item:last-child .page-link {
    border-top-right-radius: 0.25rem;
    border-bottom-right-radius: 0.25rem;
  }

  .page-item.active .page-link {
    z-index: 3;
    color: #fff;
    background-color: #007bff;
    border-color: #007bff;
  }

  .page-item.disabled .page-link {
    color: #6c757d;
    pointer-events: none;
    cursor: auto;
    background-color: #fff;
    border-color: #dee2e6;
  }

  .pagination-lg .page-link {
    padding: 0.75rem 1.5rem;
    font-size: 1.25rem;
    line-height: 1.5;
  }

  .pagination-lg .page-item:first-child .page-link {
    border-top-left-radius: 0.3rem;
    border-bottom-left-radius: 0.3rem;
  }

  .pagination-lg .page-item:last-child .page-link {
    border-top-right-radius: 0.3rem;
    border-bottom-right-radius: 0.3rem;
  }

  .pagination-sm .page-link {
    padding: 0.25rem 0.5rem;
    font-size: 0.875rem;
    line-height: 1.5;
  }

  .pagination-sm .page-item:first-child .page-link {
    border-top-left-radius: 0.2rem;
    border-bottom-left-radius: 0.2rem;
  }

  .pagination-sm .page-item:last-child .page-link {
    border-top-right-radius: 0.2rem;
    border-bottom-right-radius: 0.2rem;
  }
Ionic responsive table by using ion-grid
We can create and control the Ionic table responsive using a responsive grid. Ionic grids act as a container for all rows and columns. Grids take up the full width of their container, but adding the fixed attribute will specify the width per screen size.
The size-{breakpoint} attributes indicate the number of columns to use out of the default 12 per row. So, size=”4″ can be added to a column in order to take up 1/3 of the grid, or 4 of the 12 columns. We can control column numbers at different screen widths, for our example, we have 5 columns on a small screen for the Title column and 8 columns for the title column on the middle screen.
  <ion-grid>
    <ion-row color="success">
      <ion-col size-xs="2" size-md="2">Id</ion-col>
      <ion-col size-xs="5" size-md="8">Title</ion-col>
      <ion-col size-xs="5" size-md="2">Task Status</ion-col>
    </ion-row>
    <ion-row *ngFor="let todo of pageOfItems">
      <ion-col size-xs="2" size-md="2">{{ todo.id }}</ion-col>
      <ion-col size-xs="5" size-md="8">
        {{ todo.title }}
      </ion-col>
      <ion-col size-xs="5" size-md="2">{{ todos.completed }}</ion-col>
    </ion-row>
  </ion-grid>
Ionic table or grid responsive can be the control using size attribute on ion-column and we can have following size attribute for different screen.
| Name | Value | Width Prefix | Description |
|---|---|---|---|
| xs | 0 | size- |
Set columns when (min-width: 0) |
| sm | 576px | size-sm- |
Set columns when (min-width: 576px) |
| md | 768px | size-md- |
Set columns when (min-width: 768px) |
| lg | 992px | size-lg- |
Set columns when (min-width: 992px) |
| xl | 1200px | size-xl- |
Set columns when (min-width: 1200px) |
Conclusion
We have explored different ways of creating an Ionic table. Ionic grid component is a standard way of adding tables in Ionic and we don’t need to add any third-party UI. We can easily control the Ionic table responsiveness using the grid responsive size attribute.
Related posts
in ionic 3 not work pagination, how resolve this ?