In any application, representation of data is an important aspect and we can use tables to clearly visualization of data and classified data into sets. The ionic table allows us to arrange data in two dimensions using rows and columns, or we can also create a more complex structure.
In this article we demonstrate how to create an/ Ionic table using two ways,
- First will use the Ionic Grid component
- Second angular material design table.
- Both approaches allow us to create a responsive table that is fully compatible with PC, tablets, and mobile devices.
Example of the Ionic table using Ionic grid
We can easily create an ionic table using the ion-grid component. An Ionic has lots of pre-built components, which we can ready to use like action-sheet, loading, toast controller, and more. Ionic grid is a powerful mobile-first flexbox system for building custom layouts. Ionic grid is composed of three units — a grid, row(s), and column(s) for creating a grid-based layout. Each row has a 12 column layout with different breakpoints based on the screen size. The number of columns can be customized using CSS.
Setting up a project for ionic grid
With the release of ionic version 4, the Ionic framework is no longer limited to angular, we can create the ionic projects in different front-end frameworks like Angular, Vue, and React. Let first create a blank Ionic Angular project and we don’t need to add any third-party library for creating a table using the ion grid component. The ionic grid component is flexible and we can easily control the responsiveness of the table on any device.
ionic start ionicTable --type=angular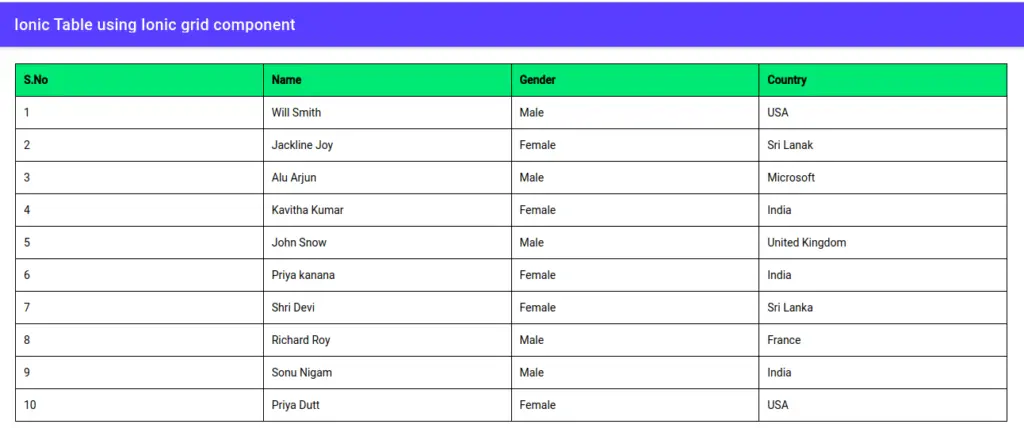
Let’s first add dummy students data, so that we can use it in our ionic table above example. Create a folder called data in the assets folder and add a file called students.json inside the data folder. We have our dummy student JSON data.
[
    {
        "name": "Will Smith",
        "gender": "Male",
        "country": "USA"
    },
    {
        "name": "Jackline Joy",
        "gender": "Female",
        "country": "Sri Lanak"
    },
    {
        "name": "Alu Arjun",
        "gender": "Male",
        "country": "Microsoft"
    },
    {
        "name": "Kavitha Kumar",
        "gender": "Female",
        "country": "India"
    },
    {
        "name": "John Snow",
        "gender": "Male",
        "country": "United Kingdom"
    },
    {
        "name": "Priya kanana",
        "gender": "Female",
        "country": "India"
    },
    {
        "name": "Shri Devi",
        "gender": "Female",
        "country": "Sri Lanka"
    },
    {
        "name": "Richard Roy",
        "gender": "Male",
        "country": "France"
    },
    {
        "name": "Sonu Nigam",
        "gender": "Male",
        "country": "India"
    },
    {
        "name": "Priya Dutt",
        "gender": "Female",
        "country": "USA"
    }
]
Defining Ionic table for dummy data in our template
We need to fetch data first from the source, the source can be a server or local static data. Angular 4.3 introduces an Angular httpClient module to request a call to the HTTP request. In this example, we are using fetch API. The Fetch API is a newer built-in feature of JavaScript that makes working with requests and responses easier.
import { Component, OnInit } from '@angular/core';

@Component({
  selector: 'app-home',
  templateUrl: 'home.page.html',
  styleUrls: ['home.page.scss'],
})
export class HomePage implements OnInit {
  students: any[];

  constructor() { }

  ngOnInit() {
    fetch('./assets/data/students.json').then(res => res.json())
      .then(json => {
        this.students = json;
      });
  }

}
<ion-header [translucent]="true">
<ion-toolbar color="primary">
<ion-title>
Ionic Table using Ionic grid component
</ion-title>
</ion-toolbar>
</ion-header>
<ion-content class="ion-margin">
<ion-grid class="ion-margin">
<ion-row>
<ion-col>S.No</ion-col>
<ion-col>Name</ion-col>
<ion-col>Gender</ion-col>
<ion-col>Country</ion-col>
</ion-row>
<ion-row *ngFor="let student of students; index as i">
<ion-col>{{ i + 1 }}</ion-col>
<ion-col>{{ student.name }}</ion-col>
<ion-col>{{ student.gender }}</ion-col>
<ion-col>{{ student.country }}</ion-col>
</ion-row>
</ion-grid>
<ion-item lines="none">
<ion-button color="primary" size="small" slot="end" routerLink="/material">
Material Design Table
</ion-button>
</ion-item>
</ion-content>To apply a style to our ionic grid table, we have added the following code to our home.page.scss
ion-grid {
  --ion-grid-column-padding: 10px;
  border-collapse: collapse;
  border-style: hidden;

  ion-row:first-child {
    background-color:  #2dd36f;
    font-weight: bold;
  }
  ion-col {
    border: 1px solid black;
    border-bottom: 0;
    border-right: 0;
  }
  ion-col:last-child {
    border-right: 1px solid black;
  }

  ion-row:last-child {
    border-bottom: 1px solid black;
  }
}
Example of the Ionic table using Angular Material Design Table
Angular Material is one of the best UI component libraries for Angular developers. Angular material developers help us to create our application rapidly and flawlessly by using reusable UI components and responsive design. We’ll continue the above example and use the same dummy data, lets first create a page called material and add angular material.
ionic generate page material
ng add @angular/material
Import MatTableModule in our component
To use the Angular material table in our component, we have to import MatTableModule. In our material page module import MatTableModule as.
import { NgModule } from '@angular/core';
import { CommonModule } from '@angular/common';
import { FormsModule } from '@angular/forms';
import { IonicModule } from '@ionic/angular';
import { MaterialPageRoutingModule } from './material-routing.module';
import { MaterialPage } from './material.page';
import { MatNativeDateModule } from '@angular/material/core';
import { MatTableModule } from '@angular/material/table';

@NgModule({
  imports: [
    CommonModule,
    FormsModule,
    IonicModule,
    MaterialPageRoutingModule,
    MatNativeDateModule,
    MatTableModule
  ],
  declarations: [MaterialPage]
})
export class MaterialPageModule {}
Defining Ionic table for dummy data in our template
In the angular material table, we have to define the data source for our table, we have retrieved and assign our static data from the fetch() method.
import { Component, OnInit } from '@angular/core';
export interface IStudent {
  name: string;
  gender: string;
  country: string;
}

@Component({
  selector: 'app-material',
  templateUrl: './material.page.html',
  styleUrls: ['./material.page.scss'],
})
export class MaterialPage implements OnInit {
  displayedColumns = ['SNo', 'name', 'gender', 'country'];
  dataSource: IStudent[];

  ngOnInit() {
    fetch('./assets/data/students.json').then(res => res.json())
      .then(json => {
        this.dataSource = json;
      });
  }
}
To define the table in Angular material we are using an HTML native table and assign it Angular material mat-table directive. We have mat-header-cell and mat-cell directives to create table header and cell respectively.
<ion-header>
  <ion-toolbar color="primary">
    <ion-title>Ionic 6 Angular 10 Material Design Table</ion-title>
  </ion-toolbar>
</ion-header>

<ion-content class="ion-padding ion-margin">
  <table mat-table [dataSource]="dataSource" class="mat-elevation-z8">

    <!--- Note that these columns can be defined in any order.
          The actual rendered columns are set as a property on the row definition" -->

    <ng-container matColumnDef="SNo">
      <th mat-header-cell *matHeaderCellDef> S.no </th>
      <td mat-cell *matCellDef="let element; let i = index;">{{ i }}</td>
    </ng-container>

    <!-- Name Column -->
    <ng-container matColumnDef="name">
      <th mat-header-cell *matHeaderCellDef> Name </th>
      <td mat-cell *matCellDef="let element"> {{ element.name }} </td>
    </ng-container>

    <!-- Weight Column -->
    <ng-container matColumnDef="gender">
      <th mat-header-cell *matHeaderCellDef> Gender</th>
      <td mat-cell *matCellDef="let element"> {{ element.gender }} </td>
    </ng-container>

    <!-- Symbol Column -->
    <ng-container matColumnDef="country">
      <th mat-header-cell *matHeaderCellDef> Country </th>
      <td mat-cell *matCellDef="let element"> {{ element.country }} </td>
    </ng-container>

    <tr mat-header-row *matHeaderRowDef="displayedColumns"></tr>
    <tr mat-row *matRowDef="let row; columns: displayedColumns; let i = index"></tr>
  </table>

</ion-content>
Edit material.page.scss to apply style as.
table.mat-table {
    display: table;
    width: 100%;
    th {
        background-color: red;
        color: white;
    }
}
Conclusion
Creating a table in ionic is easy if you are not using any third-party libraries for UI, then the ion-grid component is the best and easy to add a table in our ionic project. Check the ionic grid and angular material design table for more examples.
Related posts