An Angular allows us to protect routes with guards. An angular Route guard is a way of protecting navigation by allowing or denying a route based on the condition we supply. The most commonly used angular route guard types are CanActivate and CanDeactivate. Angular has several guard interfaces that allow us to mediate navigation to and from a route.
We have three main objectives in this Angular auth guard tutorial,
- Different types of Angular auth guard in Angular
- Demonstrate Angular canActivate with example
- Three Angular auth guard example
Route guards give us a lot of flexibility in the kinds of checks we want to add before a route opens or closes. We can easily generate an Angular guard in our project using the Angular command CLI. We want only authenticated users to access some pages by using the Angular route guard. We can generate a guard using the following command
ng g guard my-new-guard guard-typeThe guard type can be canActivate, canActivateChild, canDeactivate and canLoad.
Different types of Angular Route Guard
Based on user requirements, we can implement different guards. Angular provides the following different types of router guards.
- CanActivate: Checks to see if we can visit a route based on condition.
- CanActivateChild: Checks to see if we can visit route children based on condition.
- CanDeactivate: Prevent the user from navigating away from the current content based on condition.
- canLoad: Used to determine whether the user can navigate to a lazy-loaded module prior to loading it
- Resolve Delay navigation until a task is complete before the route activation.
Angular auth guard and an example using canActivate
Let’s take a look at what Angular’s route guards are and how to use them to help with authentication in your Angular apps.
The CanActivate: Can the user navigate to a route.?
We can have a guard class that implements can activate() method, we can inject this class into the router configuration. The Angular guard can be used to prevent a route from being activated. This is useful to navigate the user away to some resource if the user isn’t allowed to navigate to a route. This is not only limited to authorized users only, but we can also implement different logic that returns boolean values to control the activation of the route.
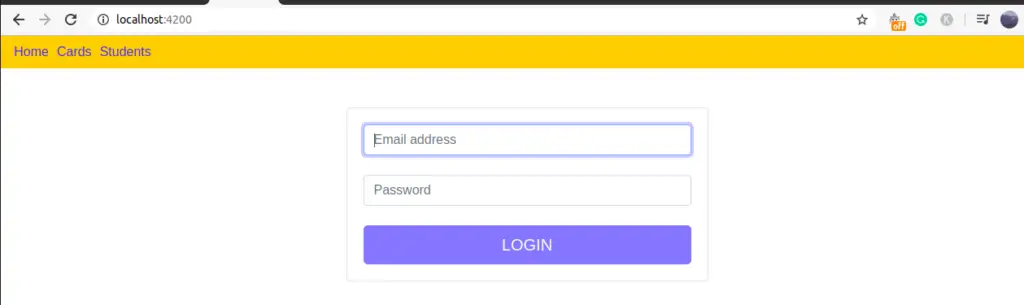
We will demonstrate an example to control the accessing some of our components like cards and students from unauthorized users. The links like card and student can access only once the user has logged in.
Step 1: Create an angular project and add a required component
We need three components, one for the login component to allow a user to loggedIn. The other two components demonstrate the auth guard controls of the navigation route. We also auth service for login validation.
ng new authApp
ng generate component login
ng generate component cards
ng generate component students
ng generate service auth
Step 2: Edit app.component.html to include router-outlet directive and navigation link
We already discussed on router-outlet and routerLink directive in the previous router tutorial.
Step 3: Edit the auth.service.ts file to check user authentication
We will set static values for email and password to demonstrate the auth guard demo. If email is [email protected] and password is admin then return Rxjs Observable of boolean value true otherwise false.
import { Injectable } from '@angular/core';
import { Observable, of } from 'rxjs';

@Injectable({
  providedIn: 'root',
})
export class AuthService {
  isAuthenticate: boolean = false;

  login(email: string, password: string): Observable<boolean> {
    if (email === '[email protected]' && password === 'admin') {
      this.isAuthenticate = true;
      return of(true);
    }
    return of(false);
  }
}
Step 4: Create an auth guard and implement canActivate interface.
Guards for route activation are classes that define a method called canActivate, which has optional ActivatedRouteSnapshot and RouterStateSnapshot arguments as resolvers. To generate Angular canActive guard run the following command below.
ng g guard auth CanActivateimport { AuthService } from './auth.service';
import { Injectable } from '@angular/core';
import { CanActivate, ActivatedRouteSnapshot, RouterStateSnapshot, UrlTree } from '@angular/router';
import { Observable } from 'rxjs';
@Injectable({
providedIn: 'root'
})
export class AuthGuard implements CanActivate {
constructor(private authService: AuthService) { }
canActivate(next: ActivatedRouteSnapshot, state: RouterStateSnapshot)
: Observable<boolean | UrlTree> | Promise<boolean | UrlTree> | boolean | UrlTree {
if (this.authService.isAuthenticate) {
return true;
} else {
return false;
}
}The canActivate() method can return three different types. We have a return value of observable or promise or just boolean. As we might have some guards which execute some synchronous code on the client-side, or we might have some asynchronous code to wait for a remote server and both are possible with canActivate(),
Step 5: Create/edit app.routing.module.ts and configure the auth guard on the router.
If your application didn’t have app.routing.module.ts, then we can manually create our new module and hook it up to the main AppModule. Angular CLI command to generate route module for us, by running:
ng generate module app-routes –flat –module=app
Add angular route guards in app.routing.module.ts
To implement Angular route guard on our components, we need to import our guard first. We can have and apply any number of Angular route guards on components. In order to check if a component can be activated we add a guard class to the key canActivate in our router configuration.
import { NgModule } from '@angular/core';
import { Routes, RouterModule } from '@angular/router';
import { CardsComponent } from './cards/cards.component';
import { LoginComponent } from './login/login.component';
import { StudentsComponent } from './students/students.component';
import { AuthGuard } from './auth.guard';

const routes: Routes = [
  { path: '', component: LoginComponent },
  { path: 'cards', component: CardsComponent, canActivate: [AuthGuard] },
  { path: 'students', component: StudentsComponent, canActivate: [AuthGuard] }
];

@NgModule({
  imports: [RouterModule.forRoot(routes)],
  exports: [RouterModule]
})
export class AppRoutingModule { }
With help of the Angular route guard, we can restrict the access of components, only authenticated user can access the card and student components. To access the route we are invoking AuthGuard class, if it returns true, the user is allowed to access the route component otherwise route access is denied for the user. The canActivate is an array, in our case we have only one guard, if you have multiple guard and you can add inside [] with a comma separated between them.
We also need to register our angular routing in the app.module.ts file as
import { FormsModule } from '@angular/forms';
import { BrowserModule } from '@angular/platform-browser';
import { NgModule } from '@angular/core';
import { AppRoutingModule } from './app-routing.module';
import { AppComponent } from './app.component';
import { LoginComponent } from './login/login.component';
import { StudentsComponent } from './students/students.component';

@NgModule({
  declarations: [
    AppComponent,
    LoginComponent,
    StudentsComponent
  ],
  imports: [
    BrowserModule,
    FormsModule,
    AppRoutingModule
  ],
  providers: [],
  bootstrap: [AppComponent]
})
export class AppModule { }
Login component to check Angular route guard
Let’s add the login form in the Login component, we need to import AuthService, if the user login with valid [email protected] and admin as a password then route to the Card component. If wrong authentication then shows some alert message. Here is a screenshot of our example.
In the login.component.ts file let import FormGroup and AuthService to check if user is valid or not.
import { Component, OnInit } from '@angular/core';
import {
  FormBuilder,
  FormGroup,
  Validators,
  FormControl,
} from '@angular/forms';
import { Router } from '@angular/router';
import { AuthService } from 'src/app/services/auth.service';

@Component({
  selector: 'app-login',
  templateUrl: './login.component.html',
  styleUrls: ['./login.component.scss'],
})
export class LoginComponent implements OnInit {
  isSubmitted: boolean = false;
  isValidUser: boolean = false;
  form: FormGroup = new FormGroup({});

  constructor(
    private fb: FormBuilder,
    private router: Router,
    private authService: AuthService
  ) {}

  ngOnInit() {
    this.form = this.fb.group({
      email: new FormControl('', [Validators.required, Validators.email]),
      password: new FormControl('', [Validators.required]),
    });
  }

  onSubmit() {
    this.authService
      .login(this.form.value.email, this.form.value.password)
      .subscribe((data) => {
        if (data) {
          this.router.navigate(['/cards']);  // If valid and route to card
        }
        this.isSubmitted = true;
        this.isValidUser = data; // false show error message
      });
  }
}
In the Login component template let’s add the Login form
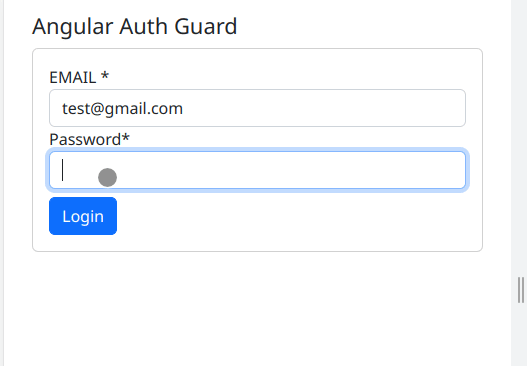
<section class="m-3">
  <div class="container">
    <h4>Angular Auth Guard</h4>
    <div class="card p-3">
      <div class="row">
        <div class="col-md-4 login-sec">
          <form class="login-form" [formGroup]="form" (ngSubmit)="onSubmit()">
            <div class="form-group">
              <label class="text-uppercase">Email *</label>
              <input type="text" class="form-control" formControlName="email" />
            </div>
            <div class="form-group">
              <label>Password*</label>
              <input
                type="password"
                class="form-control"
                formControlName="password"
              />
            </div>

            <button type="submit" class="btn btn-primary mt-2 float-right">
              Login
            </button>
          </form>
        </div>
      </div>
    </div>

    <ngb-alert [dismissible]="false" *ngIf="isSubmitted && !isValidUser">
      <strong>Wrong authentication!</strong>
      Please enter valid authentication
    </ngb-alert>
  </div>
</section>
We only want to give access to the cards and students’ components if the user is logged in. You can read more on the Angular canActivate(), guard, please check the official Angular document.
Adding Auth Guard in Firebase
Let’s add code for Angular Auth Guard in Firebase, I will only add code needed for auth guard. We need to import the authService where userDate is observable, when every user changes his or her login status, the userData value also changes using Behavior Subject, which emits the current status of the user in the application. If a user is not logged in then Angular auth guard redirect to the login page.
import { Injectable } from '@angular/core';
import { CanActivate, Router } from '@angular/router';
import { AuthService } from '../services/auth.service';
import { Observable, of } from 'rxjs';
import { catchError, map } from 'rxjs/operators';

@Injectable({
  providedIn: 'root'
})
export class AuthGuard implements CanActivate {
  constructor(
    private router: Router,
    private authService: AuthService) { }

  canActivate(): Observable<boolean> {
    return this.authService.userData.pipe(map(data => {
      if (data) {
        return true;
      } else {
        return false;
      }
    }),
      catchError((err) => {
        this.router.navigate(['/login']);
        return of(false);
      }));

  }
}
In the auth service, where we check the current logged-in status of a user using the Angular Firestore library, we used Behavior Subject of Rxjs to emit it current status and our guard code consume it.
import { Injectable } from '@angular/core';
import { AngularFirestore, AngularFirestoreDocument } from '@angular/fire/firestore';
import { Router } from '@angular/router';
import { BehaviorSubject, Observable } from 'rxjs';
import { AngularFireAuth } from '@angular/fire/auth';
import { IUser } from '../models/user.model';
import { CommonService } from './common.service';


@Injectable({
  providedIn: 'root'
})
export class AuthService {

  appUser$: Observable<IUser>;
  private _userData: BehaviorSubject<any> = new BehaviorSubject<IUser>(null);

  constructor(
    private router: Router,
    private afAuth: AngularFireAuth,
    private afs: AngularFirestore,
) {

    this.afAuth.authState.subscribe(user => {
      if (user) {
        this._userData.next(user);
      } else {
        this.router.navigateByUrl('/login');
      }
    });
  }

  get userData() {
    return this._userData.asObservable();
  }
}
If you want to know about Angular Firebase authentication implementation then check, articles on Ionic Angular firebase authentication.
- How to implement ionic firebase authentication
- How to implement Ionic facebook login and Ionic firebase Facebook authentication
Related Topic
nice 👍