The angular framework provides a single-page application (SPA), the web page won’t be reloaded, and only part may change based on the URL state. Angular Routing allows us to navigate between different content as the user navigates around. For each navigation to URL, angular has to know which component should be rendered and initialized without refreshing the page.
We have three objectives behind this tutorial, first will learn how to configure Angular routing and second we’ll learn how to pass parameter on Angular route. Last how we can retrieve route params at routed component. Let’s get started.
What is Angular routing ?
The Angular routing makes navigation from one view to another in applications. We can think of SPA(Single page application) as a collection of states, such as home, header, footer, reservation, details, profile, and confirmation. Each of these states is represented as a component that has its own view or template. When the user navigates using Angular routing, only a certain view of the page is changed, a header containing navigation, sidebar, and footer will remain the same. SPAs provide a better user experience.
Routing is very important to an Angular application. It allows the user to map components to URLs and navigate the user interface.
Why do we need angular routing ?
- Routing helps us to create Single Page Applications in Angular. In the application we may have many components, routing helps us to navigate between different views that correspond to a component.
- Protect certain parts of the application based on certain rules using Guards.
- Maintain the state in the application and pass dynamic data between components.
How to configured an angular routing ?
Let’s see the necessary steps needed to implement routing in an Angular application. In our example app, we want to route to have the SearchComponent rendered when the URL is / or root and the AboutComponent shown when the URL is /about.
An example on angular routing ?
Let’s take an example to demonstrate how we can implement routing in an Angular. First, create an angular project which we did above, we have added ng-bootstrap for UI. If you want to know how to install bootstrap in your angular project, check this article.
ng new routingDemo --routing
// Create new application routingDemo with routing module

// Create differnt component
ng generate component components/navbar
ng generate component components/home
ng generate component components/about
ng generate component components/countries
ng generate component components/countryDetails
Step 2: Create or edit Angular routing module that is app.routing.module.ts
If your application didn’t have app.routing.module.ts, then you can manually create our new module and hook it up to the main AppModule, or let the Angular CLI do it for us, by running:
ng generate module app-routes –flat –module=app
In the routing module, we configure routing for different components, we are setting the home page, about, and country page with different dynamic id on URL.
import { NgModule } from '@angular/core';
import { RouterModule, Routes } from '@angular/router';
import { AboutComponent } from './components/about/about.component';
import { CountriesComponent } from './components/countries/countries.component';
import { CountryDetailsComponent } from './components/country-details/country-details.component';
import { HomeComponent } from './components/home/home.component';
import { NavbarComponent } from './components/navbar/navbar.component';

const routes: Routes = [
  { path: '', component: HomeComponent },
  { path: 'about', component: AboutComponent },
  { path: 'navbar', component: NavbarComponent },
  { path: 'countries', component: CountriesComponent },
  { path: 'countries/:id', component: CountryDetailsComponent },
];

@NgModule({
  imports: [RouterModule.forRoot(routes)],
  exports: [RouterModule]
})
export class AppRoutingModule { }
Routes is a local variable (of type Routes) used to configure the actual navigation rules of the application. Angular route configuration is entirely in this “routes” variable. Each route now is just a javascript object in this array. The routes we pass to the forRoot method are nothing but an array of Routes. Each route is simply a configuration that defines the path for the route, as well as the component to be loaded when the route is loaded. A route configuration is usually a pair of properties:
- path: what URL will trigger the navigation
- component: which component will be initialized and inserted.
Note the path, which is countries/:id, we have included the id of dynamic value, which can change based on which country needs to be loaded.
In the app.component.html file, we have a router-outlet Angular directive, whose only job is to act as a placeholder for the template of the component of the current route.
Step 3: Register the angular route module in app.module.ts file
How will angular know about our routing configuration? We need to import our routing module in the app.module.ts file as
import { NgModule } from '@angular/core';
import { BrowserModule } from '@angular/platform-browser';
import { AppRoutingModule } from './app-routing.module';
import { AppComponent } from './app.component';
import { NavbarComponent } from './components/navbar/navbar.component';
import { SearchComponent } from './components/search/search.component';
import { AboutComponent } from './components/about/about.component';
import { HttpClientModule } from '@angular/common/http';
import { HomeComponent } from './components/home/home.component';
import { CountryDetailsComponent } from './components/country-details/country-details.component';
import { CountriesComponent } from './components/countries/countries.component';

@NgModule({
  declarations: [
    AppComponent,
    NavbarComponent,
    SearchComponent,
    AboutComponent,
    HomeComponent,
    CountryDetailsComponent,
    CountriesComponent
  ],
  imports: [
    BrowserModule,
    AppRoutingModule,
    HttpClientModule,
  ],
  providers: [],
  bootstrap: [AppComponent]
})
export class AppModule { }
Step 4: Displaying the Route Contents: RouterOutlet Directive
The last thing we need to do to get our routing application up and running. Need to tell Angular where to load the components when a certain route or path is matched.
We need to add a directive called router-outlet somewhere in our template. If the user navigates to /about we want the AboutComponent render in the same place as router-outlet. This directive tells Angular where it should insert each of those components in the route, we’ll add ours to the app.component.html, like so:
<app-navbar></app-navbar>
<div class="main">
    <div class="container">
        <router-outlet></router-outlet>
    </div>
</div>
For the navbar is a component, in navbar.component.html we have added navigation code, we need to modify the tag in navbar.component.html as follows
<nav class="navbar navbar-expand-lg navbar-light bg-dark">
    <div class="collapse navbar-collapse" id="navbarSupportedContent">
        <ul class="navbar-nav mr-auto">
            <li class="nav-item active">
                <a [routerLink]="['/']" routerLinkActive="active" [routerLinkActiveOptions]="{ exact: true }">Home</a>
            </li>
            <li class="nav-item">
                <a [routerLink]="['/about']" routerLinkActive="active" [routerLinkActiveOptions]="{ exact: true }">About</a>
            </li>
            <li class="nav-item">
                <a [routerLink]="['/countries']" routerLinkActive="active" [routerLinkActiveOptions]="{ exact: true }">Country list</a>
            </li>
        </ul>
    </div>
</nav>
In the above routes configuration, we have a root domain to the home. To access a list of countries we used http://localhost:4200/countries where localhost is your domain name.
Creating links in templates with routerLink
The router link makes navigation between pages possible. Using href attribute for navigation and clicking the link triggers a page reload, the application will lose its state and that’s definitely not what we want when programming single-page apps. To fix these issues Angular provides a solution that can be used to link to routes with no page reload: the RouterLink directive.
<a href="/">Home</a> // Don't used href
<a routerLink="/about">About</a>
<a [routerLink]="['/', 'countries', '5']">Student Detail!</a>
// rootdomain/countries/5  Where 5 correspoding to country id.
The above is one way of a link component to the route is inside a template, we can also add routing inside our component typescript using router object imported from @angular/Router. The navigate() API on the router service instance redirects to the specified route.
import { Router } from '@angular/router';
...
constructor(private router: Router){}

someMethod(country: ICountry) {
  this.router.navigate(['/about']);
  this.router.navigate(['/countries', country.id]);
  // http://localhost:4200/countries/2
}
We have used dummy data to navigate between different countries and we need to add our dummy data in assets/data/countries.json
[
  {
    "id": "1",
    "name": "Russia",
    "flag": "f/f3/Flag_of_Russia.svg",
    "area": 17075200,
    "population": 146989754
  },
  {
    "id": "2",
    "name": "France",
    "flag": "c/c3/Flag_of_France.svg",
    "area": 640679,
    "population": 64979548
  },
  {
    "id": "3",
    "name": "India",
    "flag": "4/41/Flag_of_India.svg",
    "area": 3287263,
    "population": 1324171354
  },
  {
    "id": "4",
    "name": "Germany",
    "flag": "b/ba/Flag_of_Germany.svg",
    "area": 357114,
    "population": 82114224
  },
  {
    "id": "5",
    "name": "Portugal",
    "flag": "5/5c/Flag_of_Portugal.svg",
    "area": 92090,
    "population": 10329506
  },
  {
    "id": "4",
    "name": "Canada",
    "flag": "c/cf/Flag_of_Canada.svg",
    "area": 9976140,
    "population": 36624199
  },
  {
    "id": "6",
    "name": "Vietnam",
    "flag": "2/21/Flag_of_Vietnam.svg",
    "area": 331212,
    "population": 95540800
  }
]
Adding CSS style to the active route
The routerLinkActive directive, allow us to add a Class class name on the active link, so we can apply style on the active link.
<li routerLinkActive="active" [routerLinkActiveOptions]="{exact: true}"><a routerLink="/">Home</a></li>
<li routerLinkActive="active"><a routerLink="about"></a></li>
<li routerLinkActive="active"><a routerLink="contact">Contact</a></li>
links, .links a {
padding: 10px;
}
.links a.active {
background-color: blue;
color: white;
}All my links should receive this active CSS class once they are clicked or when they are active. Well, the routerLink active directive does one thing. It analyses your currently loaded path and then checks which links lead to a route that uses this path. Without routerLinkActiveOptions, the home is marked as active all the time even we click on other links like /about.
The route / will be matched anywhere as it’s the very parent for all the other routes (like /about, /contact, etc). To simplify, it’s not a bug. It’s sometimes a needed functionality in your application to match multiple routes. To prevent that, we can specify the routerLinkActiveOptions to match exactly the route you’re on. That means it’s not going to match parent routes but will only try to find the routerLink provided for this exact route.
Wildcards and redirect in routing:
We need to handle if the user types the wrong URL, or we end up having bad links in our application. It is always useful to have a catch-all route that leads to a “Page not found” page or a redirect to some other page.
const routes: Routes = [
    { path: '', component: SearchComponent },
    { path: 'about', component: AboutComponent },
    { path: 'navbar', component: NavbarComponent },
    { path: '**', redirectTo: '/not-found' }
];
It is important to know that the router uses a first match wins strategy for matching routes. So, the order of the router really matters. It should be designed in a way such that more specific routes should be placed above less-specific routes. The following flow of design is advised for routing configuration:
- Routes with a static path
- Empty path route, for the default route
- Wildcard route
We need to generate a not-found, component, where we can add 404 not found.
Angular routing parameters
There are different ways we can pass data through Angular routing and we’ll learn each approach separately. It is important to know that the order of routing in the route array is very important.
We can pass data in URL, suppose we have /countries URL and post with id like /countries/id. In both cases, we are navigating to the countries, and the second one with on dynamic value.
Angular routing parameter using routerLink property binding
Let first used routerLink property binding to pass id in our route URL. On our countries component, we have a button with routerLink property with id. This id is unique and indicates a particular country.
<button [routerLink]="['/countries', country.id]">Country detail</button>
//http://localhost:4200/countries/2 is called
//countryDetail component with France information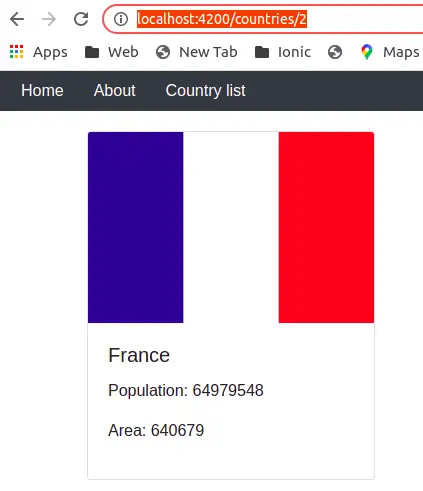
We can now see that we have a pass id of value in our country URL. The routerLink attribute is enclosed in square brackets, telling Angular that it should treat the attribute value as a data binding expression. The expression is set out as an array, in our case we have two segments and it can contain more also, with each element containing the value for one segment. In our case, the first segments are literal strings that will be included in the target URL. The second segment will be evaluated to include the id value for the countriesDetails component.
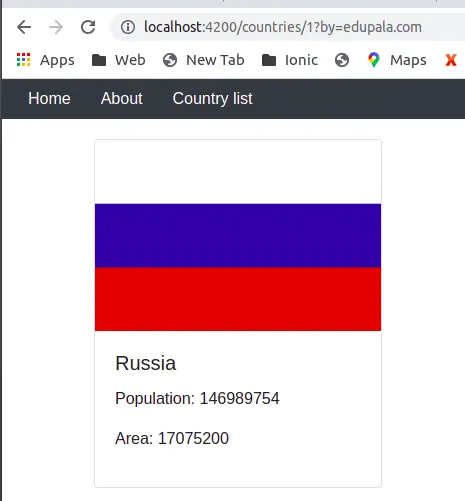
Angular routing paramter using queryParams property
We can use the [queryParams] directive along with [routerLink] to pass query parameters in the URL. In the second image, we have passed queryparams with optional parameters this is indicated by after question marks. To pass optional queryparam using routerLink and router object used following.
<button [routerLink]="['/countries', country.id]"
    [queryParams]="{by: 'edupala.com'}">
    Country detail
</button>

// http://localhost:4200/countries/1?by=edupala.com
someMethod(country: ICountry) {
   this.router.navigate(['/countries', country.id],
    {queryParams:{by:'edupala'}});
}
Using router object to pass params
Sometimes we may want to add logic to navigate between pages. We can also use router objects, and navigate API for Angular routing parameter passing.
 constructor(private router: Router) { }

  navigateCoutryDetailWithParams(country: ICountry) {
    this.router.navigate(['/countries', country.id]);
  }
Now let’s edit the countries.component.ts file to add our Router object, params, and navigation between pages.
import { HttpClient } from '@angular/common/http';
import { Component, OnInit } from '@angular/core';
import { Router } from '@angular/router';
import { ICountry } from 'src/app/models/country.model';

@Component({
  selector: 'app-countries',
  templateUrl: './countries.component.html',
  styleUrls: ['./countries.component.scss']
})
export class CountriesComponent implements OnInit {
  countries: ICountry[] = [];
  allCountries: ICountry[] = [];

  constructor(
    private router: Router,
    private http: HttpClient) { }

  ngOnInit(): void {
    this.http.get<ICountry[]>('./assets/data/countries.json')
      .subscribe((data: ICountry[]) => {
        this.countries = data;
      });
  }


  navigateCoutryDetailWithParams(country: ICountry) {
    this.router.navigate(['/countries', country.id], {
      state: {
        country
      }
    });
  }
}
Angular routing parameters using router state
We can use route state objects to pass data to our navigating component. The state object is defined as a property of the NavigationExtras object passed as the second argument to the navigate or navigate API of the router object. In the above example, we are passing country object is pass in router state object, an advantage is that it will not appear in URL.
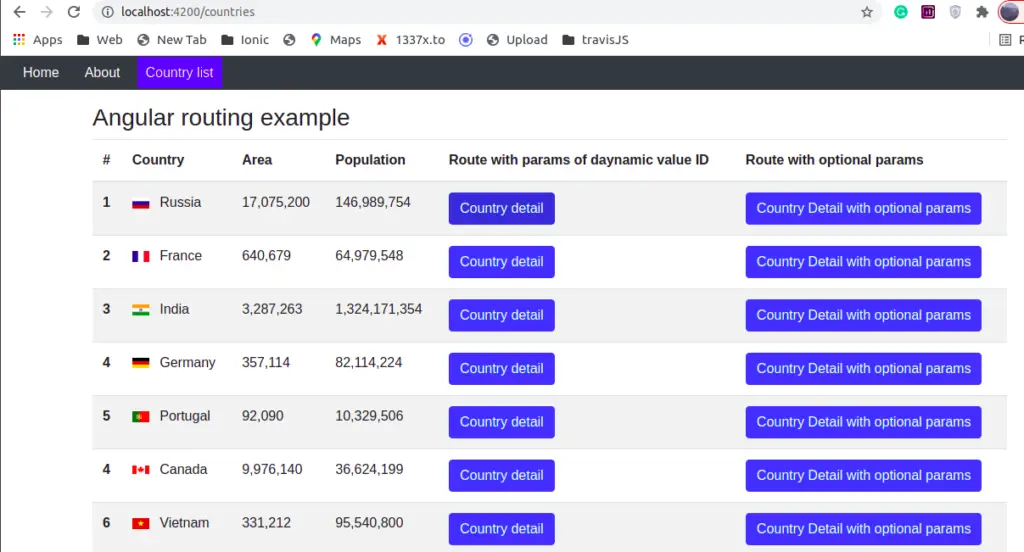
We also have to loop through countries array objects and at routerLink property to navigate and pass router params.
<div class="m-3">
    <h3>Angular routing example</h3>
    <table class="table table-striped">
        <thead>
            <tr>
                <th scope="col">#</th>
                <th scope="col">Country</th>
                <th scope="col">Area</th>
                <th scope="col">Population</th>
                <th scope="col">Route with params of daynamic value ID</th>
                <th scope="col">Route with optional params</th>
            </tr>
        </thead>
        <tbody>
            <tr *ngFor="let country of countries; index as i">
                <th scope="row">{{ country.id }}</th>
                <td>
                    <img [src]="'https://upload.wikimedia.org/wikipedia/commons/' + country.flag" class="mr-2"
                        style="width: 20px">
                    {{ country.name }}
                </td>
                <td>{{ country.area | number }}</td>
                <td>{{ country.population | number }}</td>
                <td>
                    <button [routerLink]="['/countries', country.id]"
                     [queryParams]="{by: 'edupala.com'}">
                        Country detail
                    </button>
                </td>
                <td>
                    <button (click)="navigateCoutryDetailWithParams(country)">
                        Country Detail with optional params
                    </button>
                </td>
            </tr>
        </tbody>
    </table>
</div>
Reading or retrieving Angular routing parameters
Now on our countryDetails component, we have to retrieve our id from the URL using activeRoute object. There are two approaches to accessing the value in a route this is in a URL
Using snapshot
The router state snapshot represents the state of the application at a moment in time. Snapshot provides instance access to route parameters. But components can stay active for hours, but if route params change, then the snapshot holds only params at moment. So we won’t get new params. We need to inject ActivatedRoute into our constructor.
constructor(private activatedRoute: ActivatedRoute) {}

ngOnInt() {
     const id = this.activatedRoute.snapshot.params['id'];
}
Using params as observable
We can use activatedRoute param as observable, we get change value on route params by subscribing to it.
 this.activatedRoute.params.subscribe ( r => {
 ...
 })
Reading data from state object
Once we navigate successfully to our request component, in our case it is about countryDetails component. We can read data from state objects using getCurrentNavigation method we called extras to object containing the state object.
constructor(private router: Router) {
  if (this.router.getCurrentNavigation()?.extras.state) {
      const routeState = this.router.getCurrentNavigation()?.extras.state;
      if (routeState) {
        const country = routeState.country;
        console.log('Country detail: ', country);

      }
    }
}

or in ngOnInt
ngOnInt() {
   const data = history.state.country;
}
We have discussed how to read, query params, let’s add the full code of reading queryparam from route to our routed component countryDetails. Let’s edit it typescript and next template to read data from the route.
import { HttpClient } from '@angular/common/http';
import { Component, OnInit } from '@angular/core';
import { ActivatedRoute, Router } from '@angular/router';
import { ICountry } from 'src/app/models/country.model';

@Component({
  selector: 'app-country-details',
  templateUrl: './country-details.component.html',
  styleUrls: ['./country-details.component.scss']
})
export class CountryDetailsComponent implements OnInit {
  countries: ICountry[] = [];
  country: ICountry | undefined;

  constructor(
    private activatedRoute: ActivatedRoute,
    private router: Router,
    private http: HttpClient) {
    if (this.router.getCurrentNavigation()?.extras.state) {
      const routeState = this.router.getCurrentNavigation()?.extras.state;
      if (routeState) {
        const country = routeState.country;
        console.log('Country detail: ', country);

      }
    }
  }

  ngOnInit(): void {
    // const data = history.state.country;
    const id = this.activatedRoute.snapshot.params['id'];
    debugger
    debugger
    this.http.get<ICountry[]>('./assets/data/countries.json')
      .subscribe((data: ICountry[]) => {
        this.countries = data;
        this.activatedRoute.params.subscribe(r => {
          this.country = this.countries.find(i => i.id === r.id);
        });
      });

  }
}
<div class="card" style="width: 18rem;">
<img class="card-img-top" [src]="'https://upload.wikimedia.org/wikipedia/commons/' + country?.flag"
alt="Card image cap">
<div class="card-body">
<h5 class="card-title">{{ country?.name }}</h5>
<div class="card-text">
<p> Population: {{ country?.population }}</p>
<p>Area: {{ country?.area }}</p>
</div>
</div>
</div>You can read up more on the Angular routing, please check the official Angular Docs.
Conclusion
We have completed our Angular routing tutorial, we have learned how to use angular routing, how we can pass and read data from the route, and activatedRoute objects.
Related Articles