Ionic Reactive forms allow us to configure our form in greater control. We build the form model objects programmatically in typescript (including validation form rules), and the form binds (and syncs) to the template. Whereas template-driven form we validate form inside our component template. In our previous article, we have discussed Ionic angular form types and demonstrated how to use and validate the template-driven form.
We have three goals behind this tutorial. First, we’ll explore how to create an Ionic reactive form at scratch, secondly how to validate the reactive form, and at last how to apply a different style on the form label when we get an error using form status control CSS classes.
Setting up Ionic reactive form project
Unlike template-driven forms, with reactive forms, we can define the entire tree of Ionic Angular form control objects in your component code, and then bind them to native form control elements in your template. Because the component has access to the form controls as well as the backing data model. Let create an Ionic reactive form using an angular framework and run the following command.
ionic start reactiveFormEx blank --type=angularTo use the reactive form we need to import ReactiveFormModule in our component and let add it to our home.module.ts file.
import { NgModule } from '@angular/core';
import { CommonModule } from '@angular/common';
import { IonicModule } from '@ionic/angular';
import { ReactiveFormsModule } from '@angular/forms';
import { HomePage } from './home.page';
import { HomePageRoutingModule } from './home-routing.module';
@NgModule({
imports: [
CommonModule,
ReactiveFormsModule,
IonicModule,
HomePageRoutingModule
],
declarations: [HomePage]
})
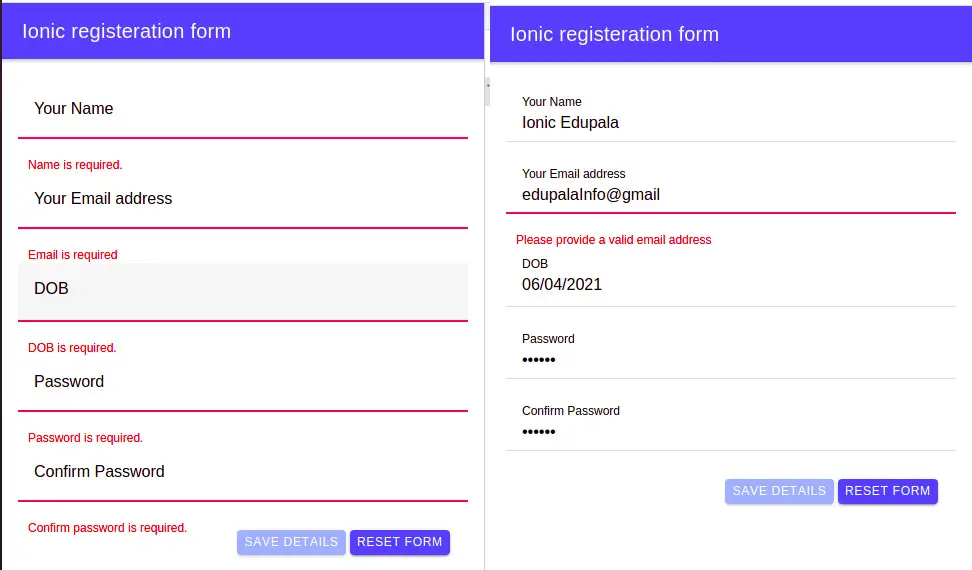
export class HomePageModule {}Here is a screenshot of Ionic reactive form example 1
We have two examples of Ionic reactive form validation, first, we will use the Validators class from angular/form, and second, we will use the helper class. In ionic, Angular has FormBuilder, which is a helper class. Using the FormBuilder we can programmatically build our forms and use that logic to control the input fields and form the state in our templates. The FormBuilder, a helper class that allows developers to take the following advantage:
- Implement validation rules for the input field.
- Listening for value changes on input fields.
- Updating the form UI to help guide user behavior (I.e. disabling buttons where required input fields have not been completed & displaying error messages).
The FormBuilder class is designed to help us to build the form model with less code. We need to inject the FormBuilder into our component’s class and use its methods as listed below.
| Method | Purpose | Arguments | Returns |
| group | Create a form group | Configuration object, extra parameters (validators, async validators) | FormGroup |
| control | Create a form control | Current form state (value/disabled status), an array of validators, an array of async validators. | FormControl |
| array | Create a form array | Configuration object (array), validator, async validator | FormArray |
In our form we have a different element, we have validation on required, min length, and valid email formats. Let’s edit our home.page.ts file.
import { Component } from '@angular/core';
import { FormBuilder, FormGroup, Validators } from '@angular/forms';

@Component({
  selector: 'app-home',
  templateUrl: 'home.page.html',
  styleUrls: ['home.page.scss'],
})
export class HomePage {
  form: FormGroup;
  submitted = false;

  constructor(private fb: FormBuilder) {
    this.form = this.fb.group({
      name: [null, [Validators.required, Validators.minLength(5)]],
      dob: [null, [Validators.required]],
      email: [null, [Validators.required, Validators.pattern("^[a-z0-9._%+-]+@[a-z0-9.-]+\\.[a-z]{2,4}$")]],
      password: [null, [Validators.required, Validators.minLength(6)]],
      confirmPassword: [null, [Validators.required]],
    });
  }

  saveDetails() {
    this.submitted = true;

    // stop here if form is invalid
    if (this.form.invalid) {
      return;
    }

    // display form values on success
    alert('SUCCESS!! :-)\n\n' + JSON.stringify(this.form.value, null, 4));
  }

  onReset() {
    this.submitted = false;
    this.form.reset();
  }
}
In our home.page.html let’s add a form template and access an individual control element to check its control state to validate input. Angular form control elements have different states like touched, dirty, errors, valid, invalid, untouched, and pristine. We can access individual elements using the form.get() method with the name of the individual form control element and then we can check its control status.
<ion-header [translucent]="true">
  <ion-toolbar color="primary">
    <ion-title>
      Ionic registeration form
    </ion-title>
  </ion-toolbar>
</ion-header>

<ion-content [fullscreen]="true">
  <div class="ion-padding">
    <form [formGroup]="form" (ngSubmit)="saveDetails()">
      <ion-list>
        <ion-item class="ion-margin-bottom">
          <ion-label position="floating">Your Name</ion-label>
          <ion-input type="text" formControlName="name"></ion-input>
        </ion-item>
        <small *ngIf="form.get('name').invalid && (form.get('name').dirty ||form.get('name').touched )">
          <small *ngIf="(form.get('name')).errors?.required">Name is required</small>
          <!--question mark(?) is a safe navigation operator-->
          <small *ngIf="(form.get('name')).errors?.minlength">Please enter more than 4 character</small>
        </small>

        <ion-item class="ion-margin-bottom">
          <ion-label position="floating">Your Email address</ion-label>
          <ion-input type="email" formControlName="email"></ion-input>
        </ion-item>

        <div *ngIf="(form.get('email').invalid && (form.get('email')).touched) || (form.get('email')).dirty">
          <small *ngIf="(form.get('email')).errors?.required">Email is required</small>
          <!--question mark(?) is a safe navigation operator-->
          <small *ngIf="(form.get('email')).errors?.pattern">Please provide a valid email address</small>
        </div>


        <ion-item class="ion-margin-bottom">
          <ion-label position="floating">DOB</ion-label>
          <ion-datetime formControlName="dob" displayFormat="MM/DD/YYYY" min="1994-03-14" max="2022-12-09">
          </ion-datetime>
        </ion-item>

        <small *ngIf="form.get('dob').invalid && (form.get('dob').dirty ||form.get('dob').touched )">
          DOB is required.
        </small>

        <ion-item class="ion-margin-bottom">
          <ion-label position="floating">Password</ion-label>
          <ion-input type="password" formControlName="password"></ion-input>
        </ion-item>
        <small *ngIf="form.get('password').invalid && (form.get('password').dirty ||form.get('password').touched )">
          Password is required.
        </small>

        <ion-item class="ion-margin-bottom">
          <ion-label position="floating">Confirm Password</ion-label>
          <ion-input type="password" formControlName="confirmPassword"></ion-input>
        </ion-item>
        <small
          *ngIf="form.get('confirmPassword').invalid && (form.get('confirmPassword').dirty ||form.get('confirmPassword').touched )">
          Confirm password is required.
        </small>

        <ion-item class="ion-float-right" lines="none">
          <ion-button color="primary" [disabled]="!form.valid" type="submit">Save Details</ion-button>
          <ion-button color="primary" (click)="onReset()">Reset Form</ion-button>
        </ion-item>
      </ion-list>
    </form>
  </div>
</ion-content>
Example two of Ionic reactive form validation using helper class
We will create a provider or helper class, where we define our rule of validation for the form control element. Here is a screenshot of our helper class validation.
Create validator class to define a validation rule.
We can create some validation rules to use with the FormBuilder service. We are creating our own custom validation to check if the name contains any number and to check to validate the email id. Create a helper folder in src and add a new file called the validator-helper.ts file and add the following code.
import { Injectable } from '@angular/core';
import { FormControl } from '@angular/forms';

@Injectable({ providedIn: 'root' })
export class Validator {

    constructor() { }
    emailValid(control: FormControl) {
        return new Promise(resolve => {
            const emailPattern = /^\w+([\.-]?\w+)*@\w+([\.-]?\w+)*(\.\w{2,3})+$/;

            if (!emailPattern.test(control.value)) {
                resolve({ InvalidEmail: true });
            }
            resolve(null);
        });
    }

    nameValid(control: FormControl) {
        return new Promise(resolve => {
            const pattern = /[0-9]/;
            if (pattern.test(control.value)) {
                resolve({ InvalidName: true });
            }
            resolve(null);
        });
    }
}
In our helper class, we have to import the Angular Forms, FormControl class which we will use in our subsequent methods to obtain the value from the input field that we are looking to validate. We had to define two methods nameValid and emailValid in validator-helper.ts. The validator-helper.ts is a custom class where both methods use promises to return the results of tests that we perform on the supplied input field value using regular expressions.
Based on regular expression results we will display an error when the regular expression fails, we return the JSON object that will use to display error messages in the HTML template, otherwise, we return the null object indicating validation successful. We can use this validation service to plug into our home.ts class using the FormBuilder service.
Import our custom validator class in our component
In the home component, we are importing 3 angular form services FormBuilder, FormGroup, Validators from ‘@angular/forms’, and our custom validator-helper.ts service provider.
We are using these services to manage the input field logic and validation functionality for the page template. A FormGroup allows us to manage more than one input field (which is quite handy if we have forms with multiple fields that we need to work with) allowing our app to programmatically determine the state of each specified input field (I.e. whether it is valid, has changed, etc).
The FormBuilder service will be used as a utility wrapper to help manage the FormControl and FormGroup services. Validators, as the name implies, provide the ability to validate input fields.
This FormGroup contains 3 FormControls (rendered as key/value pairs) which are used to target each individual input field in our form. Each FormControl is assigned its respective Validators, whereas for the name and email controls we assign our custom validation methods from the Validator service.
We also listen to value changes in the name input field using the valueChanges method of the FormControl object (which gives us access to the EventEmitter, an Observable that allows us to track custom events in our applications).
At last in home-page.ts we implement the saveDetails method which will be used to retrieve the submitted form data. In saveDetails method we have console.dir(value). Let edit home.page.ts to add our own custom form validation in our component.
import { Component } from '@angular/core';
import { FormBuilder, FormGroup, Validators } from '@angular/forms';
import { Validator } from '../helper/validator-helper';

@Component({
  selector: 'app-home',
  templateUrl: 'home.page.html',
  styleUrls: ['home.page.scss'],
})
export class HomePage {
  form: FormGroup;

  constructor(private fb: FormBuilder, private val: Validator) {
    this.form = this.fb.group({
      name: ['', Validators.required, this.val.nameValid],
      email: ['', Validators.required, this.val.emailValid],
      platform: ['', Validators.required]
    });

    const name = this.form.controls.name;
    name.valueChanges.subscribe((value: string) => {
      console.log(`Entered name is ${value}`);
    });
  }

  saveDetails(value) {
    console.dir(value);
  }
}
Note: Specifically, console.log gives special treatment to DOM elements, whereas console.dir does not. The console.dir is often useful when trying to see the full representation of the DOM JS object. Displays an interactive list of the properties of the specified JavaScript object. The output is presented as a hierarchical listing with disclosure triangles that let you see the contents of child objects.
We need to add a form in our home.page.html file to validate the form element.
<ion-header [translucent]="true">
<ion-toolbar color="primary">
<ion-title>
Ionic registeration form
</ion-title>
</ion-toolbar>
</ion-header>
<ion-content [fullscreen]="true">
<div class="ion-padding">
<form [formGroup]="form" (ngSubmit)="saveDetails(form.value)">
<ion-list>
<ion-item class="ion-margin-bottom">
<ion-label position="floating">Your Name</ion-label>
<ion-input type="text" formControlName="name"></ion-input>
</ion-item>
<ion-item class="ion-margin-bottom">
<ion-label position="floating">Your Email address</ion-label>
<ion-input type="email" formControlName="email"></ion-input>
</ion-item>
<ion-item class="ion-margin-bottom">
<ion-label position="floating">Favourite Platform</ion-label>
<ion-select formControlName="platform">
<ion-select-option value="Android">Android</ion-select-option>
<ion-select-option value="iOS">iOS</ion-select-option>
<ion-select-option value="WP">Windows Phone</ion-select-option>
<ion-select-option value="Other">Other</ion-select-option>
</ion-select>
</ion-item>
<ion-item float-right lines="none">
<ion-button color="primary" type="button" [disabled]="!form.valid">
Save Details
</ion-button>
</ion-item>
</ion-list>
</form>
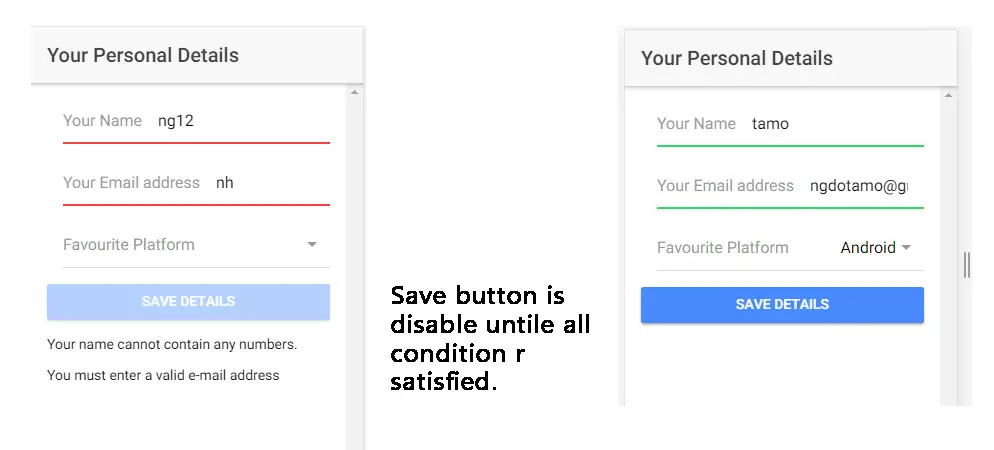
<div *ngIf="(form.get('name')).dirty && !(form.get('name')).valid">
<p *ngIf="(form.get('name')).errors.InvalidName">
Your name cannot contain any numbers.
</p>
</div>
<div *ngIf="(form.get('email')).dirty && !(form.get('email')).valid">
<p *ngIf="(form.get('email')).errors.InvalidEmail">
You must enter a valid e-mail address.
</p>
</div>
</div>
</ion-content>Note: In the home.html we have the formGroup property on our HTML form to create a link with the FormBuilder logic in the component class and the template input fields. We can implement our HTML FormControl with either of the following syntaxes:
We can implement our HTML FormControl with either of the following syntaxes:
formControlName=”name”
The formGroup property is set to a value of form which matches the same property name used in the component class (where we created a FormGroup using the FormBuilder helper).
Each input field has a formControl assigned to it whose value is mapped to the specified FormControl object in the component class (this relationship allows the FormBuilder helper to retrieve each field’s input value).
The ability to submit the form is determined through the FormBuilder object assessing the state of each input field, whether it has data and has successfully passed all applied validation criteria – if not the submit button state remains disabled.
The FormBuilder component logic listens for data entered, determines its validity, and whether any errors have occurred (and, if so, displays these under the form).
Add style to our invalid and error control element
The underlying Angular 2 framework detects the state of the input field and applies its own specific classes to reflect those states:
- ng-dirty (Input field has been interacted with)
- ng-touched (Input field has received focus)
- ng-valid (Data entry has passed validation)
- ng-invalid (Data entry has not passed validation).
We can use the above form control element CSS state to apply style for invalid and error input, labels, and more.
.ion-invalid.ion-touched ion-label {
  color: var(--ion-color-danger);
}

/** For form invalid field for Angular*/
input.ng-invalid.ng-touched{
  border: 1px solid red;
}Note: If you are doing formPatch in a reactive form in Angular, we can easily use the form patchValue method of the form object.
this.form.patchValue(data);This is extra information, I had wasted a few hours of the patch radio button field in a reactive form, it didn’t work on number value, as mine form field value is in number. So we need to convert its value to a string, as the radio button work on a string. Later when we are updating to a server we can convert it from string to number.
 this.form.patchValue(data);
 this.form.patchValue({amount: data.amount.toString()})
Conclusion
In this article, we have explored details of the Ionic reactive form in Angular applications. We learned different ways of validating the reactive form. I hope that this article was able to get you up and running with Ionic reactive form.
Related posts
Pingback: Google