In the previous article, we learned how to use the template-driven form in an Ionic Angular project. In these articles, we will learn Ionic Template-driven Form Validation using an Angular framework. HTML provides basic features for displaying forms, validating entered values, and buttons to submit data to the server.
But HTML forms may not be good enough for real-world applications, we need a way to programmatically process the entered data, apply custom validation rules, display user-friendly error messages, transform the format of the entered data, and choose the way data is submitted to the server.
Angular offers rich support for handling forms. It goes beyond regular data binding by treating form fields as first-class citizens and providing fine-grained control over form data.
In this tutorial we’ll explored how to create an Ionic template driven form at scratch and validate the template form and how we can apply CSS style for invalid or error input and its label.
Example on Ionic template-driven form validation.
In our previous, we have discussed Angular provides two forms, template and reactive form. With the template-driven API, forms are fully programmed in the component’s template using directives, and the model object is created implicitly by Angular. Because we’re limited to HTML syntax while defining the form, the template-driven approach suits only simple forms. Let’s create an Ionic template-driven form project.
ionic start MyFormValidation blank –type=angularWe have many ways of implementing form validation, we will have used two examples. In the first approach, validate a form before submitting the form by using local references to the fields in a form. Edit the following code in the home template.
<ion-header [translucent]="true">
<ion-toolbar>
<ion-title>
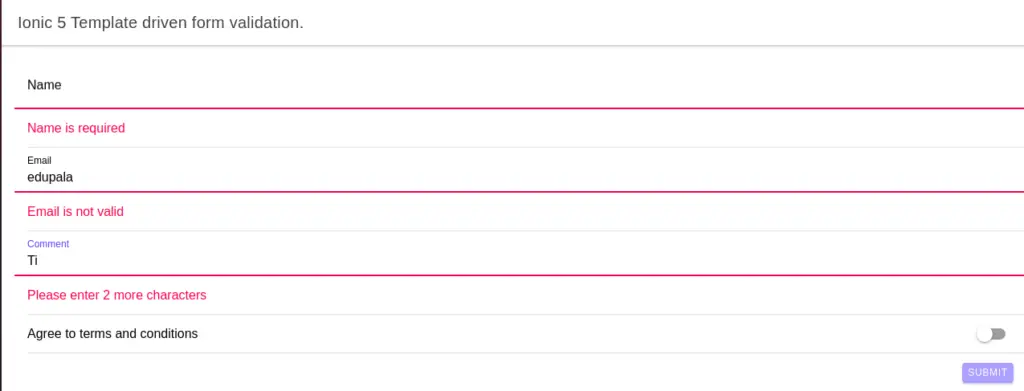
Ionic 5 Template driven form validation.
</ion-title>
</ion-toolbar>
</ion-header>
<ion-content [fullscreen]="true">
<div class="ion-padding">
<form #f="ngForm" novalidate (ngSubmit)="onSubmit(f)">
<ion-list>
<ion-item>
<ion-label position="floating">Name</ion-label>
<ion-input type="text" name="name" required [(ngModel)]="data.name" #nameCtrl="ngModel"></ion-input>
</ion-item>
<ion-item *ngIf="!nameCtrl.valid && nameCtrl.touched">
<ion-text color="danger">Name is required</ion-text>
</ion-item>
<ion-item>
<ion-label position="floating">Email</ion-label>
<ion-input type="email" name="email" required [(ngModel)]="data.email" #emailCtrl="ngModel" email></ion-input>
</ion-item>
<ion-item *ngIf="!emailCtrl.valid && emailCtrl.touched">
<ion-text color="danger">Email is not valid</ion-text>
</ion-item>
<ion-item>
<ion-label position="floating">Comment</ion-label>
<ion-input type="text" required minlength="4" name="comment" [(ngModel)]="data.comment"
#commentCtrl="ngModel"></ion-input>
</ion-item>
<ion-item *ngIf="!commentCtrl.valid && commentCtrl.touched">
<ion-text color="danger">
Please enter
{{ 4 - (f.controls.comment.errors.minlength ? f.controls.comment.errors.minlength.actualLength : 0) }} more
characters
</ion-text>
</ion-item>
<ion-item>
<ion-label>Agree to terms and conditions</ion-label>
<ion-toggle [(ngModel)]="data.tos" name="tos" type="button" (click)="noSubmit($event)"></ion-toggle>
</ion-item>
<ion-item [hidden]="(!isSubmitted) || (f.controls.tos && data.tos)" class="note danger">
<ion-text color="danger">Please check Agree</ion-text>
</ion-item>
<ion-item class="ion-float-right" lines="none">
<ion-button type="submit" size="small" [disabled]="!f.valid">Submit</ion-button>
</ion-item>
</ion-list>
</form>
</div>
</ion-content>In our home.page.html we have # is used to make local variables. The #f variable refers to ngForm which is automatically created by angular. This is a special object that contains all information related to the current form. The (ngSubmit) an event will trigger the onSubmit(f) method whenever the user clicks on the submit button of our form. The required is the default HTML attribute we can add to input.
Add validation attribute|property in template-driven form.
The email attribute on email input is a directive made available by Angular which makes sure that it is actually a valid email address type. We have added property binding disabled on the submit button to enable or disable depending on the form validation state. We have the local reference on form elements with ngModel like #nameCtrl=”ngModel” and use references on a template to check form element validation.
<ion-item>
  <ion-label position="floating">Name</ion-label>
  <ion-input type="text" name="name" required [(ngModel)]="data.name" #nameCtrl="ngModel"></ion-input>
</ion-item>

<ion-item *ngIf="!nameCtrl.valid && nameCtrl.touched">
  <ion-text color="danger">Name is required</ion-text>
</ion-item>
Angular form Control status CSS classes for ionic form validation
Angular adds a couple of classes on form elements to indicate form element validation status. Angular automatically mirrors many control properties onto the form control element as CSS classes. We can use these classes to style form to show warnings or style the form elements according to the state of the form element. The following classes are currently supported.
- pristine: Data entry has not been touched.
- dirty: (Input field has been interacted with).
- touched: (Input field has received focus).
- valid: (Data entry has passed validation)
- invalid: (Data entry has not passed validation)
- errors: Where data entry has not satisfied the rule
We can add red color on the invalid field label we need to add the following style in global.scss as.
/** For form invalid field for Ionic Angular*/
.ion-invalid.ion-touched ion-label {
    color: var(--ion-color-danger);
}

/** For form invalid field for Angular*/
input.ng-invalid.ng-touched{
    border: 1px solid red;
}
Edit the home.page.ts file to initialize our data value.
import { Component } from '@angular/core';
import { NgForm } from '@angular/forms';

@Component({
  selector: 'app-home',
  templateUrl: 'home.page.html',
  styleUrls: ['home.page.scss'],
})
export class HomePage {
  data: any;
  isSubmitted = false;

  constructor() {
    this.data = {
      name: '',
      email: '',
      comment: '',
      tos: false
    };
  }

  onSubmit(myForm: NgForm) {
    this.isSubmitted = true;
    console.log('onSubmit');
    console.log(myForm);
  }

  noSubmit(e) {
    e.preventDefault();
  }
}
Ionic Template-driven Form Validation after form submitted
In the second approach for validating an example, we check form validation after submission. The forms by using local form reference controls and the Boolean variable isSubmitted, we will use this variable to check whether the form is submitted or not.
<ion-header>
  <ion-toolbar>
    <ion-title>
      Ionic Template Drive
    </ion-title>
  </ion-toolbar>
</ion-header>

<ion-content>
  <div class="ion-padding">
    <form #f="ngForm" novalidate (ngSubmit)="onSubmit(f)">
      <ion-list>
        <ion-item>
          <ion-label position="floating">Name</ion-label>
          <ion-input type="text" name="name" required [(ngModel)]="data.name"></ion-input>
        </ion-item>

        <ion-item [hidden]="f.controls.name && (f.controls.name.valid || (f.controls.name.pristine && !isSubmitted))">
          <ion-text color="danger">Name is required</ion-text>
        </ion-item>

        <ion-item>
          <ion-label position="floating">Phone</ion-label>
          <ion-input type="tel" name="phone" [(ngModel)]="data.phone"></ion-input>
        </ion-item>

        <ion-item>
          <ion-label position="floating">Comment</ion-label>
          <ion-input type="text" required minlength=4 name="comment" [(ngModel)]="data.comment"></ion-input>
        </ion-item>

        <ion-item *ngIf="(isSubmitted && f.controls.comment && f.controls.comment.pristine) || ((f.controls.comment) &&
          (f.controls.comment.dirty && f.controls.comment.errors))">
          <ion-text color="danger">
            Please enter
            {{ 4 - (f.controls.comment.errors.minlength ? f.controls.comment.errors.minlength.actualLength : 0)  }} more
            characters
          </ion-text>
        </ion-item>

        <ion-item>
          <ion-label>Agree to terms and conditions</ion-label>
          <ion-toggle [(ngModel)]="data.tos" name="tos" type="button" (click)="noSubmit($event)"></ion-toggle>
        </ion-item>

        <ion-item [hidden]="(!isSubmitted) || (f.controls.tos && data.tos)" class="note danger">
          <ion-text color="danger">Please check Agree</ion-text>
        </ion-item>
      </ion-list>

      <ion-item float-right lines="none">
        <ion-button type="submit" size="small">Submit</ion-button>
      </ion-item>
    </form>
  </div>
</ion-content>
Validating using ngModelGroup
The ngModelGroup directive creates and binds formGroup instance to a DOM element and can be used as a child of NgForm within form tags. This directive will group inputs, and we need to set ngModelGroup equal to string to indicate the group name. When we submit the form we have our group object in value object containing key-value pair of its all group elements. Use the ngModelGroup directive to validate a sub-group of form separately from the rest of our form.
To validate the formGroup, the ngForm object has a control object which has a group name containing its validation state. All validation classes like ng-dirty touched and other classes are added to formGroup element. We can use these validation CSS class names on the formGroup to apply the style for formGroup validation state
The local reference on the ngModelGroup element gives access to the JavaScript representation of the object of formGroup.
import { Component } from '@angular/core';
import { NgForm } from '@angular/forms';
@Component({
selector: 'app-home',
template: `
<div class="ion-padding">
<form #f="ngForm" (ngSubmit)="onSubmit(f)">
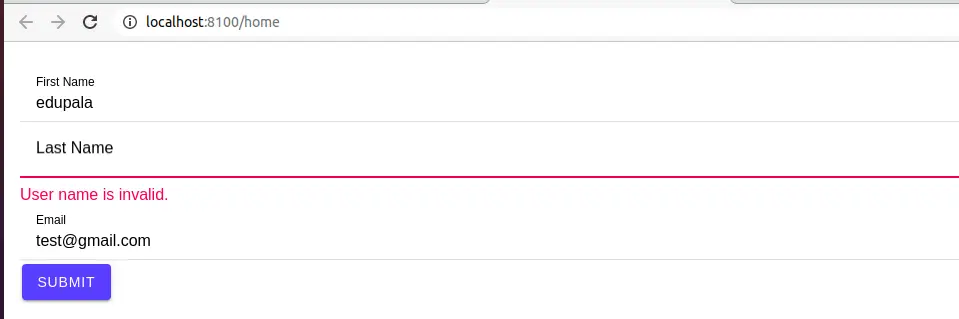
<ion-list ngModelGroup="userName" #userNameCtrl="ngModelGroup">
<ion-item>
<ion-label position="floating">First Name</ion-label>
<ion-input name="first" [ngModel]="name.first" minlength="2"></ion-input>
</ion-item>
<ion-item>
<ion-label position="floating">Last Name</ion-label>
<ion-input name="last" [ngModel]="name.last" required></ion-input>
</ion-item>
</ion-list>
<ion-text *ngIf="userNameCtrl.invalid && userNameCtrl.touched" color="danger">
User name is invalid.
</ion-text>
<ion-item>
<ion-label position="floating">Email</ion-label>
<ion-input name="email" ngModel></ion-input>
</ion-item>
<ion-button type="submit">Submit</ion-button>
</form>
</div>`,
styleUrls: ['home.page.scss'],
})
export class HomePage {
name = { first: '', last: '' };
onSubmit(f: NgForm) {
console.log(f.value); // {name: {first: '', last: ''}, email: ''}
console.log(f.valid); // true/false
}
}Conclusion
In this article, we have explored details of the Ionic template-driven form in Angular applications. We learned different ways of validating the form. I hope that this article was able to get you up and running with the Ionic Angular template-driven form.
Related posts
Pingback: Google