In this tutorial, we’ll learn React search bar using different approaches. In a real application, we might have a large list of data that we have displayed through a table using pagination. Adding a search filter allows us to search any word on a large list, thus it will save time.
We can solve the above issues by providing users with input searches, where users can filter the data based on the user requirements. We need to implement a React search filter to array objects in the input text field.
In this tutorial, we’ll have three objectives, the First implement React search filter using Material UI with a search Icon. Second, create React search component. Third, we’ll React Search filter API on the live server. Let’s get started.
React search bar with Material UI
Let’s first demonstrate React search filter with Material UI. In this example we add Material UI Table directly in our SearchFilter component, it is a good practice to create a separate React table component, just allowing code reusabilities. Check our previous articles on how to create React table component.
Let’s first create React Search Filter project and add the Material UI library.
npx create-react-app search-app
cd search-app
npm install @mui/material @emotion/react @emotion/styled
npm install @mui/icons-material
We need to add the Material UI font and icon in the public/index.js for Material UI.
<link rel="stylesheet"
href="https://fonts.googleapis.com/css?family=Roboto:300,400,500,700&display=swap"/>
<link rel="stylesheet"
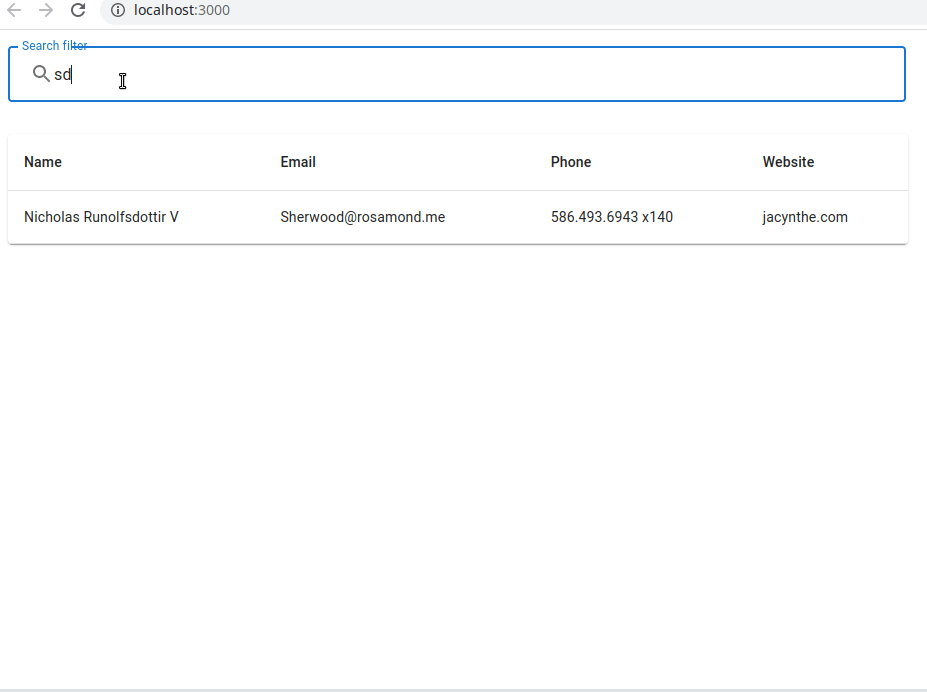
href="https://fonts.googleapis.com/icon?family=Material+Icons"/>Here is a screenshot of our React Search with Material UI.
Let’s create SearchFilter.jsx component to add material input field and table to display the user’s data. We use the Axios library to retrieve data from https://jsonplaceholder.typicode.com/users and we need to create a column for our table. Inside the search component, we need to import Axios.
Let’s add React search filter example, code in component/SearchFilter.jsx. In the above Search filter component, we have
- Axios to retrieve data from remote API when the component is mount
- In the search variable containing the search query, we add a filter on employees’ data names using a search query.
- We used material UI Paper, FormControl, Table components, and its childer component to display employees’ data in two dimension row and column form.
Implement common SearchBar component
In the large application, we may have many search inputs, is best practice to create a separate SearchBar component. Let’s create the SearchBar component and here is a screenshot of search bar component

Let’s add code for the SearchBar component, we can change the search icon position using position props value
import React from 'react';
import InputAdornment from '@mui/material/InputAdornment';
import OutlinedInput from '@mui/material/OutlinedInput';
import InputLabel from '@mui/material/InputLabel';
import FormControl from '@mui/material/FormControl';
import SearchIcon from '@mui/icons-material/Search';

const SearchBar = (props) => {
  return (
    <FormControl sx={{ m: 2, width: '100ch' }}>
      <InputLabel htmlFor='outlined-adornment-amount'>Search filter</InputLabel>
      <OutlinedInput
        id='outlined-adornment-amount'
        onChange={(e) => props.onSearch(e.target.value.toLowerCase())}
        value={props.value}
        startAdornment={
          <InputAdornment position='end'>
            <SearchIcon />
          </InputAdornment>
        }
        label='Search'
      />
    </FormControl>
  );
};

export default SearchBar;
Now we can use this SearchBar component in different components in our application, thus allowing code reusabilities. Let’s replace our previous example with SearchBar instead of FormControl and its subcomponent. Let’s import SearchBar in SearchFilter or any of your components that need this SearchBar component.
import React, { useEffect, useState, Fragment } from 'react';
import SearchBar from './SearchBar';
...


const SearchFilter = () => {
 ...

  const onSearchChange = (searchQuery) => {
    setSearch(searchQuery);
  };

  return isLoading ? (
    <h1>Loading ...</h1>
  ) : (
    <Fragment>
      <SearchBar onSearch={onSearchChange} value={search}/>
      <Paper sx={{ maxWidth: 900, m: 2 }}>
        <Table>
          ...
        </Table>
      </Paper>
    </Fragment>
  );
};

export default SearchFilter;
React Search filter API
Let’s demonstrate the second example where we perform a search on a remote API. On unsplash.com, we search images based on our type in the SearchBar component. For this example, you need to create an API key at the Unsplash developer account, is free.
Let achieve React search filter API, we need to create a few components and files. Here is our screenshot of React search filter API on Unsplash.com

Step 1: Create an Unsplash API file
In the src folder create a folder called api, in this folder, we add all our remote APIs and let create a file called unsplash.js inside the API folder.
import axios from 'axios';

export default axios.create({
  baseURL: 'https://api.unsplash.com',
  headers: {
    Authorization:
      'your api',
  },
});
Step 2: Let’s edit the App.js file to perform a search filter
We have used the Axios library to filter and retrieve search queries from Unsplash API. Axios is a simple promise-based HTTP client for the browser and node.js. In the APP component, we import SearchBar and ImageList components. We need to create an ImageList component, based on user typing on SearchBar component input we call API to retrieve data from a remote server. Let’s edit the App.js file
import { useState } from 'react';
import unsplash from './api/unsplash';
import SearchBar from './components/SearchBar';
import ImageList from './components/ImageList';

function App() {
  const [images, setImages] = useState([]);

  const onSearchChange = async (query) => {
    const response = await unsplash.get('/search/photos', {
      params: { query },
    });
    setImages(response.data.results);
  };

  return (
    <div style={{ margin: '10px' }}>
      <SearchBar onSearch={onSearchChange} />
      <ImageList images={images} />
    </div>
  );
}

export default App;
The onSearchChange function is invoked every time the user types something, this will call the Unsplash API with the search query and data we get from the remote API set to the images variable.
Step 3 Displaying images
The ImageList component receives images as props, images are displayed on the screen. We used material design components like Grids and Card to display images. Let’s edit the ImageList.jsx component
import React from "react";
import Card from "@mui/material/Card";
import CardContent from "@mui/material/CardContent";
import CardMedia from "@mui/material/CardMedia";
import Typography from "@mui/material/Typography";
import Grid from "@mui/material/Grid";

const ImageList = ({ images }) => {
  const imageCard = (image) => {
    return (
      <Card sx={{ maxWidth: 500 }}>
        <CardMedia
          height="250"
          component="img"
          image={image.urls.regular}
          alt={image.description}
        />
        <CardContent>
          <Typography gutterBottom variant="h5" component="div">
            {image.description}
          </Typography>
        </CardContent>
      </Card>
    );
  };

  if (!images) {
    return;
  }
  return (
    <Grid container spacing={1}>
      {images.map((image) => (
        <Grid item key={image.id} xs={12} sm={4}>
          {imageCard(image)}
        </Grid>
      ))}
    </Grid>
  );
};

export default ImageList;
Conclusion
We learn how how to perform a search filter in React, and also demonstrated a search filter on Remote API. I hope you have learned something, if you really feel this article is good, then please share it. In the next tutorial, we’ll learn about Debounce on search. Calling remote API every time a user types something on search input is not good practice, it caused performance issues, unnecessary rendering, and some APIs are expensive. We can use Debounce to search only after a few milliseconds after the user stopped typing.
Related Post