In this tutorial, we’ll learn how to add Angular phone number format to add Angular international phone number on input. We’ll demonstrate two examples of Angular phone numbers using Bootstrap, a material design library, and demonstrate an example of an Angular international phone number with a flag on input.
We can use the ngx-intl-tel-input library package to add International Telephone Input. This library allows us to enter and validate international telephone numbers and it also has the flag dropdown to any input, detects the user’s country, displays a relevant placeholder, and provides formatting/validation methods.
Setting up and configuring Angular phone number format project
To demonstrate Angular international phone number input, we are using the ngx-intl-tel-input, this library has a lot of dependencies, which we will implement step by step. This library allows us to add Angular phone number input with a list of the country flags and their international number code.
To implement the ngx-intl-tel-input properly, we have to follow these steps.
- Create angular project
- Install ngx-intl-tel-input library
- Install dependency libraries like intl-tel-input, google-libphonenumber, ngx-bootstrap
- Add intl-tel-input CSS file in angular.json styles [] object
- Add and use ngx-intl-tel-input component in our component template.
Let’s get started and follow each step one by one.
Step 1: Create Angular international phone number application
ng new internationalPhoneApp
cd internationalPhoneApp
Step 2: Install the ngx-intl-tel-input for Angular phone number input
npm i ngx-intl-tel-input --saveWe have to import NgxIntlTelInputModule in the app.module.ts to use Angular international phone numbers. We’ll import it later, and first install all the required dependencies of this library.
Step 3: Install the dependency library of the ngx-intl-tel-input
npm i @types/intl-tel-input --save
npm install google-libphonenumber --save
ng add ngx-bootstrap
Once we had installed all required libraries, let’s edit the app.module.ts file to import all required modules.
import { NgModule } from '@angular/core';
import { BrowserModule } from '@angular/platform-browser';
import { AppRoutingModule } from './app-routing.module';
import { AppComponent } from './app.component';
import { NgxIntlTelInputModule } from 'ngx-intl-tel-input';
import { FormsModule, ReactiveFormsModule } from '@angular/forms';
import { BrowserAnimationsModule } from '@angular/platform-browser/animations';
import { TooltipModule } from 'ngx-bootstrap/tooltip';

@NgModule({
  declarations: [
    AppComponent
  ],
  imports: [
    BrowserModule,
    AppRoutingModule,
    FormsModule,
    ReactiveFormsModule,
    NgxIntlTelInputModule,
    BrowserAnimationsModule,
    TooltipModule.forRoot()
  ],
  providers: [],
  bootstrap: [AppComponent]
})
export class AppModule { }
Step 4: Add intl-tel-input CSS file in angular.json styles [] object
...
"styles": [
  "./node_modules/intl-tel-input/build/css/intlTelInput.css",
  "src/styles.scss"
],
...
Angular international phone number example
Now we had completed the configuration of our Angular project, let’s now add the ngx-intl-tel-input component to our component template. We have also added angular phone number validation.
Let’s define form input control and add Angular phone number validation required on phone input.
import { Component } from '@angular/core';
import { FormGroup, FormControl, Validators } from '@angular/forms';
import { SearchCountryField, CountryISO, PhoneNumberFormat } from 'ngx-intl-tel-input';

@Component({
  selector: 'app-root',
  templateUrl: './app.component.html',
  styleUrls: ['./app.component.scss']
})
export class AppComponent {
 separateDialCode = true;
 SearchCountryField = SearchCountryField;
 CountryISO = CountryISO;
 PhoneNumberFormat = PhoneNumberFormat;

 preferredCountries: CountryISO[] = [CountryISO.UnitedStates,
  CountryISO.UnitedKingdom];

 phoneForm = new FormGroup({
    phone: new FormControl(undefined, [Validators.required])
  });
}
In our component template, let’s add the ngx-intl-tel-input component.
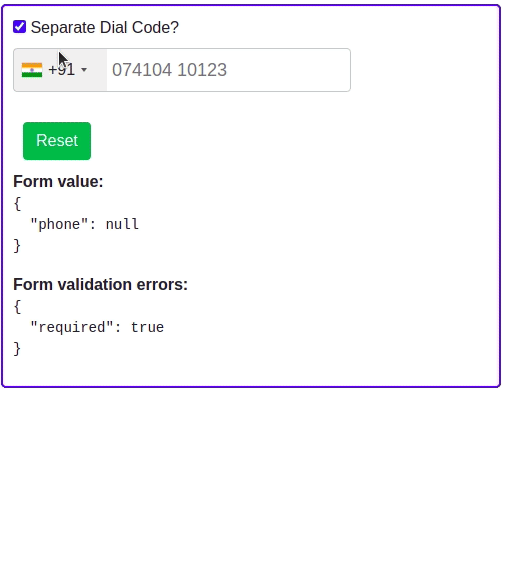
<section>
<div class="wrapper">
<input type="checkbox" [(ngModel)]="separateDialCode" />
<label> Separate Dial Code?</label>
</div>
<form #f="ngForm" [formGroup]="phoneForm">
<div class="wrapper">
<ngx-intl-tel-input
[cssClass]="'custom'"
[preferredCountries]="preferredCountries"
[enableAutoCountrySelect]="true"
[enablePlaceholder]="true"
[searchCountryFlag]="true"
[searchCountryField]="[
SearchCountryField.Iso2,
SearchCountryField.Name
]"
[selectFirstCountry]="false"
[selectedCountryISO]="CountryISO.India"
[phoneValidation]="true"
[separateDialCode]="separateDialCode"
[numberFormat]="PhoneNumberFormat.National"
name="phone"
formControlName="phone"
>
</ngx-intl-tel-input>
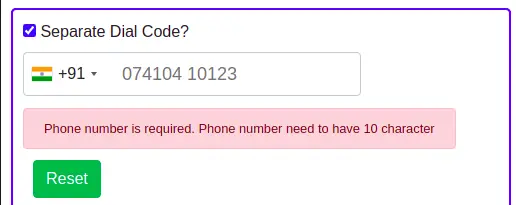
<div style="margin-top: 20px; margin-bottom: 10px">
<small
class="alert alert-danger"
*ngIf="
!phoneForm.controls['phone'].valid &&
phoneForm.controls['phone'].touched
"
>
<span *ngIf="phoneForm.controls['phone'].errors?.['required']">
Phone number is required.
</span>
<span *ngIf="phoneForm.controls['phone'].errors">
Phone number need to have 10 character
</span>
</small>
</div>
</div>
<div class="wrapper">
<button class="btn btn-success" (click)="f.reset()">Reset</button>
</div>
</form>
<div>
<strong>Form value:</strong>
<pre>{{ f.form.value | json }}</pre>
</div>
<div>
<strong>Form validation errors:</strong>
<pre>{{ f.form.controls["phone"].errors | json }}</pre>
</div>
</section>
<router-outlet></router-outlet>We have completed the ngx-intl-tel-input, you can refer to the official document of ngx-intl-tel-input on the option available in this library.
Angular material phone number with international flag and code
In our second example, we’ll demonstrate Angular international phone numbers using the ngx-mat-intl-tel-input library. Here is a screenshot of our example.

We need to install Angular material for this library, let’s create a new project and install the following libraries.
ng new telphoneMat
cd telphoneMat
ng add @angular/material
npm i ngx-mat-intl-tel-input --save
npm install libphonenumber-js --save
We have imported all dependencies of the ngx-mat-intl-tel-input library and we need to import NgxMatIntlTelInputModule, material library and component need for this example.
import { NgModule } from '@angular/core';
import { ReactiveFormsModule } from '@angular/forms';
import { BrowserModule } from '@angular/platform-browser';
import { NgxMatIntlTelInputModule } from 'ngx-mat-intl-tel-input';
import { AppRoutingModule } from './app-routing.module';
import { AppComponent } from './app.component';
import { BrowserAnimationsModule } from '@angular/platform-browser/animations';
import { MatFormFieldModule } from '@angular/material/form-field';
import { MatInputModule } from '@angular/material/input';

@NgModule({
  declarations: [
    AppComponent
  ],
  imports: [
    BrowserModule,
    AppRoutingModule,
    ReactiveFormsModule,
    NgxMatIntlTelInputModule,
    BrowserAnimationsModule,
    MatFormFieldModule,
    MatInputModule
  ],
  providers: [],
  bootstrap: [AppComponent]
})
export class AppModule { }
Let add reactive form with phone input field with validation required as below in the app.component.ts file
import { Component } from '@angular/core';
import { FormGroup, FormBuilder } from '@angular/forms';

@Component({
  selector: 'app-root',
  templateUrl: './app.component.html',
  styleUrls: ['./app.component.scss']
})
export class AppComponent {
  phoneForm = new FormGroup({});

  constructor(private fb: FormBuilder) {
    this.phoneForm = this.fb.group({
      phone: "+919876543210"
    });
  }
}
We need to add the ngx-mat-intl-tel-input component in the app.component.html file.
<div class="container">
  <section>
    <form [formGroup]="phoneForm">
      <div class="form-width">
        <mat-form-field appearance="outline">
          <mat-label>Angular material international phone input</mat-label>
          <ngx-mat-intl-tel-input formControlName="phone" [enablePlaceholder]="true" [enableSearch]="true" name="phone"
            #phone>
          </ngx-mat-intl-tel-input>
          <mat-hint>eg : {{phone.selectedCountry.placeHolder}}</mat-hint>
        </mat-form-field>
      </div>
    </form>
  </section>
</div>Conclusion
We learned how to add phone number format and Angular phone number validation in our Angular project. I hope you had learned something, if so then please share it with others and on social networks, this will encourage me to add more content. Follow me on my GitHub collection, I had code on Angular, react, and Ionic framework.
Related Post
- How to implement angular material date picker in Angular .?
- How to implement Angular date picker in Angular?
- How to implement an Angular search filter in Angular?
- How to calculate base64 image size in Angular
- How to install Angular material
- How to implement CKEditor in Angular
- How to use to implement HighCharts Angular