The ionic framework is amazing, it has lots of pre-built components like modal, alert, toast, and Ionic tabs is one of them. We have two options for creating an ionic tabs project first by using a predefined template from ionic and second by our own custom tabs. In this tutorial, we’ll learn both predefine ionic tabs and create our own ionic custom tabs so that we can learn how to add and use tabs on the Ionic angular project.
We have three objectives behind this tutorial, first will learn how to use the Ionic tabs component, and second how to create our Ionic custom tabs from scratch. Last how to apply a style to Ionic tabs. Let’s get started.
What are ionic tabs component ?
Tabs in general are a way of organizing content into separate views where only one view can be visible at a time. We can easily navigate between each view by clicking on the tab label. Each tab’s label is shown in the ion-tab-bar and the active tab’s label is designated with a different style.
The Ionic tabs are mainly used for mobile navigation and we have to see tabs are commonly used at bottom of an application. The Tab component used a router outlet to handle navigation. Ionic tabs component composed of sub-component like.
| Subcomponents | Description |
| ion-tab-bar | The tab bar is a UI component that contains a set of tab buttons and it is provided inside of tabs to communicate with each tab. |
| ion-tab-button | It is a UI component that is placed inside of a tab bar. It specifies the layout of the icon and label and connects to the tab view. |
How to create ionic tabs from ionic tabs template.
The ionic framework allows us to create an Ionic project from premade ionic tabs template. Tabs is not only a pre-made template from the Ionic framework, we have a few Ionic templates like lists, conferences, and more. Run the command below to create an ionic project for tabs, we don’t have to create routing and navigation. Ionic will create a project with three tabs and we just have to change the page name and tabs according to our needs. The screenshot is the default ionic tabs template.
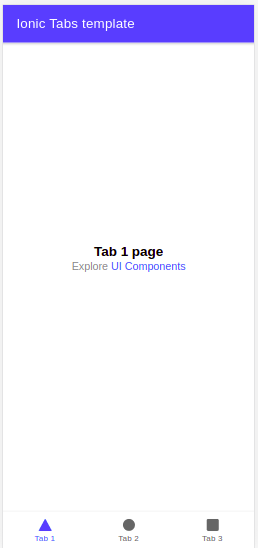
ionic start tabsApp tabs --type=angular
In the Ionic start tabs command, we need to add our project name and select our framework, in our case we are using the Angular framework. Each tab contains different information associated with each tab button. Clicking on each button on the tabs will display its corresponding data and hide other unclick tab contents. The aims of this tutorial are to learn how to create a custom tab and how to add children routing inside a tab page.
How to create custom Ionic Tabs from Scratch ?
We can create our own Ionic custom tabs so that we can learn how to configure routing and navigation in ionic projects. With the release of ionic version 4, no longer limited to angular, we can create the ionic projects in different front-end frameworks like Angular, Vue, and React. Here is a screenshot of the ionic tabs angular project and we have four ionic child tabs button components as.
- Home.
- Schedule with ionic bage component.
- Speaker
- Setting

We have added an ionic badge inside our ionic tab template. Setting up the Ionic project and creating the required page for ionic tabs. Let’s first create our ionic project and add all required pages needed for tabs and navigation.
ionic start customTabsOnce we execute the above command, it will allow us to select a framework and template. We have to select the Angular framework and select a blank template.

 ionic generate page speakers
 ionic generate page speaker
 ionic generate page schedules
 ionic generate page schedule
 ionic generate page college
 ionic generate page settings
Add dummy data to display in speakers page for tabs example
Add dummy data about speakers in assets/data/data.json, containing data about speakers. We have taken this data from ionic conference apps.
{
  "speakers": [
    {
      "name": "Burt Bear",
      "profilePic": "/assets/img/speakers/bear.jpg",
      "twitter": "ionicframework",
      "about": "Burt is a Bear.",
      "location": "Everywhere",
      "email": "[email protected]",
      "phone": "+1-541-754-3010",
      "id": "1"
    },
    {
      "name": "Charlie Cheetah",
      "profilePic": "/assets/img/speakers/cheetah.jpg",
      "twitter": "ionicframework",
      "about": "Charlie is a Cheetah.",
      "location": "Everywhere",
      "email": "[email protected]",
      "phone": "+1-541-754-3010",
      "id": "2"
    },
    {
      "name": "Donald Duck",
      "profilePic": "/assets/img/speakers/duck.jpg",
      "twitter": "ionicframework",
      "about": "Donald is a Duck.",
      "location": "Everywhere",
      "email": "[email protected]",
      "phone": "+1-541-754-3010",
      "id": "3"
    },
    {
      "name": "Eva Eagle",
      "profilePic": "/assets/img/speakers/eagle.jpg",
      "twitter": "ionicframework",
      "about": "Eva is an Eagle.",
      "location": "Everywhere",
      "email": "[email protected]",
      "phone": "+1-541-754-3010",
      "id": "4"
    },
    {
      "name": "Ellie Elephant",
      "profilePic": "/assets/img/speakers/elephant.jpg",
      "twitter": "ionicframework",
      "about": "Ellie is an Elephant.",
      "location": "Everywhere",
      "email": "[email protected]",
      "phone": "+1-541-754-3010",
      "id": "5"
    },
    {
      "name": "Gino Giraffe",
      "profilePic": "/assets/img/speakers/giraffe.jpg",
      "twitter": "ionicframework",
      "about": "Gino is a Giraffe.",
      "location": "Everywhere",
      "email": "[email protected]",
      "phone": "+1-541-754-3010",
      "id": "6"
    },
    {
      "name": "Isabella Iguana",
      "profilePic": "/assets/img/speakers/iguana.jpg",
      "twitter": "ionicframework",
      "about": "Isabella is an Iguana.",
      "location": "Everywhere",
      "email": "[email protected]",
      "phone": "+1-541-754-3010",
      "id": "7"
    },
    {
      "name": "Karl Kitten",
      "profilePic": "/assets/img/speakers/kitten.jpg",
      "twitter": "ionicframework",
      "about": "Karl is a Kitten.",
      "location": "Everywhere",
      "email": "[email protected]",
      "phone": "+1-541-754-3010",
      "id": "8"
    },
    {
      "name": "Lionel Lion",
      "profilePic": "/assets/img/speakers/lion.jpg",
      "twitter": "ionicframework",
      "about": "Lionel is a Lion.",
      "location": "Everywhere",
      "email": "[email protected]",
      "phone": "+1-541-754-3010",
      "id": "9"
    },
    {
      "name": "Molly Mouse",
      "profilePic": "/assets/img/speakers/mouse.jpg",
      "twitter": "ionicframework",
      "about": "Molly is a Mouse.",
      "location": "Everywhere",
      "email": "[email protected]",
      "phone": "+1-541-754-3010",
      "id": "10"
    },
    {
      "name": "Paul Puppy",
      "profilePic": "/assets/img/speakers/puppy.jpg",
      "twitter": "ionicframework",
      "about": "Paul is a Puppy.",
      "location": "Everywhere",
      "email": "[email protected]",
      "phone": "+1-541-754-3010",
      "id": "11"
    },
    {
      "name": "Rachel Rabbit",
      "profilePic": "/assets/img/speakers/rabbit.jpg",
      "twitter": "ionicframework",
      "about": "Rachel is a Rabbit.",
      "location": "Everywhere",
      "email": "[email protected]",
      "phone": "+1-541-754-3010",
      "id": "12"
    },
    {
      "name": "Ted Turtle",
      "profilePic": "/assets/img/speakers/turtle.jpg",
      "twitter": "ionicframework",
      "about": "Ted is a Turtle.",
      "location": "Everywhere",
      "email": "[email protected]",
      "phone": "+1-541-754-3010",
      "id": "13"
    }
  ]
}
How to configure routing for ionic tabs ?
In our example, our main ionic tab is the college page and we need to configure ionic tabs routing in college.routing.module.ts. We also have to set the college page as the root route and have to remove all other pages like home in app/app.routing.module.ts Let’s first edit the app-routing.module.ts file
import { NgModule } from '@angular/core';
import { PreloadAllModules, RouterModule, Routes } from '@angular/router';

const routes: Routes = [
  { path: '', redirectTo: 'college', pathMatch: 'full' },
  {
    path: 'college',
    loadChildren: () => import('./college/college.module').then( m => m.CollegePageModule)
  },
];

@NgModule({
  imports: [
    RouterModule.forRoot(routes, { preloadingStrategy: PreloadAllModules })
  ],
  exports: [RouterModule]
})
export class AppRoutingModule { }
We will add four tabs inside the college.page.html as shown in our screenshot of the project above. Add the following code in college.page.html
<ion-tabs>
  <ion-icon name="arrow-up-outline" class="icon-button inner-center-btn" (click)="openRequestPage()"></ion-icon>

  <ion-tab-bar slot="bottom" class="bottom-tab-bar">

    <ion-tab-button tab="home">
      <ion-icon mode="md" name="home"></ion-icon>
      <ion-label>Home</ion-label>
    </ion-tab-button>

    <ion-tab-button tab="schedules" class="inner-left-btn">
      <ion-icon name="calendar"></ion-icon>
      <ion-label>Schedule</ion-label>
      <ion-badge>6</ion-badge>
    </ion-tab-button>

    <ion-tab-button class="button-center">

    </ion-tab-button>

    <ion-tab-button tab="speakers" class="inner-right-btn">
      <ion-icon name="people-outline"></ion-icon>
      <ion-label>Speakers</ion-label>
    </ion-tab-button>

    <ion-tab-button tab="settings">
      <ion-icon name="settings"></ion-icon>
      <ion-label>Settings</ion-label>
    </ion-tab-button>

  </ion-tab-bar>
</ion-tabs>
Adding style Ionic tabs example
We can easily customize Ionic tabs using CSS for our above tabs example add the following code in the tabs.page.scss
.tab-button {
    max-width: 200px;
}

::ng-deep ion-icon.icon-button {
    background: #3c457e !important;
    color: white !important;
    border-radius: 50%!important;
}

:host ::ng-deep .tabs-inner {
    position: unset!important;
    contain: size style!important;
  }

  .bottom-tab-bar {
    --background: transparent;
    --border: 0;
  }

  ion-tab-button {
    --background: #3c457e;
    --color:white;
    --color-selected: red;
    --ripple-color: white;
  }


.button-center {
    --background: transparent!important;
    ion-icon {
      height: 40px;
      width: 40px;
      font-size: 60px;
    }
}
ion-tab-bar {
    &:before {
      box-shadow: 0 387px 0 300px #3c457e;
      position: absolute;
      margin-top: -48px;
      padding: 56px;
      border-radius: 65%;
      content: '';
    }
  }

.inner-left-btn {
    border-radius: 0 50% 0 0;
    //create the curved style on the left side of the center
}


.inner-right-btn {
    border-radius: 50% 0 0 0;
    // create the curved style on the right side of the center
}

.inner-center-btn {
    position: absolute;
    left: calc(50% - 35px); // position your button in the center
    bottom: 20px; // position button slightly above the half
    font-size: 70px;
    --background: transparent;
}
On the college.page.scss, we had style ionic tab background color, icon color, and selected tab color.
Configure ionic custom tab routing, in the college-routing.module.ts file, we have already set the college page as the root page in the app-routing.module.ts file. Edit college-routing.module.ts file.
import { NgModule } from '@angular/core';
import { Routes, RouterModule } from '@angular/router';

import { CollegePage } from './college.page';

const routes: Routes = [
  {
    path: 'collegeTab',
    component: CollegePage,
    children: [
      {
        path: 'home',
        loadChildren: () => import('../home/home.module').then( m => m.HomePageModule)
      },
      {
        path: 'schedules',
        children: [
          {
            path: '',
            loadChildren: '../schedules/schedules.module#SchedulesPageModule',
          },
          {
            path: ':id',
            loadChildren:
              '../schedule/schedule.module#SchedulePageModule'
          }
        ]
      },
      {
        path: 'speakers',
        children: [
          {
            path: '',
            loadChildren: '../speakers/speakers.module#SpeakersPageModule'
          },
          {
            path: ':id',
            loadChildren:
              '../speaker/speaker.module#SpeakerPageModule'
          }
        ]
      },
      {
        path: 'settings',
        loadChildren: () => import('../settings/settings.module').then( m => m.SettingsPageModule)
      },
      {
        path: '',
        redirectTo: '/college/collegeTab/home',
        pathMatch: 'full'
      }
    ]
  }, {
    path: '',
    redirectTo: '/college/collegeTab/home',
    pathMatch: 'full'
  }
];

@NgModule({
  imports: [RouterModule.forChild(routes)],
  exports: [RouterModule],
})
export class CollegePageRoutingModule { }
What we have done in the above Ionic tabs routing
- We have set root routing as a college in the app.routing.module.ts file in step
- We have collegeTab tabs route in college.routing.module.ts.
- We have college/collegeTab/speakers, in the college.routing.module.ts file to access all speakers pages.
- To access single speaker details using id, we will use college/collegeTab/speakers/id, we will set up everything in the college.routing.module.ts file.
- The same step is used to access schedules and single schedule details page in collegeTab in college.routing.module.ts.
In college.routing.module.ts, we have to add path: ”, this means if no routing match found then redirectTo: ‘/college/collegeTab/schedules’,
Create a speakers Service
We will work on one example on the speaker’s tab and its children’s routing. Follow the same steps for accessing the schedules tab and its children routing. Create a folder for the provider and add a file speakers-provider.ts. This provider will allow us to access the speaker’s list and the speaker’s detailed information on different pages in our application. Add the following code in the app/provider/speakers-service.ts file
import { Injectable } from '@angular/core';

@Injectable({ providedIn: 'root'})
export class SpeakersService {
  speakers: [];

  constructor() { }

  getSpeakers() {
    return new Promise((resolve: ({ }) => void, reject) => {
      fetch('./assets/data/data.json').then(res => res.json())
        .then((data) => {
          this.speakers = data.speakers;
          resolve(this.speakers);
        }, err => {
          console.log(err);
          reject();
        });
    });
  }

  getSpeaker(id: string) {
    return new Promise((resolve: ({ }) => void, reject) => {
      this.speakers.filter((row: any, index: number) => {
        if (row.id === id) {
          resolve(row);
        }
        if (this.speakers.length === index + 1) {
          reject();
        }
      });
    });
  }

}
We will access all speaker lists in the speakers.page.ts file and we need to import our speaker’s service also to access data. Add the ”following code in the speakers.page.ts file.
import { Component, OnInit } from '@angular/core';
import { SpeakersService } from '../provider/speakers.service';

@Component({
  selector: 'app-speakers',
  templateUrl: './speakers.page.html',
  styleUrls: ['./speakers.page.scss'],
})
export class SpeakersPage implements OnInit {

  speakers: any;
  constructor(private speakerService: SpeakersService) { }

  ngOnInit() {
    this.speakerService.getSpeakers().then(data => {
      this.speakers = data;
    });
  }
}
Add the following code in the speakers.page.html template, to navigate to a speaker page, we need to pass the speaker id in our routing as http://localhost:8100/college/collegeTab/speakers/id
<ion-header>
  <ion-toolbar>
    <ion-title>Speakers</ion-title>
  </ion-toolbar>
</ion-header>

<ion-content>
  <ion-list>
    <ion-grid fixed>
      <ion-row class="ion-align-items-stretch">
        <ion-col size="12" size-md="6" *ngFor="let speaker of speakers">
          <ion-card class="speaker-card">
            <ion-card-header>
              <ion-item detail="false" lines="none" routerLink="/college/collegeTab/speakers/{{speaker.id}}">
                <ion-avatar slot="start">
                  <img [src]="speaker.profilePic" alt="Speaker profile pic">
                </ion-avatar>
                {{speaker.name}}
              </ion-item>
            </ion-card-header>

            <ion-card-content>
              <ion-list>
                <ion-item *ngFor="let session of speaker.sessions">
                  <h3>{{session.name}}</h3>
                </ion-item>

                <ion-item routerLink="/college/collegeTab/schedules/{{speaker.id}}">
                  <h3>About {{speaker.name}}</h3>
                </ion-item>
              </ion-list>
            </ion-card-content>
          </ion-card>
        </ion-col>
      </ion-row>
    </ion-grid>
  </ion-list>
</ion-content>
How to access the sub-child route in the ionic tab route ?
In our case, we are accessing the speaker page which is a subroute of speakers, from the speaker page in ionic tabs through its id. In speaker.page.ts we will get detailed information about a particular speaker with the help of our speaker provider and add the following code in the speaker.page.ts file
import { Component, OnInit } from '@angular/core';
import { ActivatedRoute } from '@angular/router';
import { SpeakersService } from '../provider/speakers.service';

@Component({
  selector: 'app-speaker',
  templateUrl: './speaker.page.html',
  styleUrls: ['./speaker.page.scss'],
})
export class SpeakerPage implements OnInit {
  speaker;
  constructor(
    private route: ActivatedRoute,
    private speakerService: SpeakersService) { }

  ngOnInit() {
    const speakerId = this.route.snapshot.paramMap.get('id');
    if (speakerId) {
      this.speakerService.getSpeaker(speakerId).then((speaker) => {
        this.speaker = speaker;
      });
    }
  }

}
Add the following page in the speaker.page.html template. Here we will display all information about the particular speaker and add the following information in speaker.page.html
<ion-header>
  <ion-toolbar>
    <ion-title>Speaker</ion-title>
  </ion-toolbar>
</ion-header>

<ion-content>
  <ion-card *ngIf="speaker">
    <ion-card-content>
      <img src="{{speaker.profilePic}}">
      <p>Name : {{ speaker.name }}</p>
      <p>Email : {{ speaker.email }}</p>
      <p>Location : {{ speaker.location }}</p>
    </ion-card-content>
  </ion-card>
</ion-content>
Ionic tabs top example
If we want to move our ionic tabs from bottom to top, we can easily achieve it by using the slot attributes. The ion-tab-bar has an attribute slot by default it values is the bottom and if we change its value to the top. Then tabs will move to the top.

How to create Ionic scrollable tabs ?
By default we don’t have a scrollable attribute in tabs, we can add flex and CSS to achieve ionic scrollable tabs. Let’s add a few more tab buttons on our tabs page.
<ion-tabs>
  <ion-tab-bar slot="bottom">
    <ion-tab-button tab="tab1">
      <ion-icon name="triangle"></ion-icon>
      <ion-label>Tab 1</ion-label>
    </ion-tab-button>

    <ion-tab-button tab="tab2">
      <ion-icon name="ellipse"></ion-icon>
      <ion-label>Tab 2</ion-label>
    </ion-tab-button>

    <ion-tab-button tab="tab3">
      <ion-icon name="square"></ion-icon>
      <ion-label>Tab 3</ion-label>
    </ion-tab-button>
  </ion-tab-bar>

</ion-tabs>
The ion-tab-bar is a container that will contain all ion-tab-bar buttons that we want to scroll. To do this we have added the container display as a flexbox and set the overflow-x value to auto.
ion-tab-bar {
    overflow-x: scroll;
    display: flex;
    overflow-x: auto;
    ion-tab-button {
        display: inline-block;
        min-width: 100px;
        width: auto;
    }
}
We can also use ionic segment components to achieve horizontally scrollable buttons.
How to add icon in ionic tab ?
Ionic has lots of pre-built icons, here is the link to the site of the ionic icon. which are ready to use. We can easily change the ionic tab icon by changing the name of the ion-icon.
Edit tabs.page.html to change the ionic tabs icon.
<ion-tabs>
  <ion-tab-bar slot="bottom">
    <ion-tab-button tab="tab1">
      <ion-icon name="home-outline"></ion-icon>
      <ion-label>Home</ion-label>
    </ion-tab-button>

    <ion-tab-button tab="tab2">
      <ion-icon name="cart-outline"></ion-icon>
      <ion-label>Cart</ion-label>
    </ion-tab-button>

    <ion-tab-button tab="tab3">
      <ion-icon name="settings-outline"></ion-icon>
      <ion-label>Setting</ion-label>
    </ion-tab-button>
  </ion-tab-bar>
</ion-tabs>
How to add CSS style to Ionic tabs ?
In our custom tabs example above, we have added our own custom style for tabs. Ionic tabs component has few child components. These child components like ion-tab-bar and ion-tab-button have custom CSS properties that we can use. In case of ion-tab-bar have –background, –border and –color CSS properties.
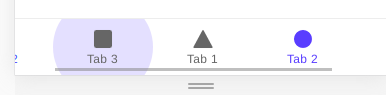
The ion-tab-button supports lots of CSS custom properties this including –background, –background-focused, –color, and more. Here is a screenshot of our second Ionic tabs style example where we have used and applied a few of these custom CSS properties on tabs child components.
Let add tabs CSS custom properties on our ionic tabs child component and edit the tabs.page.scss file.
ion-tab-bar {
  bottom: 60px;
  position: relative;
  --background: var(--ion-color-tertiary);

  ion-tab-button {
    --color: var(--ion-color-medium);
    --color-selected: var(--ion-color-light);

    &.tab-selected::before {
      background-color: var(--ion-color-light);
    }
  }
}
We are using the same ionic tabs template code from the previous example for this example also.
Conclusion
We have learned how to use and implement the ionic tabs component with an example. Tabs are mainly used in mobile applications for navigating between pages. If you want our custom ionic tabs template, then download it from the GitHub repository link here.
Related posts
Thank you very much for the tutorial, great work and good code