Ionic social sharing plugin allows us to share our content with an authorized social media account on mobile devices only. With the release of Ionic 4 and above, we can also use the same sharing functionality in Progressive Native Web, Mobile, and Desktop applications through the Ionic capacitor sharing plugin. In this article, we’ll demonstrate Ionic social sharing using two examples.
- Example first using Ionic Capacitor social sharing plugin
- Example two using Ionic Cordova socail sharing plugin
Sharing content through native has lots of advantages. First, we don’t have to log in to social media, we can share this information with a large number of people and no need to type a title, link, image, and body as all will be programmatically handled directly from apps. We’ll also demonstrate how to use ionic social sharing on WhatsApp.
Ionic capacitor socail sharing
Ionic Capacitor use Share API, which provides methods for sharing content in any sharing-enabled apps the user may have installed. The Share API works on iOS, Android, and the Web (using the new Web Share API), though web support is currently spotty.
Let create an Ionic Capacitor social sharing project and install a social plugin as below.
ionic start socialShare blank --type=angular
cd socialShare
npm install @capacitor/share
npx cap sync
To use the Share object, we need to import Share from ‘@capcitor/share’, and let add the following code in the home.page.ts file.
import { Component } from '@angular/core';
import { Share } from '@capacitor/share';

@Component({
  selector: 'app-home',
  templateUrl: 'home.page.html',
  styleUrls: ['home.page.scss'],
})
export class HomePage {

  openSocial() {
    Share.share({
      title: 'See cool stuff',
      text: 'Really awesome thing you need to see right meow',
      url: 'http://ionicframework.com/',
      dialogTitle: 'Share with buddies',
    });
  }
}
Now on the home.page.html, we add a button to invoke or open openSocial() method, which allows us to share our data through the social network.
<ion-button (click)="openSocial()" fill="clear">
    Social
</ion-button>
Ionic social sharing example using Cordova plugin
In this app, we are creating apps that will allow us to share data to different social media, we can share information to specific media like Whatsapp, or Facebook, email, SMS, and more, which can be handled by native plugin methods. Check more information on the ionic website on Cordova-plugin-x-socialsharing, we are not discussing these in this in this example,
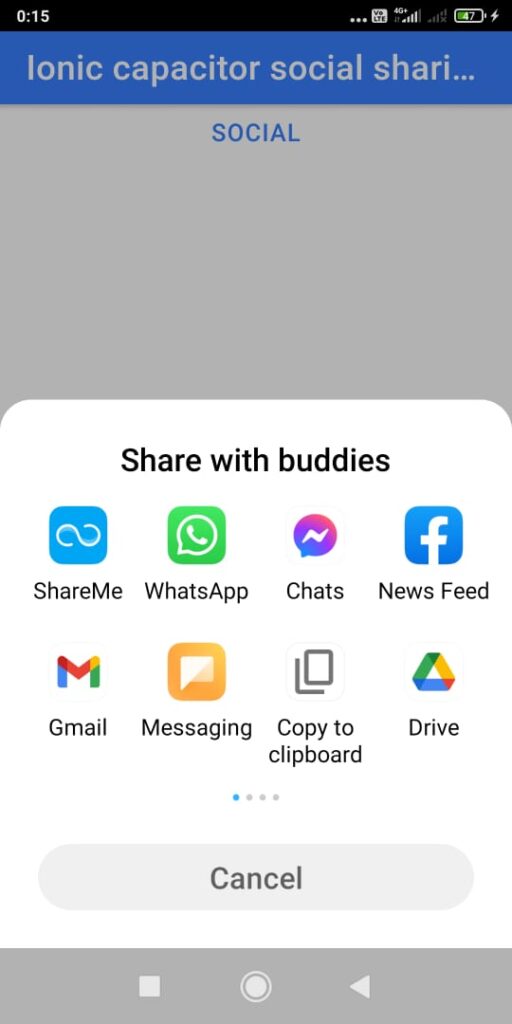
Here is a screenshot of social sharing with WhatsApp and more social networking applications.

Step 1: Let first create an Ionic angular project to demonstrate social sharing.
ionic start linkSocialShare blank type=angular
cd linkSociaShare
Step 2: Add and install social sharing Cordova plugin using the command prompt
ionic cordova plugin add cordova-plugin-x-socialsharing
npm install @ionic-native/social-sharing
Step 3: Add the following code in home-page.html
<ion-header>
  <ion-toolbar>
    <ion-title>
      Social Sharing
    </ion-title>
  </ion-toolbar>
</ion-header>

<ion-content>
  <ion-card>
    <ion-icon name="pin" slot="end" color="primary"></ion-icon>
    <h2 #messageSubject>Ionic Developer</h2>
    <p>May 5, 2019</p>
    <img src="https://source.unsplash.com/category/technology/600x390">

    <ion-card-content>
      <p #messageBody>Wow Ionic 4 is so awesom. I gotta share this to other people.</p>
      <ion-grid>
        <ion-row>
          <ion-col size="6">
            <ion-button color="primary">
              <ion-icon slot="end" name="thumbs-up"></ion-icon>
              <div>12 Likes</div>
            </ion-button>
          </ion-col>
          <ion-col size="3">
            <ion-button (click)="sendShare(messageBody.innerText,
              messageSubject.innerText, 'https://ionicframework.com/docs')">
              <ion-icon slot="icon-only" name="share"></ion-icon>
            </ion-button>
          </ion-col>
          <ion-col size="3">
            <ion-note>
              11h ago
            </ion-note>
          </ion-col>
        </ion-row>
      </ion-grid>
    </ion-card-content>
  </ion-card>
</ion-content>
When we are sharing our content with social media, we need to have a title or subject and content body. In our home.html template, we have
<h2 #messageSubject>Ionic Developer</h2>where local variable #messageSubject has a reference value of h2 DOM node. We have subject Ionic Developer because you will access messageSubject.innerText
Same we have local variable reference to #messageBody
Step 4: Add the following code in home.page.ts, we need to import the SocialSharing object from ‘@ionic-native/social-sharing/ngx’;
import { Component } from '@angular/core';
import { SocialSharing } from '@ionic-native/social-sharing/ngx';

@Component({
  selector: 'app-home',
  templateUrl: 'home.page.html',
  styleUrls: ['home.page.scss'],
})
export class HomePage {

  constructor(private socialSharing: SocialSharing) {}

  sendShare(message, subject, url) {
    this.socialSharing.share(message, subject, null, url);
  }
}
Step 5: Inside the apps.module.ts, we need to add the social sharing reference in the provider.
import { SocialSharing } from ‘@ionic-native/social-sharing/ngx’;To run apps on the actual device, if you want to add only Cordova then run the following otherwise we need to sync it using Capacitor and run using Capacitor command.
ionic platform add android
ionic build android
ionic run android
Related posts