The ionic framework has lots of components, we can use the ion-menu or Ionic menu component to create a sidebar menu in our Ionic application. Ionic we can also customize and create an Ionic drop-down menu to make a list of related navigation links.
We have three goals behind this tutorial, First, we’ll learn how to use the Ionic menu template and we can customize it for our needs. Second, we will create our own custom menu and last learn how to add an ionic dropdown menu for the submenu.
What is an ionic menu component ?
In most, mobile applications, the menu is the most important element which allows easy navigation among different pages or components. Ionic is the most popular framework to create a hybrid application and also allows us PWA application.
The ionic menu component allows us to create a sidebar menu navigation drawer that we can slide on or off from the content view. By default, the menu slides in from the left, but the side can be overridden.
The ionic menu element should be a sibling to the root content element to work. We can add a unique id for each menu and we can have any number of menus attached to the content. By using the mode attribute on the Ionic menu element we can control the design for Android and IOS devices.
Example 1: using Ionic menu from Ionic menu or Ionic side menu template ?
The ionic framework allows us to the used premade template, it has an Ionic menu template. Let’s create an ionic project from the menu template. Run the following command in the image to create an ionic menu example from the Ionic side menu template.
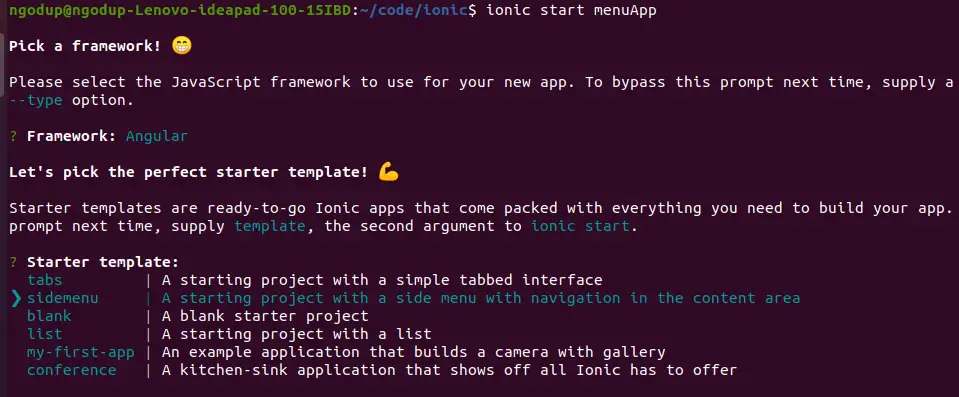
As Ionic version 4 onward, Ionic is not limited to Angular, we can create Ionic applications from Vue, and React. We have used the Ionic Angular framework to demonstrate the Ionic pre-made menu template. Here is a screenshot of the default menu on Android devices.
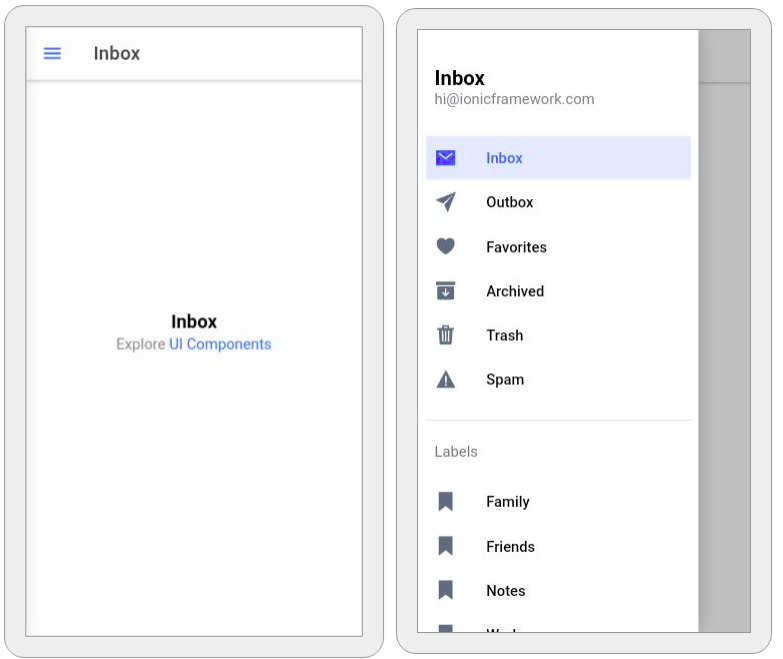
We have seen the default ionic menu example, let’s customize our template menu for our own needs. To create our Ionic menu example we need to create and add a few pages to demonstrate the ionic side menu example. Here is a screenshot of our customize Ionic menu example from the menu template.
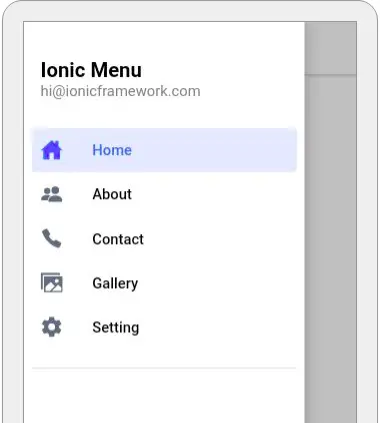
To customize this menu, we need to remove the folder page which was in the default menu template and create a few pages to demonstrate the Ionic customize menu example.
ionic g page pages/home
ionic g page pages/about
ionic g page pages/contact
ionic g page pages/gallery
ionic g page pages/setting
The above command will create a pages folder and add five-page for us. Now we need to remove the folder page as the default page for navigation and set home as the default routing navigation page.
Let edit the routing.module.ts file to set home as the default route page.
import { NgModule } from '@angular/core';
import { PreloadAllModules, RouterModule, Routes } from '@angular/router';

const routes: Routes = [
  {
    path: '',
    redirectTo: 'home',
    pathMatch: 'full'
  },
  {
    path: 'home',
    loadChildren: () => import('./pages/home/home.module')
      .then( m => m.HomePageModule)
  },
  // ... Other page routing configuration
];

@NgModule({
  imports: [
    RouterModule.forRoot(routes, { preloadingStrategy: PreloadAllModules })
  ],
  exports: [RouterModule]
})
export class AppRoutingModule {}
Now in the app.component.ts, we need to replace our own page menu item. Here we edit appPages array object with our page name, URL, and icon of our choice for the Ionic sidebar menu. Let’s edit the app.component.ts file.
import { Component } from '@angular/core';

@Component({
  selector: 'app-root',
  templateUrl: 'app.component.html',
  styleUrls: ['app.component.scss'],
})
export class AppComponent {
  public appPages = [
    { title: 'Home', url: 'home', icon: 'home' },
    { title: 'About', url: '/about', icon: 'people' },
    { title: 'Contact', url: '/contact', icon: 'call' },
    { title: 'Gallery', url: '/gallery', icon: 'images' },
    { title: 'Setting', url: '/setting', icon: 'settings' }
  ];
  constructor() {}
}
In the app.component.html template, we need to iterate on appPages object to display our menu and let edit the app.component.html file.
<ion-app>
  <ion-split-pane contentId="main-content">
    <ion-menu contentId="main-content" type="overlay">
      <ion-content>
        <ion-list id="inbox-list">
          <ion-list-header>Ionic Menu</ion-list-header>
          <ion-note>[email protected]</ion-note>

          <ion-menu-toggle auto-hide="false" *ngFor="let p of appPages; let i = index">
            <ion-item routerDirection="root" [routerLink]="[p.url]" lines="none" detail="false" routerLinkActive="selected">
              <ion-icon slot="start" [ios]="p.icon + '-outline'" [md]="p.icon + '-sharp'"></ion-icon>
              <ion-label>{{ p.title }}</ion-label>
            </ion-item>
          </ion-menu-toggle>
        </ion-list>
      </ion-content>
    </ion-menu>
    <ion-router-outlet id="main-content"></ion-router-outlet>
  </ion-split-pane>
</ion-app>
At last for each pages header we need to add an ion-menu-button element, let’s add the ion-menu-button in the home page.html
<ion-header [translucent]="true">
  <ion-toolbar>
    <ion-buttons slot="start">
      <ion-menu-button></ion-menu-button>
    </ion-buttons>
    <ion-title>Home page</ion-title>
  </ion-toolbar>
</ion-header>

<ion-content>
   <!-- Home page content -->
</ion-content>
How to add ionic dropdown menu for submenu
Ionic 3 has menuClose directive, which allows us to close the ionic menu when we click on a particular item on the menu list. The menuClose directive in Ionic 5 didn’t work. For the Ionic dropdown menu, we are learning.
- Add ionic menu close functionality on the menu and submenu item.
- Menu items having a sub-menu should not close the menu on clicking a menu item.
- Add a drop-down feature on the menu having a submenu.
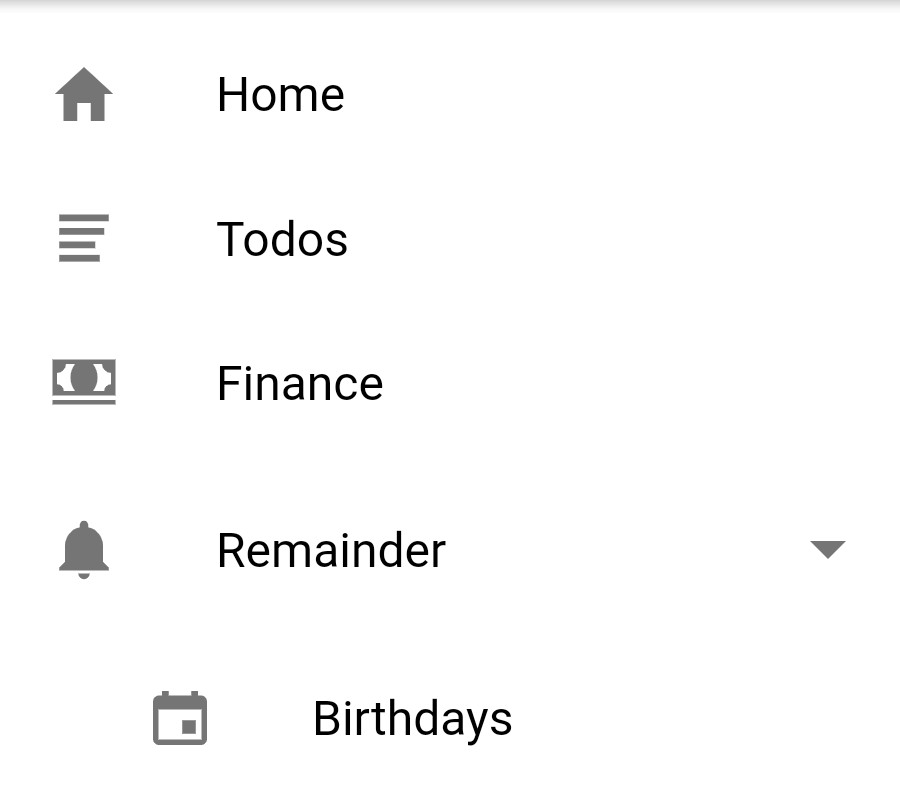
Screenshot of our ionic menu. We have two menu types main menu and a submenu
- Clicking on the main menu and submenu birthday should close the side menu.
- Clicking on the remainder ionic menu item on the side menu having a submenu shouldn’t close the menu and it will toggle submenu content to hide and show.
Instead of using menuClose directive, Ionic 4 or 5 has an ion-menu-toggle component that allows us to toggle the menu open and closed. To achieve the above issues we will follow this step.
- Add all menu items (main and submenu items) which needed to close when clicking should be encapsulated inside the ion-menu-toggle.
- The side menu item which not close when clicking on the menu item shouldn’t encapsulate the ion-menu-toggle component on its menu item. In our case, the Remainder menu item shouldn’t encapsulate inside the ion-menu-toggle component instead, we will add icon arrow-dropdown and arrow-drop right, and clicking on these icons will toggle the local isRemainder variable to true or false to control the display of its submenu (show or hide). Add the following code in the app.component.html template.
<ion-app>
  <ion-menu side="start" contentId="main-menu">
    <ion-header>
      <ion-toolbar>
        <ion-title size="small">Ionic 5 Menu and Submenu</ion-title>
      </ion-toolbar>
    </ion-header>

    <ion-content>
      <ion-menu-toggle auto-hide="false">
        <ion-list lines="none">
          <ion-item [routerLink]="'/'">
            <ion-icon name="home" slot="start"></ion-icon>
            Home
          </ion-item>
          <ion-item routerLink="todos">
            <ion-icon name="list" slot="start"></ion-icon>
            <ion-label>
              Todos
            </ion-label>
          </ion-item>
          <ion-item routerLink="finance">
            <ion-icon name="cash" slot="start"></ion-icon>
            <ion-label>
              Finance
            </ion-label>
          </ion-item>
        </ion-list>
      </ion-menu-toggle>
      <ion-item lines="none" (click)="isRemainder === 1 ? isRemainder = 0 : isRemainder = 1">
        <ion-icon name="notifications" slot="start"></ion-icon>
        Remainder
        <ion-icon slot="end" [name]="isRemainder? 'arrow-dropdown' : 'arrow-dropright'"></ion-icon>
      </ion-item>

      <ion-menu-toggle auto-hide="false">
        <ion-list lines="none">
          <ion-item menuclose [hidden]="!isRemainder" [routerLink]="['/notifications']"
            [queryParams]="{ type: 'birthday' }" menuClose class="sub-menu">
            <ion-icon name="calendar" slot="start"></ion-icon>
            Birthdays
          </ion-item>
        </ion-list>
      </ion-menu-toggle>
    </ion-content>
  </ion-menu>
  <ion-router-outlet id="main-menu"></ion-router-outlet>
</ion-app>
How to design ionic menu ?
We’ll continue from the above article, we can easily customize and design an Ionic menu for our own needs. Here is a screenshot of our new Ionic menu design.
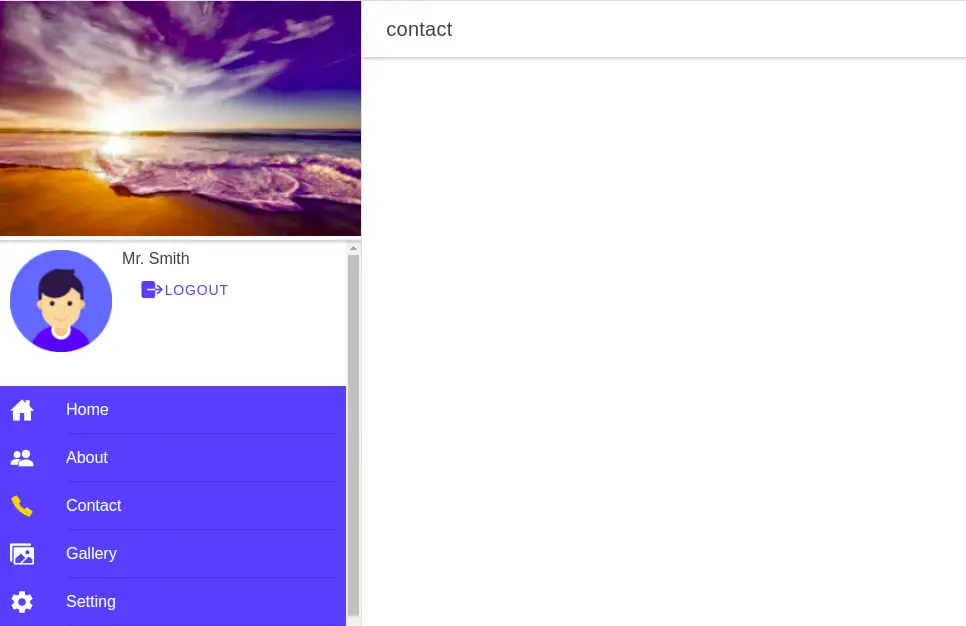
You can see we have added a new image, avatar, icon logout, and change the style of the Ionic menu. Like any ion-content component, we can add any HTML native and other Ionic components inside the ion-menu and ion-menu-toggle components. Let’s edit the app.component.html template for our new design.
<ion-app>
  <ion-split-pane contentId="main-content" class="edupala-menu">
    <ion-menu contentId="main-content" type="overlay">
      <ion-header>
        <ion-toolbar>
          <img src="assets/images/menu-header.png" />
        </ion-toolbar>
      </ion-header>
      <ion-content class="ion-no-padding">
        <ion-menu-toggle auto-hide="false" color>
          <ion-toolbar>
            <ion-grid>
              <ion-row>
                <ion-col size="4">
                  <img src="image-link" />
                </ion-col>
                <ion-col size="8">
                  <ion-text menuClose>
                    Mr. Smith
                  </ion-text>
                  <div class="headerLogoutBtn">
                    <ion-button fill="clear">
                      Logout <ion-icon slot="icon-only" name="log-out"></ion-icon>
                    </ion-button>
                  </div>
                </ion-col>
              </ion-row>
            </ion-grid>
          </ion-toolbar>

          <ion-list class="ion-no-padding ion-no-margin">
            <span *ngFor="let p of appPages; let i = index">
              <ion-item color="primary" menuClose routerDirection="root" [routerLink]="[p.url]" routerLinkActive="selected">
                <ion-icon slot="start" [ios]="p.icon + '-outline'" [md]="p.icon + '-sharp'"></ion-icon>
                <ion-label>{{ p.title }}</ion-label>
              </ion-item>
            </span>
          </ion-list>
        </ion-menu-toggle>

      </ion-content>
    </ion-menu>
    <ion-router-outlet id="main-content"></ion-router-outlet>
  </ion-split-pane>
</ion-app>
In the app.component.scss file let’s edit the style for our menu.
ion-menu ion-content {
  --background: var(--ion-item-background, var(--ion-background-color, rgb(255, 250, 250)));
}

ion-toolbar {
  padding: 0;
  margin: 0;
  img {
    width: 100%;
  }
}


ion-menu.md ion-item.selected {
  --background: rgba(var(--ion-color-primary-rgb), 0.14)
}

ion-menu.md ion-item.selected ion-icon {
  color: var(--ion-color-warning);
}

ion-menu.md ion-item ion-icon {
  color: #ffffff;
}

ion-menu.ios ion-item.selected ion-icon {
  color: var(--ion-color-primary);
}

ion-menu.ios ion-item ion-icon {
  font-size: 24px;
  color: #fff;
}

ion-item.selected {
  --color: var(--ion-color-warning);
}
Conclusion
We have explored how to create Ionic men from the premade template or from scratch. We can easily configure the Ionic menu style by adding a background image, setting the different background colors, and adding shadow colors to the Ionic card.
Related posts