We can create our own ionic custom directive in an ionic angular project. An angular directive is instructions or guidelines for rendering a template. The directive allows us to attach attributes to the element and with this attribute we can manipulate the appearance or behavior of a DOM element. There are three types of directives supported by Angular, namely
- Component Directive
- Structural Directive
- Attribute Directive
The directive extends the HTML language through directives to make page templates more dynamic and customization. Ionic by default we have lots of directives, eg ngFor, ngIf, ngSwitch. some Directives are an important concept for any Angular, directive that modifies the behavior of an existing component, We will create our own custom directives using this decorator that provides metadata about the directive. Angular defines directives as components without views. In fact, a component is a directive with an associated template view.
Example on ionic custom directive
Let’s first create our ionic angular project and create a custom directive called the ionic-input directive. The syntax for creating an ionic custom directive on the command line.
ionic start inputControlDirective blank --type=angular
ionic g directive directives/ionic-input
Ionic custom directive example
We’ll demonstrate an example of an ionic custom directive and let first create our project first.
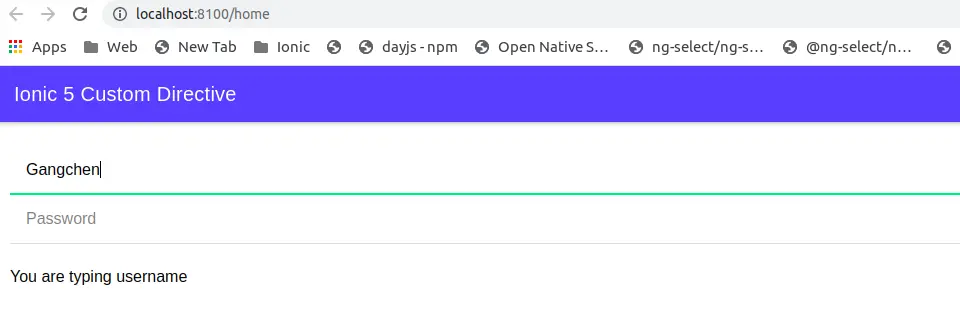
ionic start MyIonicDirective blank --type=angularAdd the following code in home.page.html. In the home.page.html template, we have two important concepts, first, we have an attribute called appIonicInput in an ion-input component of the name field. Second, we have myStyles object is used to toggle the visibility of the element.
<ion-header [translucent]="true">
  <ion-toolbar color="primary">
    <ion-title>
      Ionic 5 Custom Directive
    </ion-title>
  </ion-toolbar>
</ion-header>

<ion-content [fullscreen]="true" class="ion-padding">
  <ion-list>
    <ion-item>
      <ion-input type="text" placeholder="Username" [(ngModel)]="username" [appIonicInput]="myStyles"></ion-input>
    </ion-item>

    <ion-item>
      <ion-input type="password" placeholder="Password"></ion-input>
    </ion-item>

  </ion-list>
  <p *ngIf="myStyles.showUsername" class="hint">
    You are typing username
  </p>
</ion-content>
import { Component } from '@angular/core';
@Component({
selector: 'app-home',
templateUrl: 'home.page.html',
styleUrls: ['home.page.scss'],
})
export class HomePage {
username;
myStyles = { showUsername: false };
constructor() { }
}Create ionic custom directive
Now we are creating our own directive called ionic-input.ts in the src/directives folder by running the following command.
ionic g directive directives/ionic-inputBy running this command will add/import our custom directive in the app.module.ts file. Remove custom directive import and name in declaration. We will import it into home.module.ts later. In our custom directive, we are achieving two tasks.
- This attribute directive prevents certain characters from being input in the username field.
- Showing DOM node saying – You are typing username message show on screen while the user typing his name in the user input field.
import { Directive, Input, HostListener } from '@angular/core';

@Directive({
  selector: '[appIonicInput]',
})
export class IonicInputDirective {
  @Input('appIonicInput') myStyles: any;

  constructor() { }

  @HostListener('mouseover') onMouseOver() {
    this.myStyles.showUsername = true;
  }

  @HostListener('mouseout') onMouseOut() {
    this.myStyles.showUsername = false;
  }

  @HostListener('keydown', ['$event'])onInput(e: any) {
    if ('~!@#$%^&*()-='.includes(e.key)) {
      e.preventDefault();
      return;
    }
  }

}
We have an import Input decorator in our custom directive. The @Input() decorator in a child component or directive lets Angular know that a property in that component can receive its value from its parent component. In our case, we have input that is mystyle where we can toggle the mystyle.showUsername to true/false. The appIonicInput selector will query the DOM and will trigger actions on that DOM node based on the event.
For event detection on DOM, we have used the @HostListener decorator. This decorator declares a DOM event to listen for and provides a handler method to run when that event occurs. We have two event handlers on the input for mouseover and mouseout in the directive class. You modify the behavior on the keyboard using el.nativeElement.onkeypress so that no special character won’t be accepted as input.
We have another event listener called keydown and where we prevent certain special characters to enter into input by the trigger.preventDefault and nothing will happen. The @Input decorator is used to declare that you will bring a variable from the template. This is the reason we must have the square bracket in the [myIonicinput]=”myStyles”. myIonicinput is an object variable of Home.ts. Add the following code in the directives/ionic-input.ts file.
We need to import import { IonicInputDirective } from ‘../directives/ionic-input.directive’; in home.module.ts file. Add we have to add this directive reference in @NgModule declaration only.
import { NgModule } from '@angular/core';
import { CommonModule } from '@angular/common';
import { IonicModule } from '@ionic/angular';
import { FormsModule } from '@angular/forms';
import { HomePage } from './home.page';
import { HomePageRoutingModule } from './home-routing.module';
import { IonicInputDirective } from '../directives/ionic-input.directive';

@NgModule({
  imports: [
    CommonModule,
    FormsModule,
    IonicModule,
    HomePageRoutingModule
  ],
  declarations: [HomePage, IonicInputDirective]
})
export class HomePageModule {}
Read more information on the angular directives in official angular documentation.
Related Articles
It is not working on device