In this tutorial, we will learn and demonstrate a dynamically Angular add and remove class on the host element based on specific conditions using a custom directive and ngClass directive.
We have two objectives in this tutorial, first what is ngClass directive, and how we can bind the Angular dynamic class using the ngClass directive. Second, we’ll create a custom directive to toggle class adds or remove. Lets get started.
Prerequisites:
To create and run an Angular project, We need Node js and Angular CLI already install in our system, if not then check how to install Node js and angular in Ubuntu. To install the latest version of Angular CLI, open a terminal and run the following command:
Angular add and remove class using ngClass directive
We can also use the NgClass directive to dynamically add and remove classes based on certain conditions on NgClass. Angular has a lot of built-in directives, we have structure directives like *ngIf, *ngFor, *ngSwitch . The ngClass and ngStyle are attribute built-in directives of Angular.
These directives manipulate the DOM element by adding or removing elements based on condition. The ngClass directive is a built-in attribute directive. The ngClass in Angular allows us to change the appearance of DOM elements by adding or removing classes using ngClass directive on based condition expression.
Syntax of ngClass directive allows Angular add and remove class.
<any-element [ngClass]="{selected: isSelected}">
...
</any-element>
# where selected is condition : boolean value if true then set isSelected class to element

OR

<any-element [ngClass]="{selected: isSelected, disabled: isDisabled}">
...
</any-element>
We can add multiple conditions through ngClass directive, selected and disable is boolean value or condition if true then assign its right side class name to an element.
Example of Angular add class dynamically
Let’s use ngClass directive to dynamically add class num even to an element when num % 2 == 0. Here is a screenshot of the Angular add class dynamically based on condition.

An example of ngClass to add a class based on condition and we are setting font color white and background: red for even number using ngClass. Let’s add the code for our example.
<div class="container">
  <h3>Add blue background and white color to all even number from 1 to 10</h3>

  <span *ngFor="let number of [1, 2, 3, 4, 5, 6, 7, 8, 9, 10]" [ngClass]="{ even: number % 2 === 0 }">
    {{ number }}
  </span>

</div>
We need to add CSS code for even number
.even {
    background-color: blue;
    color: '#ffffff';
    width: 20px;
    padding: 5px;
    margin: 5px
}
In the above example, we have ngClass to add the class name when the condition is true. Now demonstrate example two using ngClass where we add different classes if the expression condition is true or false. We add blue background to even when the condition is true and a yellow background for odd numbers when num % 2 !== 0. Here is a screenshot of our second example for Angular add a class to an element using the ngClass directive.
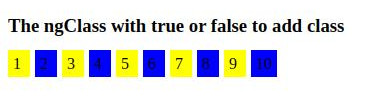
Let’s edit our component template to add both true and false conditions through ngClass, we add an even class when the condition is a true and odd class name when num mode 2 !== 0.
<div class="container">
  <h3>The ngClass with true or false to add class</h3>

  <span  *ngFor="let number of [1, 2, 3, 4, 5, 6, 7, 8, 9, 10]" [ngClass]="number % 2 === 0 ? 'even' : 'odd'" >
    {{ number }}
  </span>

</div>
Setup and configure Angular add and remove class project
In the previous few articles where we have learned details on angular directives and how to create an angular custom directive. We’ll create two examples, first to add and remove the warning class on the card header, and the second example to Angular add and remove a class to hide the div element.
We’ll demonstrate here’s a quick screenshot of what we’ll be building.
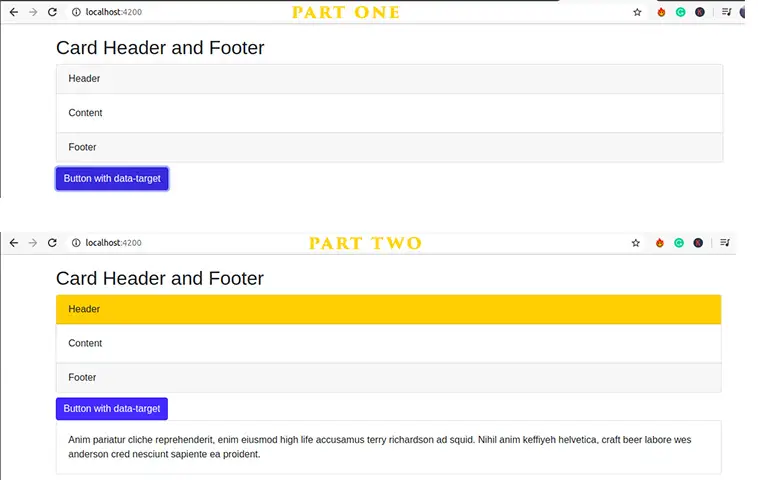
Create an angular project and add two custom directives. The first directive is to add/remove the warning background color of the card header by clicking on the card header. The second directive is to show/hide div by clicking a button to add/remove the CSS class.
ng new customDirectiveApp
ng generate directive cssToogle
ng generate directive collapse
In this example we have used the Bootstrap UI library, check our previous articles on how to install Bootstrap in Angular. You can also use CDN, as this example only add CDN in the index.html head tag. In a real project is recommended to use the Bootstrap library for Angular.
    <link
      href="https://cdn.jsdelivr.net/npm/[email protected]/dist/css/bootstrap.min.css"
      rel="stylesheet"
      integrity="sha384-gH2yIJqKdNHPEq0n4Mqa/HGKIhSkIHeL5AyhkYV8i59U5AR6csBvApHHNl/vI1Bx"
      crossorigin="anonymous"
    />
Edit the app.component.ts file to add two custom directives.
We have two custom directive attributes in app.component.html. The first is appCssToggle on card-header to control background-color by adding and removing bg-warning on host element in the css-toggle.directive.ts.
The second directive collapseEl attribute on a button to toggle to show/hide sibling element by collapse.directive.ts Let edit the app.component.html file, the highlight appCssToogle and appCollapse are custom directive
<div class="container">
  <h2>Card Header and Footer</h2>
  <div class="card">
    <div class="card-header" appCssToogle>Header</div>
    <div class="card-body">Content</div>
    <div class="card-footer">Footer</div>
  </div>

  <div class="mt-2">
    <button
      class="btn btn-primary"
      appCollapse
      type="button"
      data-toggle="collapse"
      data-target="#collapseExample">
      Button with data-target
    </button>

    <div class="collapse" id="collapseExample">
      <div class="card card-body">
        Anim pariatur cliche reprehenderit, enim eiusmod high life accusamus
        terry richardson ad squid. Nihil anim keffiyeh helvetica, craft beer
        labore wes anderson cred nesciunt sapiente ea proident.
      </div>
    </div>
  </div>
</div>
<router-outlet></router-outlet>
Create a custom CSS toggle directive for the Angular toggle class
The @HostListener decorator allows a directive to listen to events on its host element, in our case, it is the card header div element we want to listen to the click event. When a user clicks on the card header we will add/remove CSS class bg-warning using @HostBinding(). We have used the angular @hostbinding class toggle class on add and remove and let edit the
import { Directive, ElementRef, HostBinding, HostListener } from '@angular/core';

@Directive({
  selector: '[appCssToogle]',
})
export class CssToogleDirective {
  @HostBinding("class.bg-warning") isBgWarning: boolean = true;

  constructor(private elRef: ElementRef) {  }

  @HostListener('click', ['$event']) toggleOpen() {
    this.isBgWarning = !this.isBgWarning;
  }
}
Here is a screenshot of our Angular CSS toggle class bg-warning.
Create a custom CSS collapse.directive.ts directive
The @HostListener decorator will listen to the click event on the host element, in our case, it is a button. When a user clicks on the button we will use renderer2 to retrieve the next sibling element. We will use renderer2 to add/remove the show class on a sibling element to control the hide/show sibling element.
import { Directive, ElementRef, HostListener, Renderer2 } from '@angular/core';

@Directive({
  selector: '[appCollapse]',
})
export class CollapseDirective {
  isShow = true;

  constructor(private elRef: ElementRef, private renderer: Renderer2) {}
  @HostListener('click', ['$event']) toggleOpen() {
    const nextEl = this.renderer.nextSibling(this.elRef.nativeElement);
    this.isShow = !this.isShow;
    if (this.isShow) {
      this.renderer.addClass(nextEl, 'show');
    } else {
      this.renderer.removeClass(nextEl, 'show');
    }
  }
}Conclusion
We have explored Angular custom directives to add and remove a class to control div element style and content. Angular Attribute directive changes the appearance or behavior of a DOM element. Follow me on my GitHub collection, I had code on Angular, react, and Ionic framework.
Related Articles
- Angular adds and removes classes using ngClass.
- Angular ngIf directive in details
- Angular ngSwitch directive in details
- How to implement an Angular search filter in Angular 13 | 14?
- How to calculate base64 image size in Angular
- How to install Angular material
- How to implement CKEditor in Angular
- How to use to implement HighCharts Angular