The angular custom directive allows us to create our own directive, which is specific to our application needs, even though the Angular built-in directive provides the most common task needed for the web application. Angular provides a good range of built-in directives. We can also create our own directives to solve problems that are specific to an application’s needs or to support features that the built-in directives don’t have.
In these articles, we will learn how to create our own angular custom directive by using angular renderere2. Angular renderer2 is mainly used when creating custom directives and also demonstrates how to pass parameters in our angular custom directives.
What is angular directive ?
The angular directive is a concept in Angular that allows you to attach custom attributes and behaviors to a DOM element and allow us to extend the power of HTML by giving it a new syntax. We can use the directive to instructions or guidelines for rendering a template.
The directive allows us to attach attributes to the element and with this attribute we can manipulate the appearance or behavior of a DOM element. Angular has lots of built-in directives which can be either attribute or structural directives. There are three types of directives as follows
- Component: Directive with UI and logic
- Structural directive: This directive change the DOM layout by adding or removing elements from the view. For example, we have built-in structure directives like *ngIf, *ngFor, and more.
- Attribute directive: These directives change the look and feel, or the behavior, of an existing element or component that it is applied to. We have ngClass and ngStyl, etc.
We can create our own custom structure and attribute directive and we’ll demonstrate examples of each of the angular custom directive types.
Why we need use Angular custom directive ?
An Angular directive allows us to manipulate the appearance, structure, and behavior of the DOM element. Angular has lots of built-in directives which is common to the web application. Here are two main reasons for using angular custom directives.
- We need functionality that is not provided by the angular built-in directive and which is specific to our application and allows us to attach some custom functionality to our DOM element.
- Code reusability: We can place our share code-like directives and helper classes into a shared module so they can be reused across applications.
How to create angular custom directive.?
We can create an angular custom directive manually or by using angular CLI to generate a custom directive. Using the Angular CLI we can easily create a custom directive, run the following command to create a directive.
ng generate directive customDirectiveNameCreating a directive is similar to creating a component. Executing the above command will generate a directive with the following code and we need to write code based on our requirements in our custom directive.
import { Directive } from '@angular/core'

@Directive({
  selector: '[appCustomSelector]',
})
export class CustomDirectiveName {
  constructor() {}
}
The directive class had this minimum formation.
- Have to Import the Directive decorator.
- The @Directive annotation, including a CSS directive selector(in square brackets).
- You can also add other elements to the @Directive annotation,
- We might have to include the @Input() decorator and host mappings.
- The Directive class. This class will use constructor injection and will probably manipulate the injected element and renderer.
In the above command, customDirectiveName is the name of the directive which you want to create. Angular provides a good range of built-in directives, but it is a simple process to create your own directives to have a feature that is specific to your application or to support features that the built-in directives don’t have.
For example, we could write a directive to change the font style of all titles of card elements across an entire application based on user preference settings.
Angular custom directive example
Let’s create our own angular custom directive and run the following command to create our angular project. We’ll demonstrate an example of both attribute and structure directive of the custom directive.
ng new customDirectiveAppAngular attribute directives manipulate the DOM element attributes. Typical examples include applying conditional styles and classes to elements and changing the behavior or appearance of the DOM element.
The steps involved in creating and implementing custom attribute directives are as follows, let’s add our custom directive to our project using angular CLI. The command below will create a custom directive
ng generate directive directives/hovererThe above command will automatically declare our custom hoverer direction in the app.module.ts file and create a folder called directives and add our custom hoverer directive file. We need to register our custom directive in-app module so that we can use it in our application but the above command will add for us.
import { NgModule } from '@angular/core';
import { BrowserModule } from '@angular/platform-browser';

import { AppRoutingModule } from './app-routing.module';
import { AppComponent } from './app.component';
import { HovererDirective } from './directives/hoverer.directive';

@NgModule({
  declarations: [
    AppComponent,
    HovererDirective
  ],
  imports: [
    BrowserModule,
    AppRoutingModule
  ],
  providers: [],
  bootstrap: [AppComponent]
})
export class AppModule { }
Sngular custom attribute directive to apply background color to a DOM element
Let’s edit our custom directive hoverer.directive.ts file in the directives folder, here we are using a custom directive to apply a style to our div card header.
import { Directive, ElementRef, Input, OnInit, Renderer2 } from '@angular/core';

@Directive({
  selector: '[appHoverer]'
})
export class HovererDirective implements OnInit {


  constructor(
    private elementRef: ElementRef,
    private renderer: Renderer2) { }

  ngOnInit(): void {
    this.renderer.setStyle(this.elementRef.nativeElement, 'backgroundColor', 'blue');
  }
}
In our previous articles, we have learned details on angular elementRef and renderer2.
- Details on Angular elementRef and when and risk of using Angular elementRef to manipulate DOM.
- How to a used angular renderer2.
Now we need to apply our hovererDirective in our component, let’s add in the app.component.ts file as.
import { Component } from '@angular/core';

@Component({
  selector: 'app-root',
  // templateUrl: './app.component.html',
  template: `
  <div class="card">
    <div class="header" appHoverer>
      Card title
    </div>
    <div class="body">
      Card body. Custom directive attribute to change header background color to blue.
    </div>
    <div class="footer">
      Card footer
    </div>
</div>`,
  styleUrls: ['./app.component.scss']
})
export class AppComponent { }
We have applied our custom directive selector appHoverer in the div class header element. Every directive has a selector to indicate a directive. We can use this selector to apply the directive to elements in component templates. Our custom directive selector is appHoverer.
We have to apply a style to our card div, let’s add style for our card header, body, and footer. Edit app.component.scss file.
.card {
    border: 2px solid blue;
    width: 400px;

    .header, .body, .footer {
        padding: 10px;
    }
    .header {
        border-bottom: 2px solid blue;
    }
    .footer {
        border-top: 2px solid blue;
        background-color: gray;
    }
}
How to pass value from component template directive selector to angular directive ?
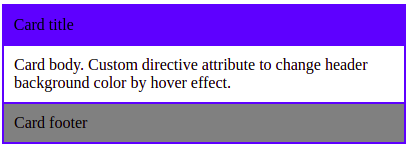
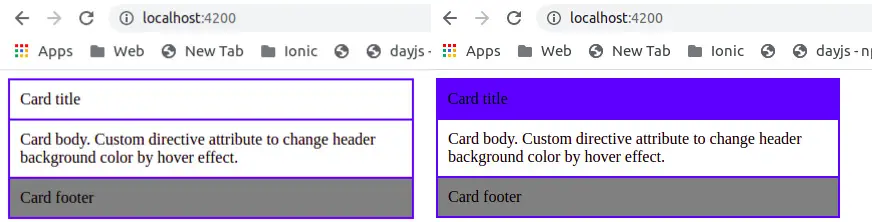
We’ll continue from our previous example, we can pass dynamic value or parameter from the angular custom directive selector in the component template to our custom directive with help of the @Input() decorator. We will create a simple custom directive to hover over card titles to set the background color which value we got from the component template selector. Here is a screenshot of our angular custom directive pass parameter example.
import { Component } from '@angular/core';

@Component({
  selector: 'app-root',
  // templateUrl: './app.component.html',
  template: `
  <div class="card">
    <div class="header" appHoverer="blue">
      Card title
    </div>
    <div class="body">
      Card body. Custom directive attribute to change header background color by hover effect.
    </div>
    <div class="footer">
      Card footer
    </div>
</div>`,
  styleUrls: ['./app.component.scss']
})
export class AppComponent { }
We can see that in our app component template we have our appHoverer with color name as a parameter value to the angular custom directive. You can add different colors of your choice, here we are passing color values from the component template to our custom directive. Now let’s edit our custom directive hoverer.directive.ts file.
import { Directive, ElementRef, Input, Renderer2 } from '@angular/core';

@Directive({
  selector: '[appHoverer]',
  host: {
    '(mouseenter)': 'onMouseHover()',
    '(mouseleave)': 'onMouseLeave()'
  }
})
export class HovererDirective {

  @Input('appHoverer') bgColor: string;

  constructor(
    private elementRef: ElementRef,
    private renderer: Renderer2) { }

  onMouseHover() {
    this.renderer.setStyle(this.elementRef.nativeElement, 'background', this.bgColor);
  }
  onMouseLeave() {
    this.renderer.setStyle(this.elementRef.nativeElement, 'backgroundColor', 'none');
  }

}
In our custom directive, we have viewChild with bgColor variable, this gets value from our selector which we had passed blue as color. Now we can use bgColor to set the background color to the card header div element. We also had two methods in our angular custom directive.
1. onMouseHover method is called when the mouse hovers on the card title element. Based on hover we add a background on the card header using an Angular renderer2.
2. onMouseLeave method is called when the mouse moves away from the card header and based on the event we are removing the card header background.
Note:
1. We inject renderer2 from angular/core in our custom directive. The renderer2 allows us to provide an abstraction for manipulating UI rendering elements of our application at runtime without the need to access the DOM directly. This is the best approach to consider because of some security reasons like XSS Attacks.
2. The ElementRef object gives us direct access to the DOM element for the directive through the nativeElement property.
3. We have used input binding to accept data from template to directive. Here we are getting blue color from a component template using an input binding.
How to implment Angular custom structure directive ?
Angular structural directives provide DOM structure manipulation and reshape the HTML layout by adding or manipulating elements. Most angular structural directives are easily recognized by the * sign that precedes the
directive. Examples of structural directives are *ngIf, *ngFor, and *ngSwitch, etc. Here we’ll create our own custom structure directive to toggle to hide and show the div element container. Here is a screenshot of our angular structure directive.

Let’s continue our previous example and create a custom directive by running the below command.
ng generate directive directives/myIfNow let’s edit the directives/my-if.directive.ts file to implement our logic to hide or show the div container.
import { Directive, Input, TemplateRef, ViewContainerRef } from '@angular/core';

@Directive({
  selector: '[appMyIf]'
})
export class MyIfDirective {

  constructor(
    private templateRef: TemplateRef<any>,
    private viewContainer: ViewContainerRef) { }

  @Input() set appMyIf(condition: boolean) {
    if (condition) {
      this.viewContainer.createEmbeddedView(this.templateRef);
    } else {
      this.viewContainer.clear();
    }
  }

}
Here in our custom directive, we have injected angular templateRef and viewContainer in our constructor. ViewContainerRef class Refers to the Container to which we want to apply our custom directive and TemplateRef is a reference to content enclosed within the container. Now let’s edit our component template where we want to apply our custom directive, in our case we used the app.component.html template. Let’s edit the app.component.html file.
<button (click)="isTrue = !isTrue">MyngIf toggle to show and hide div Element</button>

<div class="container" *appMyIf="isTrue">
  Angular structure directive to hide and show div container.
</div>
In our component template, we have a button and div container. Clicking on a button will toggle on and off the display of the div container. We also have an article on an angular directive to dynamically add and remove CSS classes.
Conclusion
In this article, we have explored the details of Angular custom directives in detail. We learned different types of directives and demonstrate two examples of angular custom directive types. I hope that this article was able to get you up and running with Angular custom directives.
Related posts
- Angular dynamically adds and removes CSS Classes using ngClass | custom directive
- Angular NgSwitch Directive with Examples
- An angular directive in detail with an example.
- How to use angular ngIf directive and ngIf else directive?
- Angular dynamically adds and removes CSS Classes using ngClass | custom directive