Redux is a popular state management library for Javascript. We can use redux in React for creating stores and it is often combined with React via the React-Redux library. React Redux is a state management tool, when our application grows, we need a state management tool like Redux to manage the global state, it can access across many parts of our React application.
In this redux react tutorial, we’ll learn what is React Redux, when, and how to use it properly in the latest react 18. We’ll demonstrate an example of context API. Let’s get started.
What is React redux?
Reducer is predictable state management for Javascript applications in general. We can use it in React for creating stores and it is often combined with React via the React-Redux library. The state in react is often referred to as a single source of truth because it is never mutated or modified but always recreated, whenever there is a change in state.
So whenever we want to change the state we dispatch an action to the Store object via reducer function, based only on action type and existing state we can update part of the state or whole state. The state is a Javascript object that represents the entire state of a redux application. It can be a single value or a more complex object.
We inject store objects into our application using the Provider component from the react-redux library. Now our components inside our application can consume the state or part of the state object. The state is managed through the unidirectional data flow.
Store:
The state is accessible through the entire application that manages by a centralized container l known as Store. The Store object has a state, and some methods like dispatch, getState, and more methods. The only way to access the store is by dispatching an action via reducer.
With redux, we need to centralize all of our logic into reducers and action as much as possible
and instead, our react component is only responsible for showing data they need, and not
responsible for fetching data at all.
Why use React-Redux?
The Redux is a state management library and it makes complex applications easier to write and manage. In most cases we don’t need Redux, special on small applications where data isn’t changed often context API seems to be a better choice. But applications like e-commerce and other complex application where state changes often need state management like Redux.
For example, useDispatch lets you dispatch an action to update the state in the store. Say you have an application to build question sets for quizzes and you want to add a question:
- Redux State management library makes creating complex applications easier.
- Now introduce or useSelect, useDispatch, and useStore in React-redux 7.1, making less code and easier to learn.
- Server-side rendering is possible with Redux.
- It is kept up-to-date with any changes to the state object to ensure that our React components behave as expected.
- Commonly used a lot of problems have been resolved by the community.
- It implements many performance optimizations internally, which allows to components rerender only when it actually needs.
- With @reduxjs/toolkit, we don’t need to install thunk separately it is included in reduxjs/toolkit and we can perform the async operation with createAsyncThunk function.
What’s the difference between Context API and React Redux?
| Context API | Redux |
| Is part of React library and no need to install any third-party library. Is built specifically for React. | The redux is predictable state management for Javascript. We need to install redux, which adds an additional bundle to our code. |
| Easy to share data between parents and nested children but difficult to build store components. | Excellent documentation. Redux is much more powerful and provides a large number of features that the Context API doesn’t provide. |
| Specifically designed for static data, that is not often refreshed or updated | Can use with both static and dynamic data. |
| Don’t have any specific dev tools and debugging can be hard in the highly nested components. | We can use the powerful Redux Dev Tools browser extension for ease of debugging. |
| It re-renders all components whenever there is any update in the provider’s value prop. | React Redux implements several optimizations to ensure your actual component only re-renders when actually necessary. |
React Redux Architecture
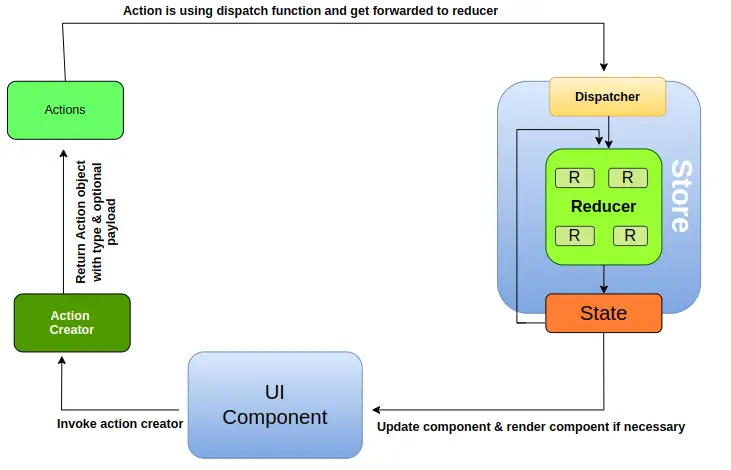
In the above diagram, we have a different part of React Redux architecture.
Store object: A Store is a Javascript object that holds the application state, there should only single store in the Redux application. Store object has some method like.
- dispatch(action) : dispatch an action.
- getState() : return current state.
- subscribe(listener) Adds a change listener.
- replaceReducer(nextReducer): Repalces the reducer.
Action creators are just simple functions that return an action. Action is a plain Javascript
object. Action must always have a type defined and they can optionally have a payload. Here is what an action creator function looks like.
const addTodo = argumentTask => {
   return {
       type: 'AddTodod',
       payload: argumentTask
   }
}
Dispatch: Redux store has a method called dispatch. The only way to update the state is to call the dispatch method with the action object as an argument.
store.dispatch(addTodo);Reducers are responsible for changing the application state over time. So whenever we dispatch an action object, it sends it to all of the different reducers in our application. Each reducer has the option to return a different piece of state than the usual based on the type of action that was received. Whenever there is a change in the State object in the Redux store, it will notify all consumer components of the state, to update the View.
React Redux example 1 counter
In our first react-redux example, we look at a simple example and it is used in many redux tutorials because the state object is simple and has only one value. We have two action creator functions to increment and decrement the counter value.
Here is our counter value at the global state level, this is just to demonstrate how react-redux works. In real application is best practice to keep the state at a local component level. Here is our screenshot of react-redux example 1..

Let’s create react counter app, and install the following packages to our react project.
npm install @reduxjs/toolkit react-redux redux --saveThe @reduxjs/toolkit, will make our life easier, With @reduxjs/toolkit, we don’t need to install thunk separately it is included in reduxjs/toolkit and we can perform the async operation with createAsyncThunk function.
Please if Im wrong on any of the above, please leave a comment, I started learning to react in the last few months. I’m Angular background, I’m learning the stage of React, Redux is one of the most difficult concepts to understand. Now we have hooks React-redux offers hooks to make interacting with the store easier: useSelector, useDispatch, and useStore.
Let’s first create our counter slice in src/store/index.js file.
import { createSlice, configureStore } from '@reduxjs/toolkit'

const counterSlice = createSlice({
  name: 'counter',
  initialState: {
    value: 0
  },
  reducers: {
    incremented: state => {
      state.value += 1;    //With redux toolkit allow us add mutating" logic in reducers
                           // But inside redux toolkit will return new immutable state
    },
    decremented: state => {
      state.value -= 1;
    }
  }
})

export const { incremented, decremented } = counterSlice.actions;

const store = configureStore({
  reducer: counterSlice.reducer
});

export default store;
Our application has to know about our Redux store, and for that, we are injecting the store using the Provider component on the App component in the index.js file
...
import React from "react";
import store from "./store";

const root = ReactDOM.createRoot(document.getElementById("root"));
root.render(
  <React.StrictMode>
    <Provider store={store}>
      <App />
    </Provider>
  </React.StrictMode>
);
In the App.js file, we are importing the useSelector hook to get the current state of the counter value and the useDispatch to dispatch an action.
import { useSelector, useDispatch } from 'react-redux';
import { incremented, decremented } from './store';
import './App.css';

function App() {
  const counter = useSelector((state) => state.value);
  const dispatch = useDispatch();

  const increment = () => {
    dispatch(incremented());
  };

  const decrement = () => {
    dispatch(decremented());
  };


  return (
    <div className='app'>
      <h1>Counter App : Count {counter} </h1>
      <div className='btn-group'>
        <button onClick={increment}>Increment</button>
        <button onClick={decrement}>Decrement</button>
      </div>
    </div>
  );
}

export default App;
Redux toolkit: Redux thunk example
React reducers have limitations and we can’t call asynchronously in React redux, we can use Redux thunk middleware to handle the asynchronous calls in the action creator. With the redux toolkit now we can have cleaner code and we can easily use Redux thunk middleware.
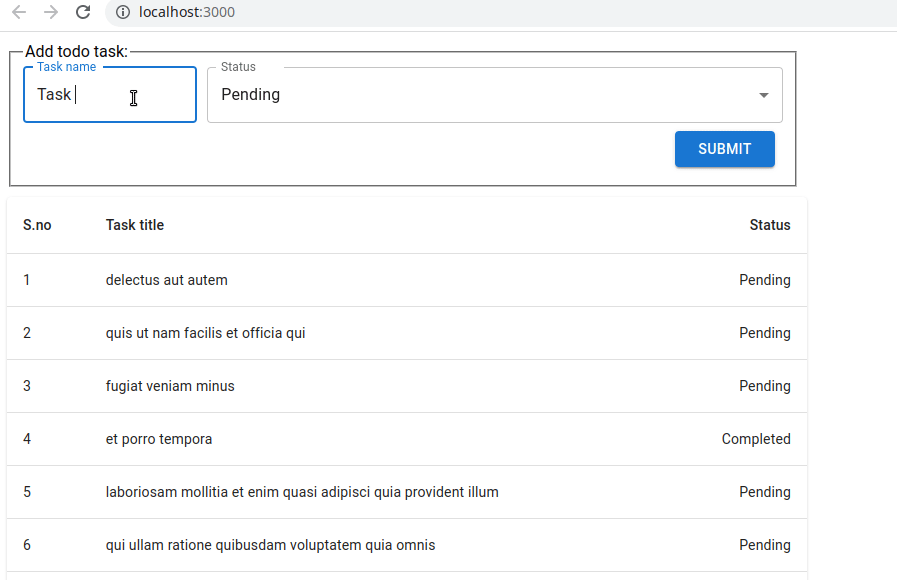
Here is a screenshot example of Redux thunk example to fetch data from jsonplaceholder.typicode.com/todo using redux toolkit with a thunk middleware and using Axios.
Step 1: Create a project and install redux toolkit packages
Let’s first create our project and install all required libraries we need to perform Asynchronous operations in our React redux project.
npx create-react-app redux-thunk-example
npm install @reduxjs/toolkit react-redux redux --save
npm install axios --save
Step 2: Create Redux store and todo slice
In this example we are fetching the todo list from the jsonplaceholder.typicode using Axios, we are creating a todo slice for this example. The slice definition from https://redux.js.org/
Redux Slices, A “slice” is a collection of Redux reducer logic and actions for a single feature in your app, typically defined together in a single file. The name comes from splitting up the root Redux state object into multiple “slices” of state.
https://redux.js.org
Let’s create a folder called a store in the src folder and add two files, index.js, and todo-slice.js file. In src/store/todo-slice.js file let’s add the following code.
import axios from "axios";
import { createSlice, createAsyncThunk } from "@reduxjs/toolkit";

export const STATUSES = Object.freeze({
  IDLE: "idle",
  ERROR: "error",
  LOADING: "loading",
});

const todoSlice = createSlice({
  name: "todo",
  initialState: {
    data: [],
    status: STATUSES.IDLE,
  },
  reducers: {
    add: (state, action) => {
      state.data.unshift(action.payload);
    },
  },

  extraReducers: (builder) => {
    builder
      .addCase(fetchTodos.pending, (state, action) => {
        state.status = STATUSES.LOADING;
      })
      .addCase(fetchTodos.fulfilled, (state, action) => {
        state.data = action.payload;
        state.status = STATUSES.IDLE;
      })
      .addCase(fetchTodos.rejected, (state, action) => {
        state.status = STATUSES.ERROR;
      });
  },
});

export const { add } = todoSlice.actions;
export default todoSlice.reducer;

export const fetchTodos = createAsyncThunk("todos/fetch", async () => {
  const response = await axios.get(
    "https://jsonplaceholder.typicode.com/todos",
    { params: { _limit: 10 } }
  );
  return response.data;
});
In fetchTodos, we are using Redux thunk middleware createAsyncThunk function, second argument is an async function where we can call API requests using fetch API or Axios. In our case we are using Axios, Axios is a promise-based HTTP client, promises have different statuses like pending, fulfilled, and rejected, based on this status we can update our store data by adding different cases in extraReducers.
In our src/store/index.js file, we combine all our slices and let add the following code to create a store and combine all slices.
import { configureStore } from '@reduxjs/toolkit';
import todoReducer from './todo-slice';

export const store = configureStore({
    reducer: {
        todos: todoReducer
    },
});
Step 3: Inject Redux store using Provider component
In our Application, we have three-component, App, Todolist, AddTodo component, the App component is our parent component of the other two, and we can inject our store into the App component using the Provider component from react-redux. Let’s edit the App.js file and add the following code.
import { store } from './store';
import { Provider } from "react-redux";
import Todolist from './components/Todolist/Todolist';
import Addtodo from './components/Addtodo/Addtodo';
import './App.css';

function App() {
  return (
    <Provider store={store}>
    <div className='app'>
      <Addtodo />
      <Todolist />
    </div>
    </Provider>
  );
}

export default App;
Step 4: Dispatch action creator add and fetchTodos in our component
Let’s create our Addtodo component, to add todo, we are using react material for our UI for form and table. In this component, we have to import add action creator function from our todo-slice.js, and whenever the user submits the form, we are using useDispatch hook to dispatch our add function.
import React, { useState } from 'react';
import './Addtodo.css';
import InputLabel from '@mui/material/InputLabel';
import MenuItem from '@mui/material/MenuItem';
import FormControl from '@mui/material/FormControl';
import Select from '@mui/material/Select';

import TextField from '@mui/material/TextField';
import Button from '@mui/material/Button';
import Box from '@mui/material/Box';
import { add } from '../../store/todo-slice';
import { useDispatch } from 'react-redux';

const Addtodo = () => {
  const [completed, setComplted] = useState(false);
  const [title, setTitle] = useState('');
  const dispatch = useDispatch();

  const handleStatus = (event) => {
    setComplted(!completed);
  };

  const handleSubmit = (event) => {
    event.preventDefault();
    dispatch(add({title, completed}));
    setTitle('');
    setComplted('');
  }

  return (
    <fieldset style={{ width: '760px'}}>
      <legend>Add todo task:</legend>
      <form onSubmit={handleSubmit} className='form'>
        <div className='formField'>

        <TextField id='outlined-basic' label='Task name' variant='outlined'
        onChange={(e) => setTitle(e.target.value)}
        name='title' className='input' />

        <FormControl fullWidth className='formControl'>
          <InputLabel id='demo-simple-select-label'>Status</InputLabel>
          <Select
            labelId='demo-simple-select-label'
            id='demo-simple-select'
            value={completed}
            name='completed'
            label='completed'
            onChange={handleStatus}
          >
            <MenuItem value='false'>Pending</MenuItem>
            <MenuItem value='true'>Completed</MenuItem>
          </Select>
        </FormControl>
        </div>

        <Box m={1} display='flex' justifyContent='flex-end' alignItem='flex-end'>
          <Button className='button' color='primary'
           variant='contained' type='submit'>Submit</Button>
        </Box>

      </form>
    </fieldset>

  );
};

export default Addtodo;
In our Todolist component, we dispatching the fetchTodos action creator function to fetch todos from our jsonplaceholder.typicode todo list, using redux-thunk middleware. We have the useSelector from react-redux to fetch our todos object from our state object from the Redux store.
import React, { useEffect } from "react";
import { useDispatch, useSelector } from "react-redux";
import { fetchTodos } from "../../store/todo-slice";
import "./Todolist.css";
import Table from "@mui/material/Table";
import TableBody from "@mui/material/TableBody";
import TableCell from "@mui/material/TableCell";
import TableContainer from "@mui/material/TableContainer";
import TableHead from "@mui/material/TableHead";
import TableRow from "@mui/material/TableRow";
import Paper from "@mui/material/Paper";

const Todolist = () => {
  const { data, status } = useSelector((state) => state.todos);
  const dispatch = useDispatch();

  useEffect(() => {
    dispatch(fetchTodos());
  }, []);

  if (status === 'loading') {
    <h3>Loading</h3>
    return;
  }

  return (
    <TableContainer component={Paper} sx={{ width: '800px', mt: '10px' }}>
      <Table sx={{ minWidth: 450 }} aria-label="simple table">
        <TableHead>
          <TableRow>
            <TableCell>S.no</TableCell>
            <TableCell>Task title</TableCell>
            <TableCell align="right">Status</TableCell>
          </TableRow>
        </TableHead>
        <TableBody>
          {data.map((row, index) => (
            <TableRow
              key={index}
              sx={{ "&:last-child td, &:last-child th": { border: 0 } }} >
              <TableCell component="th" scope="row">
                {index +1}
              </TableCell>
              <TableCell component="th" scope="row">
                {row.title}
              </TableCell>
              <TableCell align="right">
                {row.completed ? 'Completed' : 'Pending'}
              </TableCell>
            </TableRow>
          ))}
        </TableBody>
      </Table>
    </TableContainer>
  );
};

export default Todolist;
Related Articles