Angular Service contains a sharable and reusable Typescript class that contains centralized business logic that is shared across or reused across various related and unrelated components. Angular service can be instantiated and injected into components and other services. Unlike components and directives, services are without a user interface.
We have few objectives in this tutorial, first we’ll look at how to use service to share data between related and non related component. Second, we will learn angular service api call to make HTTP methods.
Angular components are our presentation layer of an application, it begs the question of who should be responsible for managing data state, by sending and receiving data from a remote server, sharing data among unrelated components, and more. This is where Angular services play all the above roles, services don’t have a view and it holds shareable or reusable code across the applications without using property and event binding.
What is the angular Service. ?
Angular contains the concept of service: a class containing methods and properties that can be reused by injecting them across application components, directives, and other services. Service is a class that acts as a central repository, as a central business unit, we could say something where you can store, where you can centralize your code is based on your application.
Why to use angular Service. ?
- Sharing data: sharing data across components, especially among not related components (parent/child relationship among components.
- Managing data state: In a small and medium application, we can use the service and rxjs library to manage the state of data across the application. In the large application, you might use ngrx for reactive state management of data in Angular.
- Retrieving and sending data to a remote server from/to our application.
How to create an angular service. ?
We can create an angular service manually or by using angular CLI to generate a new service as.
ng generate service serviceName
ng generate service services/serviceName
Angular service example
In this example, we have a service called the courseService to share data between components. The app.component.html template has two child components, the course list component is to display the list of courses and the course edit component for adding a new course.

Step 1: Let first create an Angular project, course service, and component to accept data input for a new course and to display the courses list. For UI style we have used ng-bootstrap. It is optional for this project if you want to use then check how to install ng-bootstrap in angular.
ng new coursesApp
ng generate service course
ng generate component courseEdit
ng genrate component courseList
Step 2: Edit the course.service.ts file to add getCourse method to return a list of all courses for the consumer component and addCourse to add a new course. The slice method with no argument makes a copy of our course’s object of service. One or any number of components can use this service, as a result, services are a dependency for the component.
import { Injectable, EventEmitter } from '@angular/core';
import { Course } from './model/course';

@Injectable({ providedIn: 'root' })
export class CourseService {
    selectedCourses = new EventEmitter<Course[]>();
    private courses: Course[] = [
        { name: 'Ionic', duration: '1hr' },
        { name: 'Angular', duration: '1hr 30 minutes' },
        { name: 'Javascript', duration: '1hr' },
    ];

    getCourses() {
        return this.courses.slice();
    }

    createCourse(course: Course) {
        this.courses.push(course);
        this.selectedCourses.emit(this.courses.slice());
    }
}
Step 3: Edit the course-edit.component.ts file to accept new input, we need to import FormModule in app.module.ts
import { CourseService } from './../course.service';
import { Component } from '@angular/core';

@Component({
  selector: 'app-course-edit',
  template: `
    <form>
      <div class="row">
          <div class="col-sm-5 form-group">
              <label for="name">Course name</label>
              <input type="text" id="name" class="form-control" #name>
          </div>
          <div class="col-sm-5 form-group">
              <label for="amount">Duration</label>
              <input type="text" id="name" class="form-control" #duration>
          </div>
      </div>
      <div class="float-right">
          <button class="btn btn-success" type="submit" (click)="onAddCourse(name.value, duration.value)">
              Add Course
          </button>
      </div>
    </form>
  `,
  styleUrls: ['./course-edit.component.scss']
})
export class CourseEditComponent {

  constructor(private courseService: CourseService) { }

  onAddCourse(name: string, duration: string) {
    this.courseService.createCourse({ name, duration });
  }
}
Step 4: Edit the course-list.component.ts file to display all courses.
import { Component, OnInit } from '@angular/core';
import { CourseService } from '../course.service';
import { Course } from '../model/course';

@Component({
  selector: 'app-course-list',
  template: `
  <h4>Course list</h4>
  <ol>
    <li *ngFor="let course of courses">
      {{ course.name }} - {{ course.duration }}
    </li>
  </ol>
  `,
  styleUrls: ['./course-list.component.scss']
})
export class CourseListComponent implements OnInit {
  courses: Course[] = [];

  constructor(private courseService: CourseService) { }

  ngOnInit() {
    this.courses = this.courseService.getCourses();
    this.courseService.selectedCourses.subscribe((courses) => {
      this.courses = courses;
    });
  }
}
Step 5: Edit the app-component.ts file to add two child components as
import { Component } from '@angular/core';

@Component({
  selector: 'app-root',
  template: `
  <div class="p-5 border bg-light">
    <app-course-edit></app-course-edit>

    <div class="pt-2">
      <app-course-list></app-course-list>
    </div>
  </div>
  `,
  styleUrls: ['./app.component.scss']
})
export class AppComponent {
  constructor() { }
}
We don’t have to import our service provider in app.module.ts as we have defined @Injectable({ providedIn: ‘root’ }). This means the service is defined at the root level and can be accessible to the whole application.
Provider for a Service
We have seen the injector on service and we can pass the value on it. By default, the Angular services injector has a root-level value and which means that one instance of this service is created and it can share or access from the whole application.
@Injectable({
  providedIn: 'root'
})
When Angular creates a new instance of a service class, it resolves any dependencies using an injector. The provider is another object that instructs an injector on how to create and obtain an instance of the service to be reused.
Angular dependency injection system is complex, we can have a hierarchy of injectors at a different level of application like root, module, component, or directive level. We can create service instances at the following levels.
- Root: By default is a singleton and only one instance is created at the root level and can be accessed everywhere in the application.
- Module: The service instance is reused within the module.
- Component: The service instance is specific to the component.
What if we want to share a singleton of the service?
Having a single instance of each service can be very useful because you can then use these services to hold state information (for example a customer list) accessed across multiple components.
There are two ways to make a service a singleton in Angular:
1. Declare root for the value of the @Injectable() providedIn.
2. Include the service in the AppModule
Angular service vs Component
- Angular components are the building block of Angular, it allows us to create custom HTML elements, and it has a view. Angular service doesn’t have a view.
- A component is the presentation layer of an application, where service, allow us to run logic that can be shared among component, like fetching data from the server, managing data state, and more.
Angular service api call using HTTPClient module
Angular’s HttpClient module to make GET and POST calls to a server.
We need to create a service to make HTTP requests to a server and lastly create a few components to demonstrate HTTP requests.
ng new httpClientApp --routing
cd httpClientApp
ng generate service services/todos

<-- Add few component to demonstrate Angular Http post & other methods -->
ng generate component components/home
ng generate component components/todos
ng generate component components/home
ng generate component components/edit-todo
ng generate component components/new-todo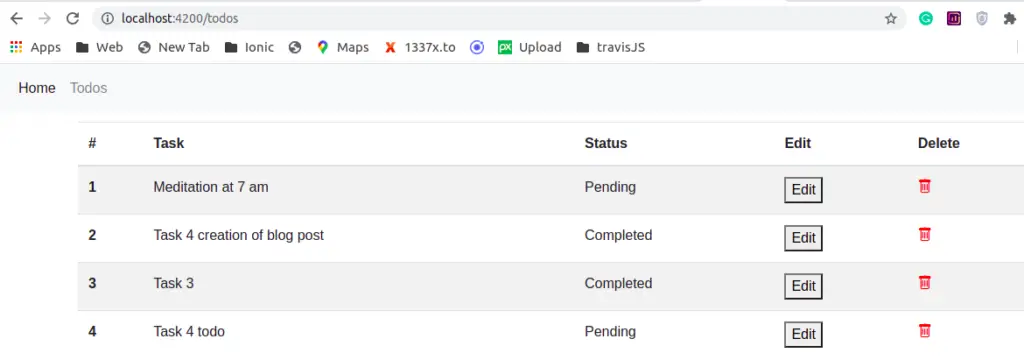
We have a few components, in the todos component will use the Angular HTTP GET method, in this component we have the HTTP DELETE method. In the new todo and edit todo components, we are demonstrating HTTP POST and PUt requests. The HTPP we can perform the following request.
| Method | Description |
| GET | Doesn’t contain a request body. GET or retrieve a list of entities from the server. |
| POST | Create a new entity for the server. |
| PUT | Override the whole entity. |
| PATCH | Replace a subset of an entity. |
| DELETE | Delete entity from the server. |
In our app.routing.module.ts let’s add routing for our components.
...
const routes: Routes = [
  { path: '', component: HomeComponent },
  { path: 'todos', component: TodosComponent },
  { path: 'todo/:id', component: EditTodoComponent },
];

...
export class AppRoutingModule { }
And in our app.component.html template, we have added a navigation bar using the bootstrap framework. If you want to know the best way to install and use bootstrap in Angular. Then check our previous articles on how to install ng-bootstrap in Angular.
Let’s edit the app.component.html template to add a navbar.
<nav class="navbar navbar-expand-lg navbar-light bg-light">
  <div class="collapse navbar-collapse" id="navbarSupportedContent">
    <ul class="navbar-nav mr-auto">
      <li class="nav-item active">
        <a class="nav-link" routerLink="/">Home</a>
      </li>
      <li class="nav-item">
        <a class="nav-link" routerLink="todos">Todos</a>
      </li>
    </ul>
  </div>
</nav>
<div class="container">
  <router-outlet></router-outlet>
</div>
Create a todo interface
In our HTTP request, we are performing a strict type request on different HTTP methods. For that, we need to create an interface of todo, let’s create folder models and add the todo.model.ts file with the following type.
export interface ITodo {
    id?: string;
    task: string;
    status: string;
}
Import Angular HttpClient module
To make an HTTP call request we have to import the HttpClient module. We can import this module into the application in either the root module or one of the feature modules before HTTP. We will import this module and FormsModule in our root module i.e the app.module.ts file.
import { NgModule } from '@angular/core';
import { BrowserModule } from '@angular/platform-browser';
import { AppRoutingModule } from './app-routing.module';
import { AppComponent } from './app.component';
import { NgbModule } from '@ng-bootstrap/ng-bootstrap';
import { TodosComponent } from './components/todos/todos.component';
import { HttpClientModule } from '@angular/common/http';
import { NewTodoComponent } from './components/new-todo/new-todo.component';
import { EditTodoComponent } from './components/edit-todo/edit-todo.component';
import { FormsModule } from '@angular/forms';
import { HomeComponent } from './components/home/home.component';

@NgModule({
  declarations: [
    AppComponent,
    TodosComponent,
    NewTodoComponent,
    EditTodoComponent,
    HomeComponent
  ],
  imports: [
    BrowserModule,
    AppRoutingModule,
    HttpClientModule,
    FormsModule,
    NgbModule
  ],
  providers: [],
  bootstrap: [AppComponent]
})
export class AppModule { }
Setting up the server for HTTP request
Setting up the server and adding data to the database will make our tutorial very long. We’ll use JSON Server to allow us to make fake HTTP requests without any coding and let install it globally.
npm install json-serverAll the HTTP requests to JSON Server are the same as Node-based express-js.
Create Dummy data for HTTP Request
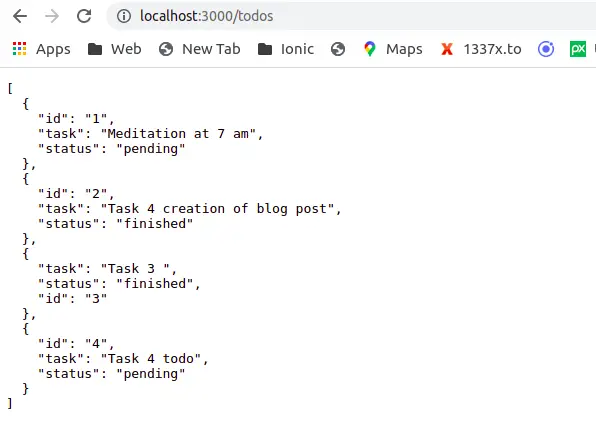
We have almost completed all configurations needed for setting up HTTP requests and we have left with our data. Let create dummy data in src/data/todo.json and add the following data.
{
  "todos": [
    {
      "id": "1",
      "task": "Meditation at 7 am",
      "status": "pending"
    },
    {
      "id": "2",
      "task": "Task 4 creation of blog post",
      "status": "finished"
    },
    {
      "task": "Task 3 ",
      "status": "finished",
      "id": "3"
    },
    {
      "id": "4",
      "task": "Task 4 todo",
      "status": "pending"
    }
  ]
}
To request or access dummy data, we need to run our fake server using the following command in our project folder on the terminal.
json-server src/assets/data/todos.jsonNote: We need to run the above command to make an HTTP request. Now you can access JSON data in our URL as follows.
Step 2: Create a service to request HTTP request
We have to create a service class to request HTTP requests to a remote server. In the HTTP Service, we’ll encapsulate some logic that helps manage the list of todos into service, edit, delete and create new todos using the HttpClient service from Angular.
We have already created todo.service.ts in the app/services folder. We have to import HttpClient from HttpClientModule and inject the HttpClient dependency in the constructor.
import { HttpClient, HttpErrorResponse } from '@angular/common/http';
import { Injectable } from '@angular/core';
import { Observable, throwError } from 'rxjs'
import { ITodo } from '../model/todo.model';
import { catchError } from 'rxjs/operators';

const URL_PREFIX = "http://localhost:3000";
@Injectable({
  providedIn: 'root'
})
export class TodosService {
  constructor(private http: HttpClient) { }

  getTodos(): Observable<Array<ITodo>> {
    return this.http.get<Array<ITodo>>(`${URL_PREFIX}/todos`,);
  }

  getTodo(id: string): Observable<ITodo> {
    return this.http.get<ITodo>(`${URL_PREFIX}/todos/${id}`);
  }


  addTodo(todo: ITodo) {
    return this.http.post(`${URL_PREFIX}/todos`, todo)
      .pipe(
        catchError((error: HttpErrorResponse) => {
          console.log(error.message);
          return throwError("Error while creating a todo" + error.message);
        }));
  }


  updateTodo(todo: ITodo, id: string): Observable<ITodo> {
    return this.http.put<ITodo>(`${URL_PREFIX}/todos/${id}`, todo)
      .pipe(
        catchError((error: HttpErrorResponse) => {
          // this.errorHandler.log("Error while updating a todo", error);
          console.log(error.message);
          return throwError("Error while updating a todo " + error.message);
        }));
  }

  patchTodo(todo: ITodo, id: string): Observable<ITodo> {
    return this.http.patch<ITodo>(`${URL_PREFIX}/todos/${id}`, todo)
      .pipe(
        catchError((error: HttpErrorResponse) => {
          console.log(error.message);
          return throwError("Error while updating a todo " + error.message);
        }));
  }

  deleteTodo(id: string) {
    return this.http.delete(`${URL_PREFIX}/todos/${id}`).pipe(
      catchError((error: HttpErrorResponse) => {
        console.log(error.message);
        return throwError("Error while deleting a todo " + error.message);
      }));
  }
}
In our service, we have performed all HTTP Requests, we have const URL_PREFIX containing the URL of our server. Angular HTTP requests are asynchronous and we can handle asynchronous by three different approaches.
- Callbacks: Is not recommended and will not use it.
- Promises
- Observables.
Angular HTTP GET method
In our Angular service, we have used the getTodos() observable to retrieve all todos from our server localhost:3000 or remote server. In our todo service, we have used the HttpClient object get method to get call HTTP requests.
Angular uses typescript which allows us to return explicitly type, in our HTTP GET we return observable of type ITodo array only. Uses of explicit type will reduce error.
Now in the todos component, we can inject our todos service and call getTodos() methods. This method in turn returns observable which we can subscribe to in our consumer components. Let’s edit the todos.component.ts file.
import { Component, OnInit } from '@angular/core';
import { ITodo } from 'src/app/model/todo.model';
import { TodosService } from 'src/app/services/todos.service';

@Component({
  selector: 'app-todos',
  templateUrl: './todos.component.html',
  styleUrls: ['./todos.component.scss']
})
export class TodosComponent implements OnInit {
  todos: ITodo[] = [];

  constructor(private todoService: TodosService) { }

  ngOnInit(): void {
    this.todoService.getTodos()
      .subscribe((data: ITodo[]) => this.todos = data);
  }

  deleteTodo(todo: ITodo) {
    let id = todo.id ? todo.id : '';
    this.todoService.deleteTodo(id).subscribe(() => {
      alert('Delete todo : ');
    })
  }
}
In our todo component, we have injected Angular HTTP service and called both todos and delete methods. Subscribing to HTTP GET will return either list of todos or errors while calling a remote HTTP request.
Let edit the todos.component.html to loop through the todos array, and add a button to delete by sending the id of todo in the HTTP Delete method. We also have an edit button to route to the todo-edit component, where we can edit our todo.
<table class="table table-striped">
    <thead>
        <tr>
            <th scope="col">#</th>
            <th scope="col">Task</th>
            <th scope="col">Status</th>
            <th scope="col">Edit</th>
            <th scope="col">Delete</th>
        </tr>
    </thead>
    <tbody>
        <tr *ngFor="let todo of todos; index as i">
            <th scope="row">{{ i + 1 }}</th>
            <td>{{ todo.task }}</td>
            <td>
                <span *ngIf="todo.status == 'finished'">
                    Completed
                </span>
                <span *ngIf="todo.status == 'pending'">
                    Pending
                </span>
            </td>
            <td>
                <button [routerLink]="['/todo/' + todo.id]">Edit</button>
            </td>
            <td>
                <i (click)="deleteTodo(todo)" class=" bi bi-trash icon-red"></i>
            </td>
        </tr>
    </tbody>
</table>
Angular HTTP GET method using observable and promise
In our previous example in Angular HTTP service, we have called HTTP GET on todos with only return type Observable. We can use Promise and Observable on HTTP GET, let’s edit our todos.service.ts file to add the following code.
import { HttpClient, HttpErrorResponse } from '@angular/common/http';
import { Observable, Observer, throwError } from 'rxjs'
import { Injectable } from '@angular/core';
import { catchError } from 'rxjs/operators';
import { ITodo } from '../models/todo.model';

const URL_PREFIX = "http://localhost:3000";
.....

  //HTTP GET with observable
  getTodosObservable(): Observable<Array<ITodo>> {
    return new Observable((observer: Observer<Array<ITodo>>) => {
      let results: Array<ITodo> = [];
      this.http.get<Array<ITodo>>(`${URL_PREFIX}/todos`)
        .subscribe((data: Array<ITodo>) => {
          data.map(i => {
            results.push(i)
          });
          observer.next(results);
          observer.complete();
        },
          // () => ({/** Error handling code goes here */ }),
          // () => ({/** Observable complete */ })
        );
    });
  }

 // HTTP GET with promise
  getPromiseTodos(): Promise<Array<ITodo>> {
    return new Promise<Array<ICountry>>((resolve) => {
      let results: Array<ITodo> = [];
      this.httpClient.get<Array<ITodo>>(`${URL_PREFIX}/todos`)
        .subscribe((data: Array<ITodo>) => {
            data.map(i => {
              results.push(i)
            });
            resolve(results);
          },
          () => ({/** Error handling code goes here */ }),
          () => ({/** Observable complete */ })
        );
    });
  }
}
Let us use observable on our consumer components, here we can use the async pipe on observable and let demonstrate it in our todos component.
import { Component, OnInit } from '@angular/core';
import { ITodo } from 'src/app/model/todo.model';
import { TodosService } from 'src/app/services/todos.service';

@Component({
  selector: 'app-todos',
  templateUrl: './todos.component.html',
  styleUrls: ['./todos.component.scss']
})
export class TodosComponent implements OnInit {
  todos$: Observable<Array<ITodo>> | undefined;

  constructor(private todoService: TodosService) {
    this.todos$ = this.todoService.getTodosObservable();
    // For promise http GET
    // this.todoService.getPromiseTodos()
    //.then((data: ICountry[]) => this.countries = data);
  }
Now in our todos template, we can use the async pipe on the todos$ observable as follows.
...
 <tbody>
        <tr *ngFor="let todo of todos$ | async; index as i">
            <th scope="row">{{ i + 1 }}</th>
            <td>{{ todo.task }}</td>
            <td>
                <span *ngIf="todo.status == 'finished'">
                    Completed
                </span>
                <span *ngIf="todo.status == 'pending'">
                    Pending
                </span>
            </td>
            <td>
                <button [routerLink]="['/todo/' + todo.id]">Edit</button>
            </td>
            <td>
                <i (click)="deleteTodo(todo)" class=" bi bi-trash icon-red"></i>
            </td>
        </tr>
    </tbody>
...
Angular HTTP POST example
To add a new entity to our database server, we can use the HTTP POST method. In our new todo component, we are calling addTodo to add a new todo to our todos.json file.
We had already added HTTP POST to add new todo in our todos.service.ts file using the Angular HTTPClient object. On our consumer component, new-todo let’s add code to add new todo and form to accept data. In a real application, we don’t need to add an id, this is handled by the server but in our case, we are using a fake JSON server.
import { Component } from '@angular/core';
import { ITodo } from 'src/app/model/todo.model';
import { TodosService } from 'src/app/services/todos.service';
@Component({
selector: 'app-new-todo',
templateUrl: './new-todo.component.html',
styleUrls: ['./new-todo.component.scss']
})
export class NewTodoComponent {
constructor(private todoService: TodosService) { }
addTodo(todo: ITodo) {
this.todoService.addTodo(todo).subscribe((data: any) => {
alert('Add new task successful' + data);
})
}
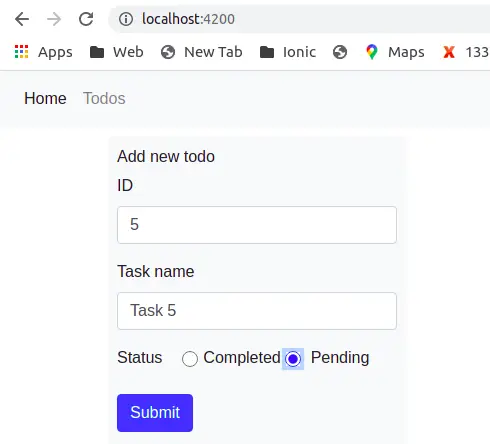
}In the new.todo.component.html template add Angular form to accept data from users.
<div class=form-container>
    <h6>Add new todo</h6>
    <form #taskForm="ngForm" (ngSubmit)="addTodo(taskForm.value)">
        <div class="form-group">
            <label>ID</label>
            <input type="text" name="id" class="form-control" ngModel>
        </div>
        <div class="form-group">
            <label>Task name</label>
            <input type="text" name="task" class="form-control" ngModel>
        </div>

        <div class="form-group radio">
            <label>Status</label>
            <input type="radio" name="status" class="form-control" value="finished"
             ngModel> Completed
            <input type="radio" name="status" class="form-control" value="pending"
            ngModel> Pending
        </div>
        <div class="form-group">
            <button class="btn btn-primary" type="submit">Submit</button>
        </div>
    </form>
</div>
When we enter new todo and click on submit button will invoke addTodo which the intern calls HTTP POST to add new todo and return add todo.
Angular HTTP PUT example
At last, we can demonstrate HTTP PUT and PATCH, both are used to edit data in the database server. The PUT method will override the whole entity and PATCH will edit the subset of the entity.

When the user clicks on the edit button of the corresponding todo in the todo list, the Angular application will navigate to a todo-edit component by using http://localhost:4200/todo/2.
Once we are in the edit-todo component we can retrieve the corresponding todo by using its id from the URL and ActivatedRoute object. Clicking on the update button will invoke Angular HTTP PUT to override the existing todo with the new value.
import { Component, OnInit } from '@angular/core';
import { ActivatedRoute, Router } from '@angular/router';
import { ITodo } from 'src/app/model/todo.model';
import { TodosService } from 'src/app/services/todos.service';

@Component({
  selector: 'app-edit-todo',
  templateUrl: './edit-todo.component.html',
  styleUrls: ['./edit-todo.component.scss']
})
export class EditTodoComponent implements OnInit {
  todo = {
    id: '',
    task: '',
    status: ''
  };

  constructor(
    private router: Router,
    private activatedRoute: ActivatedRoute,
    private todoService: TodosService
  ) { }

  ngOnInit(): void {
    let id = this.activatedRoute.snapshot.params['id'];
    if (id) {
      this.todoService.getTodo(id).subscribe((data: any) => {
        this.todo = {
          id: data.id,
          task: data.task,
          status: data.status
        }
      })
    }
  }


  updateTodo(todo: ITodo) {
    this.todoService.updateTodo(todo, this.todo.id)
    .subscribe((data) => {
      alert('Successful update');
      this.router.navigateByUrl('todos');
    })
  }

}
In our edit-todo template add the todo edit form, to allow the user new data for todo.
<div class=form-container>
    <h6>Edit Todo</h6>
    <form #taskForm="ngForm" (ngSubmit)="updateTodo(taskForm.value)">
        <div class="form-group">
            <label>Task name</label>
            <input type="text" name="task" class="form-control" [(ngModel)]="todo.task">
        </div>

        <div class="form-group radio">
            <label>Status</label>
            <input type="radio" name="status" class="form-control" value="finished" [(ngModel)]="todo.status">Completed
            <input type="radio" name="status" class="form-control" value="pending" [(ngModel)]="todo.status"> Pending
        </div>
        <div class="form-group float-right">
            <button class="btn btn-primary" type="submit">Update</button>
        </div>
    </form>
</div>Conclusion
We have learned how to create and used Angular services. We use subject when we have some common business logic that we want to share or reuse at multiple places in our application.
Related posts