In Angular, the component has a lifecycle that begins with their initial instantiation and continues with their rendering until they’re destroyed and removed from the application. Whenever a new component is created, the Angular component goes through a couple of different phases in this creation process and it will actually give us a chance to hook into these phases and execute some code.
We can hook into these phases by implementing some methods Angular will call if they are present. Where we can place the custom code to handle various events (component create, start, run, and so forth).
Angular Component LifeCycle hooksM
Angular create a new component and it follows the following phases.
- Angular creates the component
- Renders the component
- Creates and renders the component children
- Checks when the component data-bound properties change and
- Destroys the component before removing it from the DOM
To tap into and react when these life cycle events occur, angular offers several life cycle hooks. The life cycle Hook interfaces are defined in the @angular/core library.
The constructor of a component should only be used for dependency
injection because data-bound input values are not yet set in the
constructor.
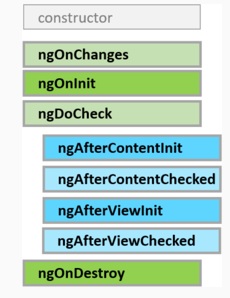
ngOnChanges(): is called both right after the constructor to set and then later every time the one or more input binding of a component or directive get changed. It’s the only hook method that receives an argument of type SimpleChanges object containing current and previous property values. Called before ngOnInit() and whenever one or more data-bound @Input() properties @Output() change and angular render part of template where it changes its value.
ngOnInit (): OnInit is called only once during the component lifecycle. Executes after the constructor and after ngOnChange hook for the first time. It is most commonly used for any initialization and loading data from API. This runs once after the component has fully initialized and before any of the child directive properties are initialized which is after the first OnChanges hook.
ngDoCheck(): The “DoCheck” hook allows you to integrate into the change detection cycle and find changes within the objects’ references or any areas where Angular did not detect changes automatically. Called during every change detection run, immediately after ngOnChanges() and ngOnInit().
This is one of the ways we can use to notify Angular of any changes because certain trigger events like click events on the button, or observables were resolved in the component. That may result in a change in properties value state so we need to update a value in the template then Angular needs to re-render that part of the template and ngDoCheck is a hook executed multiple times or every check Angular make.
ngAfterContentInit(): Called only once after Angular put external content into the component view which is projected via the (ng-content) directive. So not the view of the component itself but instead you could say the view of the parent component, especially the part which will get added to our component through ng-content.
A lifecycle hook is called after Angular has fully initialized all content of a directive. Use ngAfterContentInit to call something once after all of the content has been initialized. It will run once after the first ngDoCheck(). It’s called when the component’s child views and external content have been attached. The AfterContent hooks concern ContentChildren, the child components that Angular projected into the component.
ngAfterViewInIt():
Angular invokes the “ngAfterViewInit” hook only once the view of the component and all view children have been initially rendered. That also includes the child components that may be part of the template. You can access child instance members and perform additional tasks in the code, for example changing properties or subscribing to events. Here, @ViewChild and @ViewChildren will be resolved.
ngAfterContentChecked(): The “AfterContentChecked” lifecycle hook allows you to provide a custom mechanism for checking changes in the projected components. The behavior is similar to the “DoCheck” but applied to the components that are part of the “ng-content” container. Is executed whenever change detection checked this content we are projecting into our component.
ngAfterViewChecked():
When Angular checks the component view and any View Children have been checked, you can implement additional logic to determine whether changes occurred. It will execute only after all the children components’ AfterViewChecked hooks have finished executing. It can be useful if the component is waiting for something coming from its child components.
ngOnDestroy() Executes just before angular destroys the component and is generally used for performing the cleanup to avoid a memory leak.
Example of Angular Component LifeCycle hook ngOnChanges
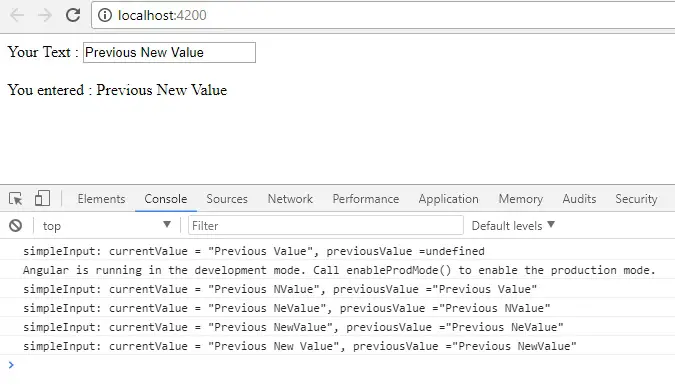
We will learn a simple example of using ngOnChanges lifecycle hook ngOnChanges is called every time the value of an input property of the component changes. So first let’s create a Simple Component with an input property. Our example has an input text box, as soon as a user starts typing in the text box, we want to capture the current and previous value and log it on the browser console.
We have to follow certain steps to achieve our task.
Step 1: Create a simple component in app/simple.component.ts
import { Component, Input, OnChanges, SimpleChanges } from '@angular/core';

@Component({
  selector: 'simple',
  template: `You entered : {{simpleInput}}`
})
export class SimpleComponent implements OnChanges {
  @Input() simpleInput: string;

  constructor(){}

  ngOnChanges(changes : SimpleChanges){
    for (let propertyName in changes){
      let change = changes[propertyName];
      let current = JSON.stringify(change.currentValue);
      let previous = JSON.stringify(change.previousValue);
      console.log(propertyName + ': currentValue = ' +current + ', previousValue =' + previous);
    }
  }
}
Angular supports the @Input and @Output annotations to pass values between components having parent and child relationships. The @Input annotation is for variables that receive values from a parent component, whereas the @Output annotation sends (or “emits”) data from a component to its parent component when the value of the given variable is modified.
“Inputs” specify which properties you can set on a component from parent to child whereas “outputs” identify the events a component can fire to send information up to the hierarchy to its parent.
We have to import the Input decorate simple to convert the variable simpleInput to input property. OnChanges interface, SimpleChanges is the object provided by the angular framework that represents the basic change from a previous to a new value.
The simple input property with interpolation displays the value it receives from the parent component.
1. We have to implement the OnChanges Life Cycle Hook interface Input property. When this property changes ngOnChanges lifecycle hook method is called @Input() simpleInput: string;
2. Implementation of the hook method This ngOnChanges(changes: SimpleChanges) code logs the current and previous value of input text to the console.
Step 2: Add the input text box in app.component.ts
import { Component } from '@angular/core';

@Component({
  selector: 'app-root',
  template: `Your Text : <input type='text' [(ngModel)]='userText'>
            <br/><br/>
            <simple [simpleInput]='userText'></simple>
            `
})
export class AppComponent {
  userText: string = 'Previous Value';

  constructor(){}
}
We have a simple selector as a directive and bind it simplenput with userText property of the app component. Whatever the value we type in the input of userText properties and it updated value of the userText property is bound to the simple directive input property of the simple component.
Conclusion
Angular components are fundamental to the library and we had learned different stages of the Angular lifecycle and its hooks. Angular component life cycle please check an official document for more information.
Related posts