Ionic Angular data binding is the synchronization of elements of the component UI widget to the data in your component classes, and vice versa, managed by Angular. It allows communication between the template and components class. Ionic data binding can be one-way or two-way data binding.
With data binding, we can control the user interface of our components by changing variables, and we can accept user input, allowing them to change the value of some variables. Angular Ionic data binding can control every aspect of the user interface: hiding things, showing results, accepting user input, and more. It’s incredibly powerful and easy to use.
Angular Ionic data binding types
- String Interpolation
- Property Binding
- Event Binding
- Two Way Data Binding
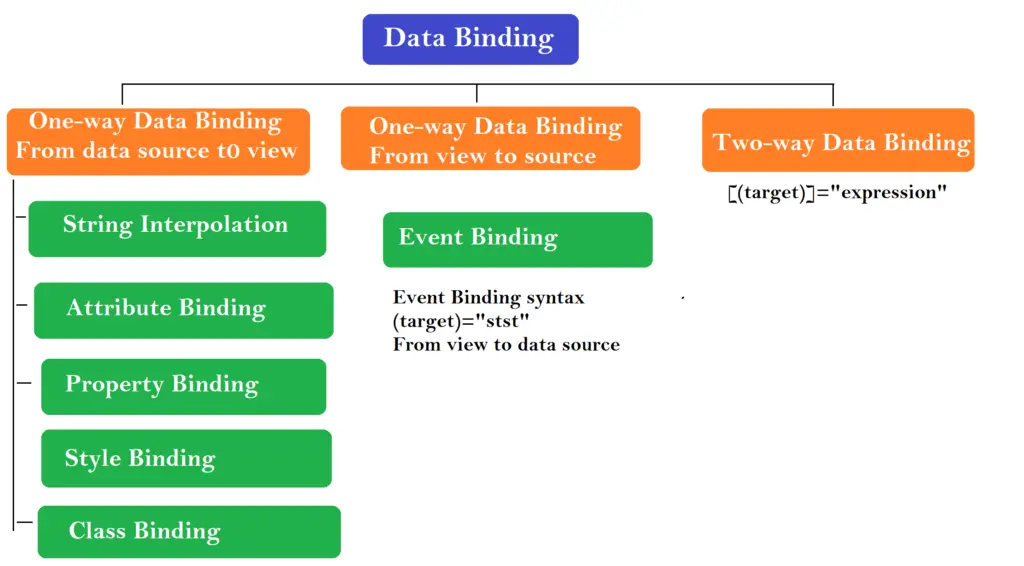
Angular One Way Data binding : String Interpolation
This can occur when the template (the View) is automatically kept up-to-date with the latest values in the class instance variables (the Model). Updates flow in only one direction.
One-Way Data Binding with {{ and }}
Those double curly braces are also known as mustaches or interpolations. The double curly braces are used for one-way binding a template expression, making a calculation from available data in the Model and including it in the View.
The expression produces a value, and it’s included in the View (the markup from the component template). The Model—that is, the data in the Component class—is never updated.
Example: Expression in string interpolation
{{ 2+4 }} output view in 6 in template|view.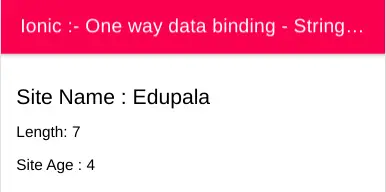
Create a simple ionic app –
ionic start interpolationApp blank –type=angular
Step 2: Add the following code in home.page.ts
import { Component } from '@angular/core';

@Component({
  selector: 'app-home',
  templateUrl: 'home.page.html',
  styleUrls: ['home.page.scss'],
})
export class HomePage {
  name = 'Edupala';
  dob = 2016;

  constructor() { }

  getAge() {
    return 2020 - 2016;
  }

}
Add the following code in home.page.html
<ion-header [translucent]="true">
  <ion-toolbar color="danger">
    <ion-title>
      Ionic :- One way data binding - String interpolation
    </ion-title>
  </ion-toolbar>
</ion-header>

<ion-content [fullscreen]="true">
  <div class="ion-padding">
    <h3>Site Name : {{ name }}</h3>
    <p>Length: {{ name.length}}</p>
    <p>Site Age : {{ getAge() }}</p>
  </div>
</ion-content>
Angular Property Binding: One-Way Data Binding with [ and ] or *
This binding allows us to bind values to properties of an element to modify its behavior or appearance. This can include properties such as class, disabled, href, or textContent. The square braces OR * can be used for one-way property binding. With [] we can bind a template expression, making a calculation from available data in the Model and including it in the data binding target.
[Data Binding Target] = “Template Expression”
Or:
*Data Binding Target = “Template Expression”
The data binding target with * is something in the DOM (including element properties, component properties, and directive properties) that can be bound to the result of the expression on the right side of the target, as shown in
<ion-img [src]="{{ imageUrl }}"></ion-img>

<div [ngClass] = "{ selected" isSelected }" >

<div [style.color] = "isAlert ? 'red' : 'green'">

<ion-item *ngFor="let student of students">
<div *ngIf="isStudentExist">
import { Component } from '@angular/core';
import { Platform } from '@ionic/angular';
import { SplashScreen } from '@ionic-native/splash-screen/ngx';
import { StatusBar } from '@ionic-native/status-bar/ngx';
@Component({
selector: 'app-root',
template: `
<h4>Site name</h4>
<input [value]='site'>
`,
styleUrls: ['app.component.scss']
})
export class AppComponent {
site = 'Edupala - 2020';
}Ioinc Angular event binding
Angular event binding allows you to listen for certain events such as clicks, touches, keystrokes, and mouse movements so that we can respond to this event. Event binding syntax consists of a target event name within parentheses on the left and a quoted template statement on the right.
To test the event bindings in action let’s wire the “input” event on the input element and when ever user types the keyboard the input event is raised and we assign a value of the input to a variable name.
import { Component } from '@angular/core';
import { Platform } from '@ionic/angular';
import { SplashScreen } from '@ionic-native/splash-screen/ngx';
import { StatusBar } from '@ionic-native/status-bar/ngx';

@Component({
  selector: 'app-root',
  template: `
  <div>
	<input [value]="name" (input)="name = $event.target.value">
	{{name}}
</div>
  `,
  styleUrls: ['app.component.scss']
})
export class AppComponent {
  name = '';
}
Please check our previous articles on an Ionic Angular two-way data binding in detail. Read more information on Angular data binding in official angular documentation.