In this article, we’ll learn about Express authentication using JWT, the JWT is stateless authentication, where the state of the user is not stored or maintained at the server-side, this approach is called stateless.
Express JWT (JSON Web Tokens) is one of the popular approaches to implementing stateless authentication in Node or Express Js and recommended approach in RESTful API.
Intro to Express authentication using JWT
There are mainly two ways of implementing authentication on the web application
- session : Stateful Authentication
- token: Stateless authentication using JWT
The session is the traditional approach and used for a long time, where user information is saved at sever and client end this approach is stateful authentication. User information like the session ID, time to log in, expiration, and others are saved in browser cookies. The backend keeps track of the active sessions in a database, while on the front-end a cookie is created that holds a session identifier.
This traditional approach isn’t suitable for Express (MEAN OR MERN). The approach used server-side resources to maintain each user-session information. The stateless approach doesn’t store any information on the server-side and is recommended approach for Express authentication. We can implement a stateless authentication using JWT and middleware like passport.js,
How do JWT works?
The JWT is token base authentication, that doesn’t store any information on the server. This allows us to scale our application without worrying about users logged in or how many users are. logged in at serve. The JWT token provides use safe and secure (authentication and information exchange between client and server).

Step 1: The client sent the username and password to the server, when the user is valid the server sent back access and refresh tokens to the client.
Step 2: On a subsequent request client sent a request with an access token on the request header.
Step 3: The server checks if the access token is valid or not, if valid then fulfill the user request. If the token is expired, then the client can use the refresh token to get a new access token from the server.
Both access token and refresh token are in encryption format and transmitted over the internet and token encryption is made of three-part. We can’t decrypt this token and only compare tokens. Token consists of the following three parts.
- Header: (Type and hash algorithm)
- Signature: To create the signature part you have to take the encoded header, the encoded payload, a secret, and the algorithm specified in the header, and sign that.
- Payload: The second part of the token is the payload, which contains the claims. Claims are statements about an entity (typically, the user) and additional data.
Step for registering and signup user authentication using Express JWt
I hope you have created your express project. We need to install the following packages for our Express JWT project bcrypt, dotenv, esm, joi, jsonwebtoken, mongoose, multer. Let’s install it on our project.
npm install bcrypt dotenv esm joi jsonwebtoken mongoose multerBefore working on Express authentication, we need to configure our project. Let’s create .env file and add the following configuration.
APP_PORT=5000
DEBUG_MODE=true
DB_URL=mongodb://username:password@localhost:27017/rest-api?authSource=admin&w=1
JWT_SECRET=thisismysecret
REFRESH_SECRET=thisismyrefreshsecret
APP_URL=http://localhost:5000
ON_HEROKU=false
Above is the demon configuration on window OS, you have different configurations for your MongoDB hosting or based on your requirement. In the config/index.js file export the following configuration, so that we can use it inside our JWT express authentication project.
import dotenv from 'dotenv';

dotenv.config();

export const {
    APP_PORT,
    DEBUG_MODE,
    DB_URL,
    JWT_SECRET,
    REFRESH_SECRET,
    APP_URL
} = process.env;
Step 1: Create an Expressjs server
In the root folder create the file server.js where we create our express server by calling on Express listen function.
import express from 'express';  import routes from './routes';
import mongoose from 'mongoose';
import { APP_PORT, DB_URL } from './config';
import errorHandler from './middlewares/errorHandler';

const app = express();

app.use(express.json());
app.use(express.urlencoded({ extended: false }));
...
app.use('/api', routes);
app.use(errorHandler); //Our errorhandler middleware is add as global

app.listen(APP_PORT, () => {  console.log("Express app started on port 5000.");   });
Step 2: Create user schema
Let’s first create a User Schema for MongoDB. We have to store both username, email, and password in the database. Where schema is a blueprint of what kind of data we want to store in the database. In the root folder create models and file user.js file and add the following schema definition for user data.
import mongoose from "mongoose";

const Schema = mongoose.Schema;

// Blueprint of what kind of document we want in db
const userSchema = new Schema({
    name: { type: String, required: true },
    email: { type: String, required: true, unique: true },
    password: { type: String, required: true },
    role: { type: String, default: 'customer' },
}, { timestamps: true })


export default mongoose.model('User', userSchema, 'users');
The above code will generate schema for Users and users is optional and will create collection name users.
Step 3: Define auth and admin middleware
We need auth middleware to check if the token is valid or not, middlewares can access the request object, and based on validation it will fulfill or reject the request. In the root folder create the middleware folder middlewares/auth.js. In auth.js we access the token from the request header and check if it is valid or not.
import CustomErrorHandler from "../services/CustomErrorHandler";
import JwtService from "../services/JwtService";

const auth = async (req, res, next) => {
    //Step 1 - Get authorization header from request
    let authHeader = req.headers.authorization;

    // Step 2: If header not exist
    if (!authHeader) {
        return next(CustomErrorHandler.unAuthorized())
    }

    //Step 3: If header exist split bearer and token
    // Apply middleman auth in
    const token = authHeader.split(' ')[1];

    // Step 4: Verify token
    try {
        const { _id, role } = await JwtService.verify(token);
        const user = { _id, role }
        req.user = user;
      // Setting user on req, so we can valid token user in userController
        next();

    } catch(err) {
        return next(CustomErrorHandler.unAuthorized())
    }
}

export default auth;
To validate the token, we have used the following services.
- JwtService: To generate and verify the token.
- CustomErrorHandler: To handle the different error that occurs in our Express js project
Let’s create both services, in the services folder, and add the following code in the services/JwtService.js file
import { JWT_SECRET } from '../config';
import jwt from 'jsonwebtoken';

class JwtService {
    static sign(payload, expiry = '60s', secret = JWT_SECRET) {
        return jwt.sign(payload, secret, { expiresIn: expiry });
    }

    static verify(token, secret = JWT_SECRET) {
        return jwt.verify(token, secret);
    }
}

export default JwtService;
The sign function generates the token and verify function validates the token.
To handle a custom error, we have services called We CustomErrorHandler.js inside the services folder.
class CustomErrorHandler extends Error {

    constructor(status, msg)  {
        super();
        this.status = status;
        this.message = msg;
    }

    static alreadyExist(message) {
        return new CustomErrorHandler(409, message);
    }

    static wrongCredential(message = 'Username or pasword is wrong') {
        return new CustomErrorHandler(401, message); //401 Unauthorized
    }

    static unAuthorized(message = 'UnAuthorized') {
        return new CustomErrorHandler(401, message); //401 Unauthorized
    }


    static notFound(message = '404 Note Found') {
        return new CustomErrorHandler(404, message); //401 Unauthorized
    }

    static serverError(message = 'Internal server error') {
        return new CustomErrorHandler(500, message); //401 Unauthorized
    }
}

export default CustomErrorHandler;
We also need admin middleware, if a user has the role of type admin, then he/she can perform CRUD operations on our MongoDB database. Let’s add the following code in the middlewares/admin.js file
import { User } from '../models';
import CustomErrorHandler from '../services/CustomErrorHandler';

const admin = async (req, res, next) => {
    try {
        // We get user infor from auth middleware
        const user = await User.findOne({ _id: req.user._id });
        if (user.role === 'admin') {
            next();
        } else {
            return next(CustomErrorHandler.unAuthorized());
        }
    } catch (err) {
        return next(CustomErrorHandler.serverError(err.message));
    }
};

export default admin;
Step 4: Define error handler middleware
We also need an error handler middleware for our project and let’s add this in the middleware/errorHandler.js file
import { DEBUG_MODE  } from "../config";
import { ValidationError } from 'Joi';
import CustomErrorHandler from '../services/CustomErrorHandler';

const errorHandler = (err, req, res, next) => {
    let statusCode = 500; //By default for any error we need to sent statuscode and msg
    let data = {
        message: 'Internal server error',
        ...(DEBUG_MODE === 'true' && { originalError: err.message })
    }

    if (err instanceof ValidationError) { // Error class from Joi
        statusCode = 422;
        data = {
            message: err.message
        }
    }

    if (err instanceof CustomErrorHandler) { // custom error
        statusCode = err.status;
        data = {
            message: err.message
        }
    }

    return res.status(statusCode).json(data);
}

export default errorHandler;
Step 5: Define the route for Express authentication
For routes, create folder routes and add a file called index.js file. Let’s add the following routes for authentication registration, logged-in, user information, and log-out.
import express from 'express';
import {  registerController, loginController, userController, refreshController } from "../controllers";
import auth from '../middlewares/auth.js';

const router = express.Router();

router.post('/register', registerController.register);
router.post('/login', loginController.login);
router.get('/me', auth, userController.me);
router.post('/refresh', refreshController.refresh);
router.post('/logout', auth, loginController.logout);
Still, now we haven’t added any code for the controller.
Express Register new user
Here is a screenshot of express registering a new user, we have used Postman as a client endpoint to register a new user. We used the POST method with JSON body payload of name, email, password, and repeat_password.
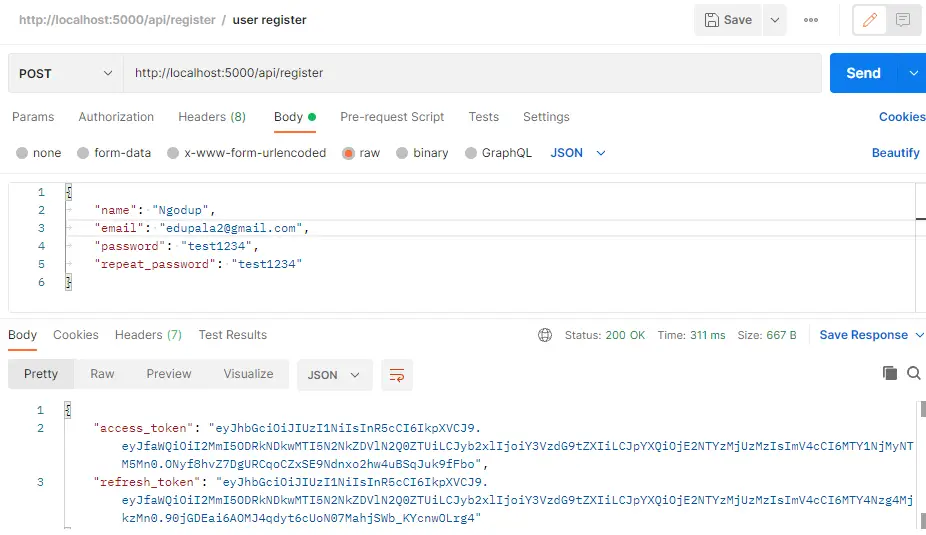
This request is passed to this route at the server end.
router.post('/register', registerController.register);Now we need the registerController to register new users, let’s create folder controllers and add folder auth. In auth folder, we add all our user authentication-related controllers. Registering new users using HTTP POST, we get refresh and access tokens from the response. We have followed the following to register a user and token.
- Validate the request using the Joi schema
- Check if email exists in the database by using the User model
- If no user then encrypt the password using bcrypt
- Prepare model and add a new user to database users.
- Generate JWT token for both access and refresh token
- Save Access token inside a database and need to create a model for refresh token
- send respond with access and refresh token
In controllers/auth/registerController.js add the following code
import Joi from 'joi';
import { RefreshToken, User } from '../../models';
import bcrypt from 'bcrypt';
import JwtService from '../../services/JwtService';
import CustomErrorHandler from '../../services/CustomErrorHandler';
import { REFRESH_SECRET } from '../../config';

const registerController = {
    async register(req, res, next) {
        // Step 1: Validate
        const registerSchema = Joi.object({
            name: Joi.string().min(3).max(30).required(),
            email: Joi.string().email().required(),
            password: Joi.string().pattern(new RegExp('^[a-zA-Z0-9]{3,30}$')).required(),
            repeat_password: Joi.ref('password')
        });

        const { error } = registerSchema.validate(req.body);

        if (error) {
            return next(error); // Joi validation error
        }


        // Step 2: Validate
        try {
            const exist = await User.exists({ email: req.body.email });
            if (exist) {
                return next(CustomErrorHandler
                  .alreadyExist('This email is already taken'));
            }
        } catch(err) {
            return next(err);
        }


        const { name, email, password } = req.body;

        // Step 3: Encrypt password
        const hashedPassword = await bcrypt.hash(password, 10); // SaltRound

        // Step 4: Prepare user model and save to DB
        const user = new User({
            name: name,
            email: email,
            password: hashedPassword
        });

        let access_token;
        let refresh_token;


        try {
            const result = await user.save();
            access_token = JwtService.sign({_id: result._id, role: result.role});

            refresh_token = JwtService.sign({_id: result._id, role: result.role}, '1y', REFRESH_SECRET);

            await RefreshToken.create({ token: refresh_token});
        } catch(err) {
            console.log('Catch error in access', err)
        }

     // Step 7: Return access and refresh token
        res.json({ access_token : access_token, refresh_token: refresh_token});
    }
}

export default registerController;
We not only have registerController but also have other auth controllers. Let’s add all controllers inside the controllers/index.js file so that we can access it without specifying all paths.
export { default as registerController } from './auth/registerController';
export { default as loginController } from './auth/loginController';
export { default as userController } from './auth/userController';
export { default as refreshController } from './auth/refreshController';
Express login example
Once we have a user inside our MongoDB, we can logged in, and here is a screenshot of it. We need to pass email and password for Express login authentication.
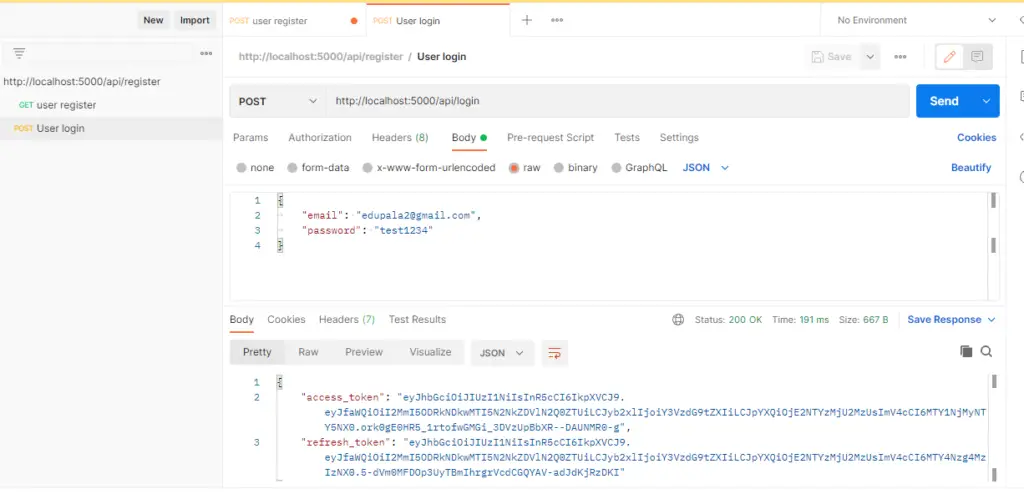
This request is passed to this route at the server end.
router.post('/login', loginController.login);Now we need the loginController for the logged-in user. For the logged-in user using HTTP POST, with the above route, we get refresh and access tokens from the response.
- Validate the request by using Joi
- Check if the user exists inside MongoDB using the User model
- Compare encrypted passwords using the JWT service
- If the user is valid generate access and refresh token
- Save refresh token in DB
- Send respond with access and refresh token
import Joi from 'joi';
import { User, RefreshToken } from '../../models';
import CustomErrorHandler from '../../services/CustomErrorHandler';
import bcrypt from 'bcrypt';
import JwtService from '../../services/JwtService';
import { REFRESH_SECRET } from '../../config';

const loginController = {
    async login(req, res, next) {
        // Step 1: Request validation
        const loginSchema = Joi.object({
            email: Joi.string().email().required(),
            password: Joi.string().pattern(new RegExp('^[a-zA-Z0-9]{3,30}$')).required(),
        });

        const { error } = loginSchema.validate(req.body);


        if (error) {
            return next(error);
        }

        // Step 2: Check if email exist
        try {

            const user = await User.findOne({ email: req.body.email });

            if (!user) {
                return next(CustomErrorHandler.wrongCredential());
            }


            //Step 3: Compare password
            const match = await bcrypt.compare(req.body.password, user.password);

            if (!match) {
                return next(CustomErrorHandler.wrongCredential());
            }

            //Step 4: Generate token and send it to client
            const access_token = JwtService.sign({ _id: user._id, role: user.role });


            const refresh_token = JwtService
           .sign({ _id: user._id, role: user.role }, '1y', REFRESH_SECRET);

            await RefreshToken.create({ token: refresh_token });

            res.json({ access_token: access_token, refresh_token: refresh_token });

        } catch (err) {
            return next(err);
        }
    },

    async logout(req, res, next) {
        // validation

        const refreshSchema = Joi.object({
            refresh_token: Joi.string().required(),
        });
        const { error } = refreshSchema.validate(req.body);

        if (error) {
            return next(error);
        }

        //Step 2: No error delete refresh token from db
        try {
            await RefreshToken.deleteOne({ token: req.body.refresh_token });
        } catch (err) {
            return next(new Error('Something went wrong in the database'))
        }

        res.json({ status: 1 });

    }
}

export default loginController;
We have also added a logout code also in loginController, here is a screenshot, we need to send an access token in body JSON to logout a user.

Express jsonwebtoken refresh token
We also need API to generate a new access token, when it is expired. We can generate an access token using a refresh token and here is a screenshot of our example.

This request is passed to this route at the server end to generate a refresh token.
router.post('/refresh', refreshController.refresh);import Joi from 'joi';
import { REFRESH_SECRET } from '../../config';
import { RefreshToken, User } from '../../models';
import CustomErrorHandler from '../../services/CustomErrorHandler';
import JwtService from '../../services/JwtService';
const refreshController = {
async refresh(req, res, next){
// Step 1: Validate request like valid email
const refreshSchema = Joi.object({
refresh_token: Joi.string().required(),
});
const { error } = refreshSchema.validate(req.body);
if (error) {
return next(error);
}
// Step 2:Check refresh token in db
// If not then user logout and refresh_token is revoke
// If no then issue new refresh token
let refreshToken;
try {
// Check db for refresh token
refreshToken = await RefreshToken
.findOne({ token: req.body.refresh_token});
//No refresh token
if (!refreshToken) {
return next(CustomErrorHandler.unAuthorized('Invalid refresh token'));
}
//Step 3: If refresh token exist and moved forward - verify token
let userId;
try {
const { _id } = await JwtService.verify(refreshToken.token, REFRESH_SECRET);
//JwtService need 2 parameter token and secret
userId = _id;
} catch (err) {
return next(CustomErrorHandler.unAuthorized('Invalid refresh token'));
}
//Step 4: Check user
const user = User.findOne({ _id: userId });
if(!user) {
return next(CustomErrorHandler.unAuthorized('No user found !'));
}
// Step 5: If token valid and user is exist then generate both token
const access_token = JwtService.sign({_id: user._id, role: user.role});
// Create refresh token
const refresh_token = JwtService.sign({_id: user._id, role: user.role}, '1y', REFRESH_SECRET);
await RefreshToken.create({ token: refresh_token});
res.json({ access_token: access_token, refresh_token: refresh_token });
} catch(err) {
return next(new Error('Something went wrong' + err.message));
}
}
}
export default refreshController;Expressjs API to get user information
We can get user information, we need to pass a refresh token to validate if a user is genuine and exist.
// Apply middleman auth to check valid header or token

router.get('/me', auth, userController.me);
In controllers/auth/userController.js following code to get user information.
import { User } from "../../models";
import CustomErrorHandler from "../../services/CustomErrorHandler";

const userController = {
  async me(req, res, next) {
      try {
        //Step 1: Check token validation - Protected request - need token
        //We need auth middleman to intercept to check if token exist on route  or not by checking valid or non valid
        //In select if we add - or minus it means don't select it
        const user = await User.findOne({ _id: req.user._id }).select('-password -updatedAt -__v');

        // Where req.user._id we get from auth middleware when token is valid
        //Step 2: If user not exist
        if (!user) {
          return next(CustomErrorHandler.notFound());
        }

        //Step 3: If user exist
        res.json(user);
      } catch(err) {
        return next(err);
      }
  }
}

export default userController;
Related Post