We have made a series of tutorials on Express js Controller, authentication, and middleware, in this tutorial we’ll learn and demonstrate Nodejs express CRUD operation. This is continuing our previous Nodejs Express js authentication, we need middleware like auth, and admin to perform CRUD on our Express MongoDB project.
MongoDB is one of the most popular databases, it is No SQL database, Express js is one popular Nodejs server-side framework for designing Web applications and APIs. You can use any frontend framework like Angular and React, we can have full-stack MEAN or MERN.
Developing RESTful APIs to Perform CRUD Operations
CRUD (Create, Read, Update, Delete) is an acronym for ways we can perform operations on a database. We are using MongoDB, Nodejs, and Express to perform CRUD operations with an image. Express along with MongoDB as a database we are developing RESTful API to perform CRUD (Create, Read, Update, and Delete) operations
Here we are creating posts with titles, content, and image. CRUD stands for
- Create (POST) – Sending something to DB
- Read (GET)- Getting something from DB
- Update (PUT) – Change something on DB
- Delete (DELETE)– Remove something on DB
What we are learning?
In this example, we are learning about CRUD operations.
- Adding new Posts, editing existing and deleting posts or data to MongoDB.
- Validate user and admin using middleware,
- How to add image URL in our MongoDB database.
First, we create our project by running npm init and naming the project. As we are continuing from our previous example, we need a user authentication code, which we have covered in previous articles. We need the following libraries packages.
npm install bcrypt dotenv esm joi jsonwebtoken mongoose multerCreate a file called server.js in our project and add the following code to it.
import express from 'express';
import { APP_PORT, DB_URL } from './config';
import errorHandler from './middlewares/errorHandler';
import path from 'path';

const app = express();

import routes from './routes';
import mongoose from 'mongoose';

// Database connection
mongoose.connect(DB_URL, {
    useNewUrlParser: true,
    useUnifiedTopology: true
});

const db = mongoose.connection;
db.on('error', console.error.bind(console, 'connection error:'));
db.once('open', () => {
    console.log('DB connected...');
});

//To define global appRoot to access root folder
global.appRoot = path.resolve(__dirname);

//As we have multipart data like data with image we need inbuilt middleware
// app.use(cors());
app.use(express.urlencoded({ extended: false }));

app.use(express.json());
app.use('/api', routes);

app.use('/uploads', express.static('uploads'));
//Whenever uploads words came on serving request - used express static middleware
// to serve uploads folder to serve all files inside

app.use(errorHandler);
app.listen(APP_PORT, () => console.log(`Listening on port ${APP_PORT}`));
Express CRUD: Create Post
Your application may be eCommerce or any other but in most cases, we have the same data and may be images also. Here in our example is an article or post containing three fields.
- Title of post
- Content of a post
- Image for the feature image of the post.

Here is a screenshot of our Express js Post using frontend tools like Postman or Insomnia.
We use the Insomnia tool as a frontend for making requests, here we are creating a post using an HTTP POST method to pass data from client to server. We have three fields for each post, title, content, and image. In Hthe TTP header request we have set Authorization bearer with Access token along with our payload in body multipart.
Step 1: Define route for Express CRUD Post articles
First, we need to define routes for making Express js Post requests, in the routes/index.js file let’s add a route for HTTP POST requests.
router.post('/posts', [auth, admin], postController.store);The post request has two middleware auth to check if a user is authentic using token and admin to check if the user has privileges to perform database operation. We have already added both auth and admin middleware in our previous articles, please check it.
Step 2: Create Post model schema
The post or article data have three field titles, content, and image. We need to define Post schema.
import mongoose from 'mongoose';
const Schema = mongoose.Schema;
import { APP_URL } from '../config';

const postSchema = new Schema(
    {
        title: { type: String, required: true },
        content: { type: String, required: true },
        image: { type: String, required: true,
            get: (image) => { // GETTER METHOD to get domain name before uploads folder
                if (process.env.ON_HEROKU == 'true') {
                    return `${image}`;
                }
                // add domain name before image
                return `${APP_URL}/${image}`;
            },
        },
    },
    { timestamps: true, toJSON: { getters: true }, id: false }
);

export default mongoose.model('Post', postSchema, 'posts');
Step 3: Define the callback function to handle our Express POST request or create a new article in the posts collection. We need to configure or set up the Mutler middleware. Multer is a node.js middleware for handling multipart/form-data, which is primarily used for uploading files. For our image, we need to specify which folder we want to upload the image file.
import { Post } from '../models';
import multer from 'multer';
import path from 'path';
import CustomErrorHandler from '../services/CustomErrorHandler';
import fs from 'fs';
import postSchema from '../validators/postValidator';

const storage = multer.diskStorage({
    destination: (req, file, cb) => cb(null, 'uploads/'),
       // cb first is error & 2nd argument is destination folder
    filename: (req, file, cb) => {

      const uniqueName = `${Date.now()}-${Math.round(Math.random() * 1e9)}${path.extname(file.originalname)}`;
        // 3746674586-836534453.png
        cb(null, uniqueName);
    },
});

const handleMultipartData = multer({
    storage, limits: { fileSize: 1000000 * 5 }, //convert bytes to 5mb
}).single('image'); // 5mb Call this method inside postController

const postController = {
    async store(req, res, next) {
        //To upload image also from data we need special types of data format
        // multipart form data
        // Create model - done
        // Need multer

        handleMultipartData(req, res, async (err) => { //if error then callback return err
            if (err) {
                return next(CustomErrorHandler.serverError(err.message));
            }
            //If no error - then

            const filePath = req.file.path; // Where we get file from multer

            //Step 2: Validate post from postValidator schema of Joi
            // Create reusable code in validators folder validators/postValitors.js
            const { error } = postSchema.validate(req.body);

            if (error) { // Joi error
                //If error occurs while validation then deleted upload file
                // Delete the uploaded file
                fs.unlink(`${appRoot}/${filePath}`, (err) => {
                    //rootfolder/upload/filename
                    //Where appRoot is global variable need to declare in Server.js global.appRoot = path.resolve(__dirname);
                    if (err) {
                        return next(CustomErrorHandler.serverError(err.message));
                    }
                });
                return next(error);    // Joi error
            }

            //Step 3 - No error fetch data from request save new post inside db
            const { title, content } = req.body;
            let document;
            try {
                document = await Post.create({
                    title, content, image: filePath,
                });
            } catch (err) {
                return next(err);
            }

            res.status(201).json(document);
        });
    },

}

export default postController;
We need to import validators/postValidator function, as this function is used in multiple places in our postController.js file for CRUD operation. Let’s add reusable the postValidator.js in the validators/postValidator.js file
import Joi from 'joi';

const postSchema = Joi.object({
    title: Joi.string().required(),
    content: Joi.string().required(),
    image: Joi.string(),
});

export default postSchema;
Expressjs update operation: PUT method
Once we have existing data record in our MongoDB database, we can edit or modify records using the HTTP PUT method. Here is a screenshot of it.
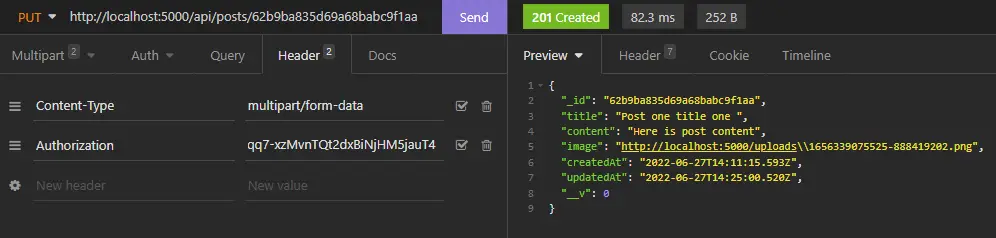
We also need to send the access token inside the authorization bearer in the HTTP header request, in the multipart body payload remove the image and edit the title or content. Only users with valid tokens and user type admin can update data. Like before we need to define HTTP PUT post request in the Expressjs routes/index.js file.
router.put('/posts/:id', [auth, admin], postController.update);In the PUT request, we need to send the post id of the record that we want to edit, let’s add an update callback in our existing postController.js code.
import { Post } from '../models';
...

const postController = {
    ...
    async update(req, res, next) {
        handleMultipartData(req, res, async (err) => {
           //if error then callback return err
            if (err) {
                return next(CustomErrorHandler.serverError(err.message));
            }

            //When image file is optional in update
            let filePath;
            if (req.file) {
                filePath = req.file.path; // We get file from multer
            }

            //Step 2 - Validate postSchema for Joi
            const { error } = postSchema.validate(req.body);

            if (error) { // Joi Error
                //If error occurs then we have to deleted upload file
                // Delete the uploaded file only if exist
                if (req.file) {
                    fs.unlink(`${appRoot}/${filePath}`, (err) => { //rootfolder/upload/filename
                        if (err) {
                            return next(CustomErrorHandler.serverError(err.message));
                        }
                    });
                }
                return next(error);

            }

            //Step 3 - No error update document
            const { title, content } = req.body;
            let document; //
            try {
                document = await Post.findOneAndUpdate({_id: req.params.id}, { // Need to pass what post to update using id
                    title, content,
                    ...(req.file && { image: filePath}) // Image update is optional
                }, { new : true } //As update return old data to get new update value
                );
            } catch (err) {
                return next(err);
            }
            res.status(201).json(document);

        });
    },

    }

export default postController;
Expressjs Delete operation: PUT method
Let’s now implement the record deletion operation in Express Mongodb, same as the above operation we need to send the access token inside the HTTP header authorization bearer.
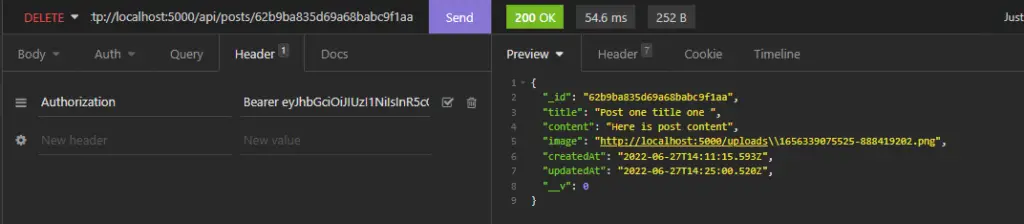
Step1, let’s define the delete route for the post inside the routes/index.js file.
router.delete('/posts/:id', [auth, admin], postController.destroy);Inside the postController.js file, the destroy function is a callback for a delete request.
...
const postController = {
   ...
    async destroy(req, res, next) {
        const document = await Post.findOneAndRemove({ _id: req.params.id });
        if (!document) {
            return next(new Error('Nothing to delete'));
        }
        // image delete

        const imagePath = document._doc.image;

        // http://localhost:5000/uploads/1616444052539-425006577.png

        fs.unlink(`${appRoot}/${imagePath}`, (err) => {
            if (err) {
                return next(CustomErrorHandler.serverError());
            }
            return res.json(document);
        });
    },

}

export default postController;
Expressjs GET all post
We can have an HTTP GET method to get all records from a collection, and we also need the access token inside the HTTP header authorization bearer.
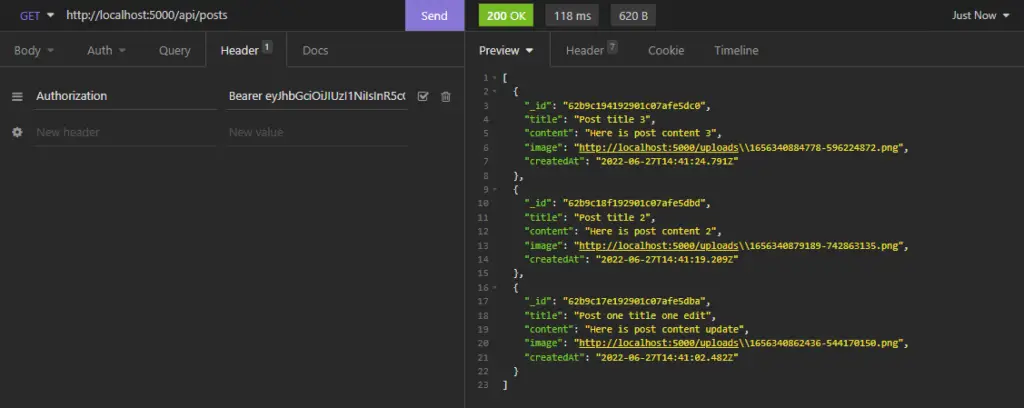
Let’s first define a route for all posts inside the routes/index.js file
router.get('/posts', postController.index);Inside the postController.js file, the index function is a callback to get all records from collection posts in MongoDB.
...
const postController = {
....
    async index(req, res, next) {
        let documents;
        try {
            documents = await Post.find().select('-updatedAt -__v').sort({ _id: -1 });
            //As documents need to loop - list of post is not recommended
            // We need to add domainName plus upload/imageName.file extension
            // Out of many option - we can use getter or
            // Accessor from posts-model to get domain name
        } catch (err) {
            return next(CustomErrorHandler.serverError());
        }
        return res.json(documents);
    },
}

export default postController;
Expressjs GET a record
We can have an HTTP GET method retrieve particular records from a collection using its id, and we also need the access token inside the HTTP header authorization bearer.

Let’s first define a route to retrieve a detailed record from Express MongoDB
router.get('/posts/:id', postController.show);Inside the postController.js file, the show function is a callback to get detail about a record.
...
const postController = {
    ...
    async show(req, res, next) { // for single post
        let document;
        try {
            document = await Post.findOne({ _id: req.params.id }).select(
                '-updatedAt -__v').sort({_id:-1 });

            // add sort .sor({_id:-1 })// descending order at it after select function

        } catch (err) {
            return next(CustomErrorHandler.serverError());
        }
        return res.json(document);
    },
}Conclusion: We have learned how to use middleware to allow or reject user requests. If a user is valid and admin, then he/she can perform CRUD operations like adding, deleting, and updating articles data with images in the Express MongoDB project. I hope you got some idea on Express CRUD operation.
Related Post