Angular Pipe is one of the important features of Angular. Angular comes with lots of built-in pipes such as Date Pipe, UpperCasePipe, LowerCasePipe, CurrencyPipe, PercentPipe and so many others. Check more information on what is the pipe and built-in pipe in our previous articles. We can easily create our own Angular Custom pipe.
Angular custom pipe
Angular allows us to create our own custom pipe. Sometimes we need some functionality not available in the built-in pipe. In that case, we need to create our own pipe.
Step by Step any example of Angular custom pipe
Creating a custom pipe in Angular is super simple. Here, for example, we create a pipe that takes an object variable and we will extract Firstname, Lastname, and age from the object.
Step 1: Let’s first create an angular project and create our extract custom pipe.
ng new customPipe
ng generate pipe extractData
Screenshot of our angular custom pipe as an example.
Step 2: Add code for custom pipe: We will create a folder called pipe and add all our custom pipe code in this folder. Edit the code of the extract-data.pipe.ts file to extract different data from the user data object.
import { Pipe, PipeTransform } from '@angular/core';

@Pipe({ name: 'extractData' })
export class ExtractDataPipe implements PipeTransform {
  transform(value: any, arg: string): any {
    let newVal: any;
    if (arg === 'firstname') {
      newVal = value.name ? value.name.split(' ')[0] : '';
    } else if (arg === 'lastname') {
      newVal = value.name ? value.name.split(' ').splice(-1) : '';
    } else if (arg === 'age') {
      const currentTime = new Date();
      newVal = value.birthyear ? currentTime.getFullYear() - value.birthyear : 0;
    }
    return newVal;
  }
}
We have used transform(value: any, arg) as a method of Pipe class that will take two parameters. The first value is a value from the left side of the | pipe symbol, in our case is the user variable and arg is the second argument is the right side of pipe |. To create a custom pipe in ionic we have to import Pipe and PipeTransform from the angular/core.
Step 3: Import pipe name in our component module
We will use our custom pipe in the app.component.html template, we need to declare the pipe in our component. In the app.module.ts we need a reference of pipe and have to declare inside the declaration of the module as.
import { BrowserModule } from '@angular/platform-browser';
import { NgModule } from '@angular/core';
import { FormsModule } from '@angular/forms';


import { AppComponent } from './app.component';
import { ShortenPipe } from './shorten.pipe';
import { ExtractDataPipe } from './pipes/extract-data.pipe';
@NgModule({
  declarations: [
    AppComponent,
    ExtractDataPipe
  ],
  imports: [
    BrowserModule,
    FormsModule,
  ],
  providers: [],
  bootstrap: [AppComponent]
})
export class AppModule { }
In angular, we convert any value to any desired format with the help of an Angular pipe. Angular will detect the sign | as the pipe in the HTML or template and turn the value in front of it to input.
Step 4: Use our angular custom pipe in our component
In our case, we are using the app.component.ts file to use our custom pipe as below.
import { Component, OnInit } from '@angular/core';
@Component({
selector: 'app-root',
template: `
<div class="p-5 border bg-light">
<h3>Angular Custom pipe example</h3>
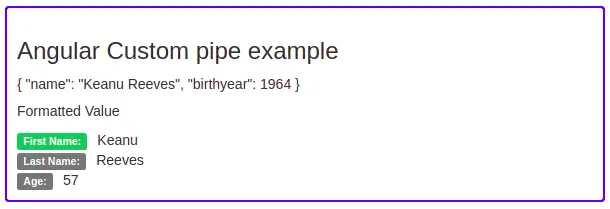
<p> {{ user | json }}</p>
<h5>Formatted Value</h5>
<div class="container">
<div class="row">
<span class="col-3 label label-success">First Name:</span>
<span class="col-*-*">{{ user | extractData : "firstname" }}</span>
</div>
<div class="row">
<span class="col-3 label label-default">Last Name:</span>
<span class="col-*-*">{{ user | extractData : "lastname" }}</span>
</div>
<div class="row">
<span class="col-3 label label-default">Age:</span>
<span class="col-*-*">{{ user | extractData : "age" }}</span>
</div>
</div>
</div>`,
styleUrls: ['./app.component.scss']
})
export class AppComponent implements OnInit {
user: any;
constructor() { }
ngOnInit() {
this.user = { name: 'Keanu Reeves', birthyear: 1964 };
}
}In our template we have used user | userExtract: “firstname”, where a user is a variable object, userExtract is a pipe name and the first name is an argument to extract the first name from a user object. The same concept is applied to Lastname and age to extract respected user’s data from the user object.
What are requirement to create Angular custom pipe.
- transform method:
The custom pipe class needs to have one special method to be usable as a pipe and which not strictly necessary. It is good practice to implement a certain interface that requires you to implement the method. The interface is called PipeTransform import from @angular/core. We need to add the transform method, this method needs to receive the value which should get transformed and need to receive a list of arguments.
2: Add a custom pipe name in declarations of the module of component: To use this pipe we need to add a custom pipe name to declarations of the module.
3: Need for pipe decorator :
We need to add a special decorator, the @Pipe decorator which is also imported from @angular/core. In the @Pipe. In pipe decorator, we can specify the name for the pipe by simply adding a name. Once we define the name of the pipe we can use pipe in the template as.
Angular Pipe with parameters
In Angular, we can also define any amount of parameters in the pipe, which enables you to pass parameters to it. For example, above we want to remove only age then we have specified which user data to extract from the user object.
Let’s say we have truncate text as a custom pipe to truncate text, we can pass a number as a parameter to specify how many characters to truncate by the pipe. To pass the parameter in the pipe in the template we need to add a colon and then a value. If we have another argument then we can use it with another colon with the second parameter this is how you parameterize your own pipes. We can also chain them with built-in types so you can use them as a built-in.
{{ name | truncateText: 10 }}Angular custom pipe example: Angular format phone number
In our second, Angular custom pipe example we will demonstrate an Angular format phone number with a hyphen symbol in between like this.
98-76-54-321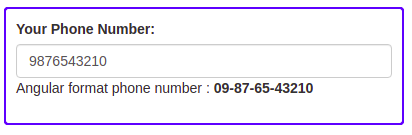
In this tutorial on Angular custom pipe, we are learning the following.
- Creating Angular custom pipe to allow Angular format phone number with a hyphen.
- We are applying for this Angular format phone number on string interpolation, not on the input box.
- Phone input will not allow more than ten characters.
- Still need extra work to allow numbers only on input, in our example it allows us to enter any character type.
As we are focusing on Angular custom pipe, we still need to refine input to allow only numbers. I hope you can fix it, we’ll make a separate tutorial on input to allow number and hyphen format using custom directives.
Let first, allow Angular to create a custom pipe to format the phone numbers by running the following command.
ng g pipe pipes/phoneFormatLet’s add the code for our Angular formate phone number custom pipe.
import { Pipe, PipeTransform } from '@angular/core';

@Pipe({ name: 'phoneFormat' })
export class PhoneFormatPipe implements PipeTransform {
  transform(value: string): string {
    return value.replace(/(\d{1})(\d{2})(\d{2})(\d{4})/, '0$1-$2-$3-$4');
  }
}
We also need to import FormsModule, let’s import it in the app.module.ts file
....
import { FormsModule } from '@angular/forms';
import { PhoneFormatPipe } from './pipes/phone-format.pipe';

@NgModule({
  declarations: [
    AppComponent,
    PhoneFormatPipe
  ],
  imports: [
    BrowserModule,
    AppRoutingModule,
    FormsModule
  ],
...
})
export class AppModule { }
Let edit the app.component.ts file to add both the component template and model.
import { Component } from '@angular/core';

@Component({
  selector: 'app-root',
  template: `
  <section>
    <div class="form-group">
      <label>Your Phone Number: </label>
      <input class="form-control" [(ngModel)]="phoneNumber"
        maxlength="10" (input)="allowNumber($event)"/>
      <p *ngIf="phoneNumber">
        Angular format phone number : <b>{{ phoneNumber | phoneFormat }}</b>
      </p>
    </div>
</section>`,
  styleUrls: ['./app.component.scss']
})
export class AppComponent {
  phoneNumber: string | undefined;

  allowNumber(event: any) {
    if (event) {
      let isNumber = parseInt(event.data);
      if (isNaN(isNumber)) {
        const length = (event.target.value).length;
        this.phoneNumber = (event.target.value).slice(0, -1);
      }
    }
  }
}
Note:
- maxlength=10, in input, will us to add characters up to ten and we can’t enter more than 10 characters.
- {{ phoneNumber | phoneFormat }} where we had applied phoneFormat custom pipe.
To check more information on the angular pipe on the official documentation site.
Conclusion
We have completed our Angular custom pipe and how easy to create an angular custom pipe. We have demonstrated a few an example of Angular custom pipes.
Related Post