In general, Tabs are a way of organizing content into separate views where only one view can be visible at a time. React Native tabs are a popular way to implement navigation in mobile apps. We can easily navigate between each Screen by clicking on the tab label. Tabs are typically displayed at the bottom of the screen, but they can also be displayed at the top.
In this article we have several objectives, here are our main objectives as follows
- How to use react native tabs using @react-navigation/bottom-tabs
- Adding different icons on tabs using the Expo vector icon
- We will combine react-navigation bottoms tabs with react-navigation native stack
Table of Contents
Steps for using React Native Tabs
- Create a React native project and configure the project by installing required packages like React navigation etc.
- Create news screens or pages to demonstrate the tab’s example
- In Appjs configure both reactive navigation stacks and
- First, configure the React navigation bottom tabs, and after configuring it inside the Native Stack
Example of React native Tabs
There are several libraries available for implementing React native tabs in React Native, such as React Navigation and react-native-tab-view. In this example, we will demonstrate React native tabs using the React navigation. If you are using UI libraries like React Native Paper, then you should first use the components provided by your libraries. Our screenshot examples are presented here.
Steps 1 to 2: Create, configure the project, and install the required libraries
First, we need to create the project, and we need to install react navigations libraries to implement the stack and the bottom tabs navigation. Along with the required libraries, we need to install its dependency.
npm install @react-navigation/native
npx expo install react-native-screens react-native-safe-area-context
npm install @react-navigation/native-stack
npm install @react-navigation/bottom-tabs
Once we install all the required navigation, we need to create a list of screens that we want to display in our React native tabs. Then, we can wrap the screens in our custom bottom Tab component. We had home, about, contact, settings, and schedule screens.
Step 3: In Appjs configure both reactive navigation stacks and Bottom Tabs
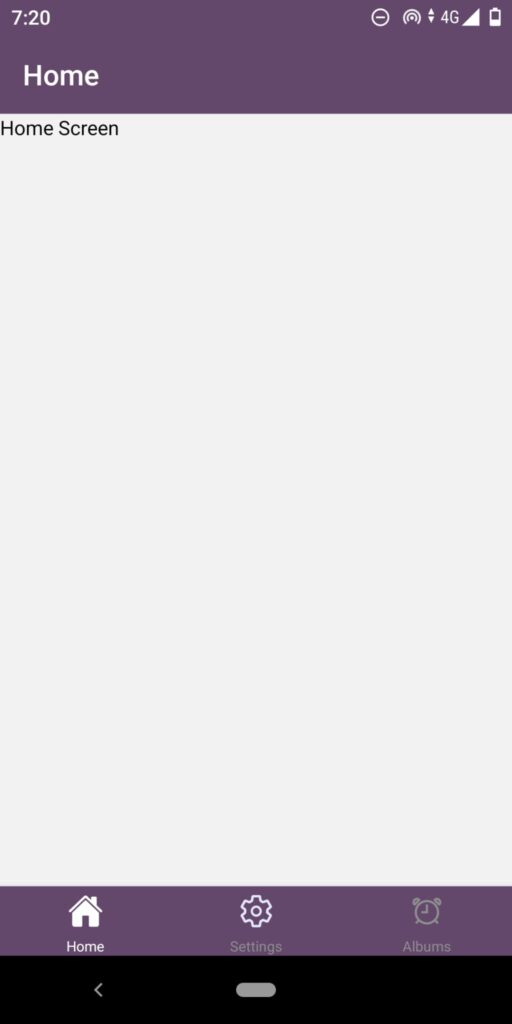
We create a Tab variable using createBottomTabNavigator () from react-navigation/bottom-tabs. Inside the custom BottomTabs.Navigator component, we define the individual screens using the Tab.Screen component. Each screen is given a name and a corresponding component. In the app.js, let’s first add three tabs with the same layout as the screenshot above and we will add and combine with stack navigation later.
import { createBottomTabNavigator } from "@react-navigation/bottom-tabs";

const BottomTabs = createBottomTabNavigator();

function MyTabs() {
  return (
    <BottomTabs.Navigator
      screenOptions={({ navigation }) => ({
        headerStyle: { backgroundColor: "#63486c" },
        headerTintColor: "white",
        tabBarStyle: { backgroundColor: "#63486c" },
        tabBarActiveTintColor: "white",
      })}
    >
      <BottomTabs.Screen
        name="Home"
        component={HomeScreen}
        options={{
          title: "Home",
          tabBarLabel: "Home",
          tabBarIcon: ({ focused, color, size }) => (
            <Ionicons
              name={focused ? "ios-home" : "ios-home-outline"}
              size={size}
              color={focused ? "#ffffff" : "#e6e6fa"}
            />
          ),
        }}
      />
      <BottomTabs.Screen
        name="Settings"
        component={SettingScreen}
        options={{
          title: "All Settings",
          tabBarLabel: "Settings",
          tabBarIcon: ({ focused, color, size }) => (
            <Ionicons
              name={focused ? "ios-settings" : "ios-settings-outline"}
              size={size}
              color={focused ? "#ffffff" : "#e6e6fa"}
            />
          ),
        }}
      />
      <BottomTabs.Screen
        name="Albums"
        component={ScheduleScreen}
        options={{
          title: "Albums",
          tabBarLabel: "Albums",
          tabBarIcon: ({ focused, color, size }) => (
            <Ionicons
              name={focused ? "albums" : "alarm-outline"}
              size={size}
              color={color}
            />
          ),
        }}
      />
    </BottomTabs.Navigator>
  );
}
The screenOptions props of the BottomTabs.Navigator can be utilized by us to add styles like backgrounds for headers and tabs of the screen. We can also add icons on individual tabs using tabBarIcon props or callback from options of the individual tabs. We can customize the appearance and behavior of the tabs using various options and props provided by React Navigation options props on each tab or the screenOptions props for all the tabs.
Once we create our custom bottom component, we can pass it in the Stack navigation with another list of the list of screens as a prop. Finally, you can wrap the stack navigation list with NavigationContainer from the @react-navigation/native.and is required to wrap the navigator components.
import { StatusBar } from "expo-status-bar";
import { StyleSheet } from "react-native";
import { NavigationContainer } from "@react-navigation/native";
import { createNativeStackNavigator } from "@react-navigation/native-stack";
import { createBottomTabNavigator } from "@react-navigation/bottom-tabs";
import { Ionicons } from "@expo/vector-icons";
import HomeScreen from "./screens/HomeScreen";
import SettingScreen from "./screens/SettingScreen";
import ScheduleScreen from "./screens/ScheduleScreen";
import AboutScreen from "./screens/AboutScreen";
import ContactScreen from "./screens/ContactScreen";

const Stack = createNativeStackNavigator();
const BottomTabs = createBottomTabNavigator();

function MyTabs() {
  return (
    <BottomTabs.Navigator
      screenOptions={({ navigation }) => ({
        headerStyle: { backgroundColor: "#63486c" },
        headerTintColor: "white",
        tabBarStyle: { backgroundColor: "#63486c" },
        tabBarActiveTintColor: "white",
      })}
    >
      <BottomTabs.Screen
        name="Home"
        component={HomeScreen}
        options={{
          title: "Home",
          tabBarLabel: "Home",
          tabBarIcon: ({ focused, color, size }) => (
            <Ionicons
              name={focused ? "ios-home" : "ios-home-outline"}
              size={size}
              color={focused ? "#ffffff" : "#e6e6fa"}
            />
          ),
        }}
      />
      <BottomTabs.Screen
        name="Settings"
        component={SettingScreen}
        options={{
          title: "All Settings",
          tabBarLabel: "Settings",
          tabBarIcon: ({ focused, color, size }) => (
            <Ionicons
              name={focused ? "ios-settings" : "ios-settings-outline"}
              size={size}
              color={focused ? "#ffffff" : "#e6e6fa"}
            />
          ),
        }}
      />
      <BottomTabs.Screen
        name="Albums"
        component={ScheduleScreen}
        options={{
          title: "Albums",
          tabBarLabel: "Albums",
          tabBarIcon: ({ focused, color, size }) => (
            <Ionicons
              name={focused ? "albums" : "alarm-outline"}
              size={size}
              color={color}
            />
          ),
        }}
      />
    </BottomTabs.Navigator>
  );
}
export default function App() {
  return (
    <>
      <StatusBar style="light" />
      <NavigationContainer>
        <Stack.Navigator>
          <Stack.Screen
            name="MyTabs"
            component={MyTabs}
            options={{ headerShown: false }}
          />
          <Stack.Screen name="About" component={AboutScreen} />
          <Stack.Screen name="Contact" component={ContactScreen} />
        </Stack.Navigator>
      </NavigationContainer>
    </>
  );
}

const styles = StyleSheet.create({
  topIcon: {
    marginRight: 20,
  },
});
For more advanced customization, you can configure the tab appearance, add icons or labels to tabs, handle tab navigation events, and more. The React Navigation documentation provides detailed information on how to use and customize tab navigators. Let’s add an icon of a phone on the tabs screens header to navigate to the contact page, and you can add your own navigation of your choice.

import { StatusBar } from "expo-status-bar";
import { StyleSheet } from "react-native";
import { NavigationContainer } from "@react-navigation/native";
import { createNativeStackNavigator } from "@react-navigation/native-stack";
import { createBottomTabNavigator } from "@react-navigation/bottom-tabs";
import { Ionicons } from "@expo/vector-icons";
import HomeScreen from "./screens/HomeScreen";
import SettingScreen from "./screens/SettingScreen";
import ScheduleScreen from "./screens/ScheduleScreen";
import AboutScreen from "./screens/AboutScreen";
import ContactScreen from "./screens/ContactScreen";

const Stack = createNativeStackNavigator();
const BottomTabs = createBottomTabNavigator();

function MyTabs() {
  return (
    <BottomTabs.Navigator
      screenOptions={({ navigation }) => ({
        headerStyle: { backgroundColor: "#63486c" },
        headerTintColor: "white",
        tabBarStyle: { backgroundColor: "#63486c" },
        tabBarActiveTintColor: "white",
        headerRight: ({ tintColor }) => (
          <Ionicons
            name="call-sharp"
            size={24}
            color={tintColor}
            style={styles.topIcon}
            onPress={() => {
              navigation.navigate("Contact");
            }}
          />
        ),
      })}
    >
      <BottomTabs.Screen
        name="Home"
        component={HomeScreen}
        options={{
          title: "Home",
          tabBarLabel: "Home",
          tabBarIcon: ({ focused, color, size }) => (
            <Ionicons
              name={focused ? "ios-home" : "ios-home-outline"}
              size={size}
              color={focused ? "#ffffff" : "#e6e6fa"}
            />
          ),
        }}
      />
      <BottomTabs.Screen
        name="Settings"
        component={SettingScreen}
        options={{
          title: "All Settings",
          tabBarLabel: "Settings",
          tabBarIcon: ({ focused, color, size }) => (
            <Ionicons
              name={focused ? "ios-settings" : "ios-settings-outline"}
              size={size}
              color={focused ? "#ffffff" : "#e6e6fa"}
            />
          ),
        }}
      />
      <BottomTabs.Screen
        name="Albums"
        component={ScheduleScreen}
        options={{
          title: "Albums",
          tabBarLabel: "Albums",
          tabBarIcon: ({ focused, color, size }) => (
            <Ionicons
              name={focused ? "albums" : "alarm-outline"}
              size={size}
              color={color}
            />
          ),
        }}
      />
    </BottomTabs.Navigator>
  );
}
export default function App() {
  return (
    <>
      <StatusBar style="light" />
      <NavigationContainer>
        <Stack.Navigator>
          <Stack.Screen
            name="MyTabs"
            component={MyTabs}
            options={{ headerShown: false }}
          />
          <Stack.Screen name="About" component={AboutScreen} />
          <Stack.Screen name="Contact" component={ContactScreen} />
        </Stack.Navigator>
      </NavigationContainer>
    </>
  );
}

const styles = StyleSheet.create({
  topIcon: {
    marginRight: 20,
  },
});
Conclusion
We’ve learned how to implement React native tabs-based navigation using React navigation packages. We can customize tab bars by adding colors on tabs and the header of the screen. I hope you have some idea how to implement it. If you want to learn more details the check official website of the react navigation.
Related React Tutorial