The React Native Context API allows sharing data between components without passing props down through the tree. The context in React native is not specific to React native, is the same as what we used in React. I have already written an article on React Native with details, and if you want, you can read more details on it.
In this tutorial, we have a few objectives as follows
- How to utilize React native context API
- Different approaches of adding and reading data from context objects.
- Demonstrate React native context example. Let’s get started.
Table of Contents
Steps for using React Native Context in the application
- Create a React native project and configure the project by installing required packages like React navigation etc.
- Create a new context using the
createContextfunction from thereactpackage. This function returns an object with two properties:ProviderandConsumer. TheProvidercomponent is used to provide the context value to the components, and theConsumercomponent is used to consume the context value. - Wrap your component tree with the
Providercomponent and pass the desired value as a prop. This value will be accessible to all the components that consume the context. - Consume the context value in the components that need access to it by using the
Consumercomponent. TheConsumercomponent accepts a function as its child and provides the context value as an argument to that function.
React Native Context Example
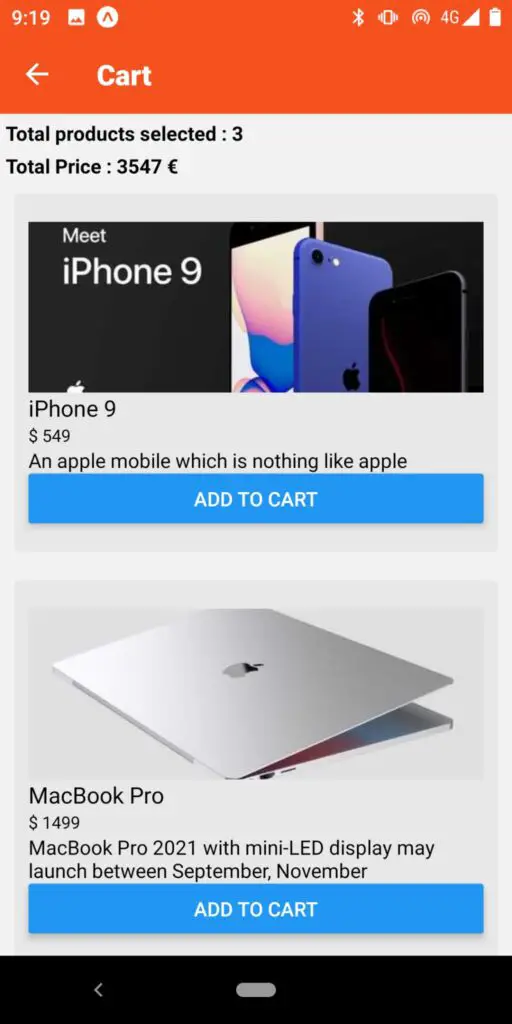
Below we have a screenshot of our react native context example, We store the orders selected by the user in the context of the Product Screen component and we used this order to display on the Cart Screen.
Step 1: Let’s first create Screens for our application, We have two screens ProductsScreen and CartScreen, and one component to display the product item. We need to create a context in the store/context and add a file called orders-context.js.
Step 2: Create context using createContext. Our context for the cart contains an ids object containing the list of all ids of the products selected by the user. It also contains two functions: addOrder and removeOrder. The addOrder allows you to add a selected product ID to the ids array object in the context.
import { createContext, useState } from "react";

export const OrdersContext = createContext({
  ids: [],
  addOrder: (id) => {},
  removeOrder: (id) => {},
});

function OrdersContextProvider({ children }) {
  // Function need logic for managing our orders IDS
  const [orderIds, setOrderIds] = useState([]);

  function addOrder(id) {
    setOrderIds((currentOrderIds) => [...currentOrderIds, id]);
  }

  function removeOrder(id) {
    setFavoriteMealIds((currentFavIds) =>
      currentFavIds.filter((mealId) => mealId !== id)
    );
  }
  // Need to pass these function and ids to our context provider
  const value = {
    ids: orderIds,
    addOrder: addOrder,
    removeOrder: removeOrder,
  };
  return (
    <OrdersContext.Provider value={value}>{children}</OrdersContext.Provider>
  );
}

export default OrdersContextProvider;
The Provider component is used to wrap the components that need access to the shared data. It accepts a value prop that can be accessed by the consuming components. The Provider component should be placed higher up in the component tree to make the context available to all the components that need it. We are using OrderContext inside the app.js file.
Let’s add code for the app.js file. We had to import our context provider and wrap our screen components in it. By default, we show the Products screen first, and in the Products header, we have a cart icon to navigate to the cart screen.
import { StatusBar } from "expo-status-bar";
import { StyleSheet } from "react-native";
import { NavigationContainer } from "@react-navigation/native";
import { createStackNavigator } from "@react-navigation/stack";
import { AntDesign } from "@expo/vector-icons";
import CartScreen from "./screens/CartScreen";
import ProductsList from "./screens/ProductsList";
import OrdersContextProvider from "./store/context/orders-context";

const Stack = createStackNavigator();

export default function App() {
  return (
    <OrdersContextProvider>
      <NavigationContainer>
        <StatusBar style="light" />
        <Stack.Navigator
          initialRouteName="Product"
          screenOptions={{
            headerStyle: { backgroundColor: "#f4511e" },
            contentStyle: { backgroundColor: "#bdbebd" }, // Different style option
            headerTitleStyle: {
              fontWeight: "bold",
            },
            headerTintColor: "white",
          }}
        >
          <Stack.Screen
            name="Products"
            component={ProductsList}
            options={({ route, navigation }) => {
              return {
                title: "Products",
                headerRight: () => (
                  <AntDesign
                    name="shoppingcart"
                    color="white"
                    size={18}
                    style={{ padding: 10, marginRight: 10 }}
                    onPress={() => navigation.navigate("Cart")}
                  />
                ),
              };
            }}
          />
          <Stack.Screen
            name="Cart"
            component={CartScreen}
            options={{
              title: "Cart",
            }}
          />
        </Stack.Navigator>
      </NavigationContainer>
    </OrdersContextProvider>
  );
}

const styles = StyleSheet.create({
  container: {
    flex: 1,
    backgroundColor: "#fff",
    alignItems: "center",
    justifyContent: "center",
  },
});
React native context consumer
Step 4: Consume the context value in the components that need access to it by using the useContext hooks. In the Products screen we are listing all the products from dummy data, to display each product we are using the custom Product component in the components folder. In later articles, we will add code for producing components.
import { StyleSheet, ScrollView } from "react-native";
import Product from "../components/Product";
import { PRODUCTS } from "../data/products";

const ProductsList = () => {
  return (
    <ScrollView>
      {PRODUCTS?.map((item) => (
        <Product
          id={item.id}
          title={item.title}
          imageUrl={item.imageUrl}
          price={item.price}
          description={item.description}
          key={item.id}
        />
      ))}
    </ScrollView>
  );
};

export default ProductsList;

const styles = StyleSheet.create({});
Let’s add our dummy data in the data folder to file products.js First we need to define a model for Products in the models/Product.js file as here.
class Product {
    constructor(id, title, imageUrl, price, description) {
      this.id = id;
      this.title = title;
      this.imageUrl = imageUrl;
      this.price = price;
      this.description = description;
    }
  }

  export default Product;
Now in the data/products.js file let add dummy data.
import Product from "../models/Product";

export const PRODUCTS = [
  new Product(
    "1",
    "iPhone 9",
    "https://i.dummyjson.com/data/products/1/thumbnail.jpg",
    549,
    "An apple mobile which is nothing like apple"
  ),
  new Product(
    "2",
    "iPhone X",
    "https://i.dummyjson.com/data/products/2/thumbnail.jpg",
    999,
    "SIM-Free, Model A19211 6.5-inch Super Retina HD display with OLED technology A12 Bionic chip with"
  ),
  new Product(
    "3",
    "Samsung Universe 9",
    "https://i.dummyjson.com/data/products/4/thumbnail.jpg",
    1200,
    "https://i.dummyjson.com/data/products/3/thumbnail.jpg",
    1300,
    "Samsung's new variant which goes beyond Galaxy to the Universe"
  ),
  new Product(
    "4",
    "OPPOF19",
    "https://i.dummyjson.com/data/products/5/thumbnail.jpg",
    540,
    "OPPO F19 is officially announced on April 2021."
  ),
  new Product(
    "5",
    "MacBook Pro",
    "https://i.dummyjson.com/data/products/6/thumbnail.png",
    1499,
    "MacBook Pro 2021 with mini-LED display may launch between September, November"
  ),
  new Product(
    "6",
    "Samsung Galaxy Book",
    "https://i.dummyjson.com/data/products/7/thumbnail.jpg",
    1550,
    "Samsung Galaxy Book S (2020) Laptop With Intel Lakefield Chip, 8GB of RAM Launched"
  ),
  new Product(
    "8",
    "Microsoft Surface Laptop 4",
    "https://i.dummyjson.com/data/products/8/thumbnail.jpg",
    1499,
    "Style and speed. Stand out on HD video calls backed by Studio Mics. Capture ideas on the vibrant touchscreen."
  ),
];
In the product component we are consuming order context using useContext hooks from React, the add to cart button will call the addOrder functions from the context to add selected product order in the ids array in context.
import { StyleSheet, Alert, Text, View, Button, Image } from "react-native";
import React, { useContext } from "react";
import { OrdersContext } from "../store/context/orders-context";

const Product = ({ id, title, imageUrl, price, description }) => {
  const ordersCtx = useContext(OrdersContext);

  const onAddToCartHandler = () => {
    Alert.alert(`${title} add to cart`);
    ordersCtx.addOrder(id);
  };

  return (
    <View style={styles.rootContainer}>
      <Image source={{ uri: imageUrl }} style={styles.image} />
      <Text style={styles.name}>{title}</Text>
      <Text style={styles.price}>$ {price}</Text>
      <Text style={styles.description}>{description}</Text>
      <Button title="Add to cart" onPress={onAddToCartHandler} />
    </View>
  );
};

export default Product;

const styles = StyleSheet.create({
  rootContainer: {
    backgroundColor: "#E8E8E8",
    borderRadius: 4,
    margin: 10,
    paddingHorizontal: 10,
    paddingVertical: 20,
  },
  name: {
    fontSize: 16,
  },
  description: {
    fontSize: 14,
  },
  price: {
    fontSize: 12,
  },
  image: {
    width: "100%",
    height: 120,
  },
});
After adding the product ids to the ids array object. We can use this ids variable from the context to display a list of order products and include codes for them. Add code for the cartScreen.js
import { StyleSheet, View, Text } from "react-native";
import React, { useContext } from "react";
import { OrdersContext } from "../store/context/orders-context";
import Product from "../components/Product";
import { PRODUCTS } from "../data/products";

const CartScreen = () => {
  const ordersCtx = useContext(OrdersContext);

  const ordreProducts = PRODUCTS.filter((product) =>
    ordersCtx.ids.includes(product.id)
  );

  const totalPrice = ordreProducts.reduce((acc, curr) => acc + curr.price, 0);

  return (
    <View>
      <Text style={styles.total}>
        Total products selected : {ordreProducts.length}
      </Text>
      <Text style={styles.price}>Total Price : {totalPrice} € </Text>
      {ordreProducts?.map((item) => (
        <Product
          id={item.id}
          title={item.title}
          imageUrl={item.imageUrl}
          price={item.price}
          description={item.description}
          key={item.id}
        />
      ))}
    </View>
  );
};

export default CartScreen;

const styles = StyleSheet.create({
  total: {
    fontWeight: "bold",
    margin: 4,
  },
  price: {
    fontWeight: "bold",
    marginHorizontal: 4,
  },
});
Conclusion
In this tutorial, we learned how to use context in React Native with an example. I hope you will get some ideas on what context is and how to use it in context. It is good to read the official document in the React context.
Related React Tutorial