An angular Renderer2 class is an abstraction provided by Angular in the form of a service that allows manipulating elements in our application without having to touch the DOM directly. In our previous articles, we learned the pros and cons of using angular elementRef to directly access DOM element manipulation.
An Angular app consists mainly of components and its HTML template. The browser can’t understand these components and templates. We need a view engine takes for compiling these templates and components we’ have written into regular HTML and JavaScript that the browser can read and display. The responsibilities of View Engine include template Parsing, tree-Shaking, and compilation.
In this tutorial, we’ll explore angular renderer2 class uses, differences between elementRef and renderer2 class, and different examples on angular rendere2 on our component and directive.
What is an angular renderer2 ?
The renderer2 is Angular’s View Engine from Angular 4 onward till Angular 8, it was the responsibility of the view engine to compile components to JS and HTML. Unlike native javascript methods and an Angular Renderer2 class is an abstraction provided by Angular in the form of a service that allows manipulating elements of your app without having to touch the DOM directly.
This is recommended approach of manipulating DOM elements, unlike angular elementRef which has a risk involved of XSS attack for directly manipulating DOM elements. This makes it easier to develop applications that can be rendered in environments that don’t have DOM access, like on the server, in a web worker, or on native mobile.
What is an Angular ivy renderer?
Ivy is the next generation of Angular renderer and compiler. It is default available with Angular 9 and optional in Angular 8. It is a stepping stone for the future of an Angular framework and it changes how the framework works internally without changing how we write Angular applications. The goal of Ivy renderer.
- Faster initial loading: less bundle size with a general code more compatible with tree shaking.
- Low memory footprint: improve memory allocation
- Faster compilation time (with more incremental compilation).
Example of how to use angular rendere2 class in component ?.
Let’s first create our angular project to demonstrate our first example of renderer2 in the component. When working with the Angular component, we often use the @ViewChild decorator and template reference to get access to a specific element instance in a component typescript. Below angular CLI command to create a project.
ng ng new rendere2Example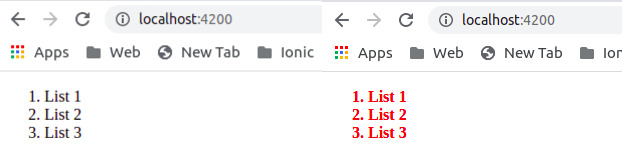
Once our project is created, in our first example we used Angular rendere2 to add class and remove CSS class on the order list by mouse enter and mouse leave event. We have implemented it on the component level and components are also directive. In our example 1, we are doing Angular renderer2 toggle class, that is adding and removing the CSS class name in a single component, if we want to create reusable then create a separate directive this will allow us to reuse these features at multiple places in the application.
import { Component, ViewChild, ElementRef, Renderer2 } from '@angular/core';

@Component({
  selector: 'app-root',
  template: `
  <ol class="col-md-2" #addlistCss (mouseenter) ="mouseEnter()"  (mouseleave) ="mouseLeave()">
  <li>List 1</li>
  <li>List 2</li>
  <li>List 3</li>
</ol>`,
  styleUrls: ['./app.component.css']
})
export class AppComponent {
  @ViewChild('addlistCss') list: ElementRef;

  constructor(private renderer: Renderer2) { }

  mouseEnter() {
    this.renderer.addClass(this.list.nativeElement, 'ol-list');
  }

  mouseLeave() {
    this.renderer.removeClass(this.list.nativeElement, 'ol-list');
  }
}
On mouse enter on list element we add CSS class called ol-list, this class we’ll add red font color and increase font-weight of the list. Edit app.component.scss file.
.ol-list {
    color: red;
    font-weight: 700;
}
Angular renderer2 example on custom directive
Let now create an angular custom directive to demonstrate our angular renderer2 example. Creating an angular directive allows us to reuse this directive throughout our application. Now we’ll demonstrate an example of how to use renderer2 in our custom directive the command below will create folder directives and within it, we have the child-element.directive.ts file.
ng generate directive directive/child-elementHere is a screenshot of our angular renderer2 example on the custom directive.
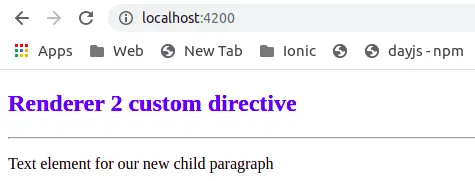
Now let’s edit the child-element.directive.ts file to add a new child paragraph and text node to our reference DOM element.
import { Directive, ElementRef, OnInit, Renderer2 } from '@angular/core';

@Directive({
  selector: '[appChildElement]'
})
export class ChildElementDirective implements OnInit {

  constructor(
    private renderer2: Renderer2,
    private elementRef: ElementRef
  ) { }

  ngOnInit() {
    const newParagraph = this.renderer2.createElement('p');
    const textElement = this.renderer2.createText('Text element for our new child paragraph');

    this.renderer2.appendChild(newParagraph, textElement);
    this.renderer2.appendChild(this.elementRef.nativeElement, newParagraph);
  }
}
In our custom directive, we need to inject renderer2 and elementRef class from angular/core. The ElementRef object gives us direct access to the DOM element for the directive through the nativeElement property. Let’s edit our app.component.html template file to add our custom child element directive.
  <h2 style="color: blue;">Renderer 2 custom directive</h2>
  <hr>
  <div appChildElement></div>
When we should use Angular Renderer2 ?
In our previous example, we learned details on angular elementRef class and the risk of XSS attack using angular elementRef to direct access to manipulate DOM element. Cross-site scripting (XSS) attacks occur when an attacker injects and executes malicious code, generally in the form of a browser-side script, to a different end-user.
The renderer2 class is one of the best approaches for manipulating the DOM element without having to touch the DOM directly. Using Renderer2 class, we can add and remove CSS classes, styles, and HTML attributes to our DOM element. We can also use the renderer2 class to append or remove a child element within a parent element.
The Angular Renderer2 object gives us many helper methods to enable us to modify the DOM element and some methods we have included here.
| Method name | Description |
| createElement() | Implement this callback to create an instance of the host element. |
| createText() | Implement this callback to add text to the DOM of the host element. |
| appendChild() | Appends a child to a given parent node in the host element DOM. |
| removeChild() | Implement this callback to remove a child node from the host element’s DOM. |
| setStyle() | Add CSS style to the host element’s DOM. |
| removeStyle() | Remove CSS style from the host element’s DOM. |
Angular Renderer2 to add element
We have details and examples of how to use the above renderer2 method in the custom directive. Here we have a simple example of how to use the above methods.
constructor(private renderer: Renderer2, private el: ElementRef) {}

ngOnInit() {
  const newParagraph = this.renderer2.createElement('p');
}
Angular renderer2 to set and remove attribute
We can use the setAttribute() and removeAttribute() from the Renderer2 service to set or remove an attribute from an element. Here just for the demo of how to use it, we have set a value for a placeholder by using renderer2 setAttribute and for the real application, you can use a custom directive.
constructor(private renderer: Renderer2, private el: ElementRef) {}
import { Component, ElementRef, Renderer2, ViewChild } from '@angular/core';

@Component({
  selector: 'app-root',
  template: ` <input type="text" #inputRef (mouseenter)="mouseEnter()"  (mouseleave)="mouseLeave()">`,
  styleUrls: ['./app.component.scss']
})
export class AppComponent {
  @ViewChild('inputRef') elRef: ElementRef;

  constructor(private renderer: Renderer2) { }

  mouseEnter() {
    this.renderer.setAttribute(this.elRef.nativeElement, 'placeholder', 'Enter your name on mouse enter')
  }

  mouseLeave() {
    this.renderer.setAttribute(this.elRef.nativeElement, 'placeholder', 'Name on mouse leave')
  }
}
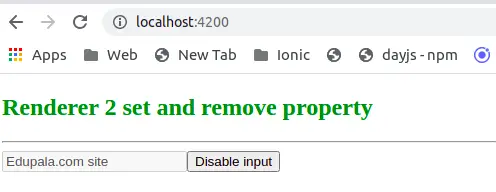
Angular Renderer2 setProperty
In the example below we have demonstrated how to add input disabled property and we used the removeAttribute method to remove disabled property of the Input field.
import { Component, ElementRef, Renderer2, ViewChild } from '@angular/core';

@Component({
  selector: 'app-root',
  template: `
  <h2 style="color: green;">Renderer 2 set and remove property</h2>
  <hr>
  <input type="text" #disableInput>
  <button (click)="disableInputBox()">Disable input</button>
  `,
  styleUrls: ['./app.component.scss']
})
export class AppComponent {
  toggle = false;

  @ViewChild('disableInput') elRef: ElementRef;

  constructor(private renderer: Renderer2) { }

  disableInputBox(): void {
    debugger
    this.toggle = !this.toggle;
    if (this.toggle) {
      this.renderer.setProperty(this.elRef.nativeElement, 'disabled', 'disabled');
    } else {
      this.renderer.removeAttribute(this.elRef.nativeElement, 'disabled');
    }
  }
}
Angular renderer2 setStyle
In the example below we have used a custom directive with renderer2 setStyle to set div container font size to 50px.
import { Directive, Renderer2, ElementRef, OnInit } from '@angular/core';

@Directive({
   selector: '[fontSize]'
})

export class FontSizeDirective implements OnInit {

   constructor(
      private renderer: Renderer2,
      private elmRef: ElementRef
   ) { }

   ngOnInit() {
      this.renderer.setStyle(
         this.elmRef.nativeElement,
         'font-size',
         '50px'
      );
   }

}
In our template, we have to apply custom directives on the div container.
  <div #fontSize>
    Angular font size to set 50px
    <h2 style="color: green;">Renderer 2 setStyle property</h2>
    <input type="text" placeholder="Enter your name">
  <div>
We can also use renderer2 removeStyle to remove CSS style to our element.
this.renderer.removeStyle(this.elmRef.nativeElement, 'background');Is possible to use angular renderer2 in Service?
We cannot inject angular Renderer2 directly into the service, but we can use RendererFactory2 to get the Renderer2 instance inside the @Injectable() service. Service is meant to handle business logic (retrieving remote data mainly). The component is directive with a template. Angular Renderer2 is mainly used in custom directives to indirectly manipulate the DOM elements.
import { Renderer2, RendererFactory2 } from '@angular/core';

@Injectable()
class ServiceName {
    private renderer: Renderer2;

    constructor(rendererFactory: RendererFactory2) {
        this.renderer = rendererFactory.createRenderer(null, null);
    }
}Conclusion
In this article, we have explored details of the Angular renderer2 class and demonstrated two examples of angular rendere2. In javascript, we used document.querySelector() to get a reference to the DOM element, in angular we can use elementRef to directly access DOM and rendere2 to indirectly manipulate the DOM element.
Related Post