An angular directive is one of the core building blocks in Angular and thinks of directives as an HTML enhancer. A directive is instructions or guidelines for rendering a template. It allows us to attach attributes to the element and with this attribute we can manipulate the appearance or behavior of a DOM element. A directive is very much like a component, except it does not have a template. In fact, the Component class inherits from the Directive class in the framework.
In this article, we’ll learn what is angular directives, Angular directives types, when to use them, and demonstrate an example of a directive in an angular. Understand directive is important.
What is an angular directive?
An angular directive is a concept in Angular that allows you to attach attributes and behaviors to a DOM element. This concept is used to extend the power of HTML by giving it a new syntax. Think of an Angular directive as a custom HTML element or attribute that enhances HTML power by providing additional features and functionalities. A directive can’t have its own UI but can be attached to a component or a regular HTML element to change its visual representation.
A directive is a class annotated with the @Directive() decorator. We can apply directives to HTML native elements or components. We can have multiple directives on the same element. A directive must have a CSS selector, which indicates to the framework where to activate it in our template. In Angular CLI we can run the following command to create a new Angular directive.
ng generate directive directiveName
OR
ng g d directiveName
What are Angular directive types?
Directives core building block of angular and there are three categories of directives in Angular.
- Angular Components – also known as Directives with Templates. The components are the basic UI building block of Angular or React Applications. Component directives allow us to create our own custom elements. We can reuse components as many as we want and thus provide code reusability. We can have custom elements like <Student>
- Attribute Directives – Attribute directives allow us to change the appearance or behavior of an element, component, or another directive. Like changing element color, background, and more.
- Structural Directives –provide DOM structure manipulation and for reshaping the HTML layout by adding or manipulating elements. Based on the condition we can add or remove the block of an element in DOM.

Angular Structural directives
Angular property and event binding allow us to share data between a component template and class, they are very handy, but it does not let us change the DOM structure, like iterating over a collection and adding/removing an element. To do so, we need to use structural directives to add behavior to an element. Angular has the following structure directive built for us to use.
- *ngIf: Control the display of block based on condition, check our previous tutorial on Angular if and else directive.
- *ngFor: iterates through this array and check our previous example on the ngFor directive.
- NgSwitch, NgSwitchWhen, NgSwitchDefault
Example of Angular structure directive using *ngFor
Angular Attribute Directives
Attribute directive allows one to listen to and modify the behavior of other HTML elements, attributes, properties, and components, such as CSS classes, HTML styles, and HTML form elements. Here we have listed some of the Attribute directives available in Angular.
- NgStyle
- NgControlName
- NgModel
Angular directives list | Angular Built-in directive.
Angular has a lot of built-in directives: ngIf, ngFor, ngSwitch. These directives are so-called structural directives, which are used to transform the DOM structure. Structural directives start with an asterisk ( * ). Angular also includes several non-structural directives for use in the template like ngClass, and ngStyle these two directives manipulate the CSS classes and styles dynamically. Here is a list of angular directives list.
| Built-in Directive Name | Description |
| ngIf | Adds and removes elements in the DOM. |
| ngSwitch | Adds or removes DOM elements when we have plenty of options. |
| ngFor | Repeat a collection of DOM elements. |
| ngStyle | Adds and removes a set of HTML styles. |
| ngClass | Adds and removes a set of CSS classes. |
| ngModel | Adds two-way data binding to an HTML form element. |
Angular also has other built-in directives like
- routerLink: To add links to one of the routes, use the routerLink directive in HTML.
- ngModelGroup: Creating common group names for a list of form elements.
- ng-template: Angular directive referring to block of an element that we can show or hide based on condition.
- ngModel: directive to bind the value in the <input> element and allow two-way data binding.
Here are some of the popular Angular structure directives in detail.
*ngIf directive: The ngIf angular structure directive adds and removes elements in the DOM, based on the Boolean result of an expression.
<div *ngIf="number % 2 == 0; else showOdd">
	Even number {{ number }}
</div>
<ng-template #showOdd>
`Odd number {{ number }}
</ng-template>
Angular 4 has introduced a new else clause with the reference name for a template defined by the ng-template. The content within the ng-template is shown when the ngIf condition evaluates to false.
2. ngSwitch Directive: The ngSwitch is a structure directive for adding or removing DOM elements when they match switch expressions. For more information on ngSwitch with an example check on this article.
3. ngFor Directive: This angular structure directive is to repeat a given DOM element (or a collection of DOM elements) and pass an element of the array on each iteration.
The syntax is *ngFor=”let item of items“
<h5 *ngFor="let name of names; let i = index">
  {{ name }} {{ i }}
</h5>
In typescript file of component add
 names = ['Smith', 'Tara', 'Sonam'];
Note: let i = index is optional, and not needed in most circumstances.
4. ngClass Directive: We can change the appearance of DOM elements by adding or removing classes using ngClass directive on based condition expression.
<p *ngFor="let number of numbers" [ngClass]="{'selected': number % 2 === 0}">
  {{ number }}
</p>
Add array number in typescript file
 numbers = [1, 2, 3, 4, 5, 6, 7, 8];

Add css for even
.even {
	  color: white;
	  background-color:red;
}
The argument of ngClass is an object that contains pairs of a CSS class name and an expression. The CSS class name is added to the target DOM element if the expression is true.
5. ngStyle Directive: We can add a set of styles to an element using the ngStyle directive. With the boolean conditions, we can add and remove set styles on an element by using the ngStyle directive based on a boolean condition. For more information and ngStyle example check on articles here.
Angular directive vs component
We have learned angular components are directives with templates and are the most commonly used directive. In this type of directive that is an angular component, we can use other directives, custom or builtin directives.
| Directive | Component |
| A directive is a class annotated with the @Directive() decorator. | To register a component we use @Component meta-data annotation. |
| Directives don’t have their own UI, but they can be attached to the UI of components. | A component is a directive with a UI template that uses shadow DOM to create encapsulated visual behavior. |
| Directives are used to add behavior to an existing DOM element. | A component is basically markup, meta-data, and a class (containing data and code) that are combined together to create a UI widget. |
Angular custom directive
Angular allows us to create our own Angular custom directive, sometimes we need something that is not available in the Angular built-in directives. We can create on own structure and attribute custom directives based on our own needs.
Custom directive: Angular directive to change the color of the div
We have learned that angular has lots of built-in directives and we can create our own custom angular directive for our needs. If we want a feature that is not available in the built-in angular directive then we can have our own custom directive. In the example below, we have an angular custom directive to change the background color of the div and its font color. Let’s create a directive called colorDirective.
ng generate directive directives/colorThe above angular CLI command will generate a color directives in the directives folder. Here is a screenshot of what we are achieving.

We have a div container containing 9 div elements and all have the same background color. Whenever we hover on any one of them we change its background color and font color using our custom angular directive. Let’s edit the app.component.html template to add our nine div elements.
<div class="grid-container">
    <div class="grid-item" appColor bgColor="greenYellow">1</div>
    <div class="grid-item" appColor bgColor="sandyBrown">2</div>
    <div class="grid-item" appColor bgColor="greenYellow">3</div>
    <div class="grid-item" appColor bgColor="turquoise">4</div>
    <div class="grid-item" appColor bgColor="sandyBrown">5</div>
    <div class="grid-item" appColor bgColor="silver">6</div>
    <div class="grid-item" appColor bgColor="turquoise">7</div>
    <div class="grid-item" appColor bgColor="yellow">8</div>
    <div class="grid-item" appColor bgColor="blue">9</div>
  </div>

<router-outlet></router-outlet>
In our template, we need the appColor directive selector and we have passed background color from our div to directive using the bgColor attribute.
To add a grid for all our containers, let’s edit the app.component.scss file
.grid-container {
    display: grid;
    grid-template-columns: auto auto auto;

    .grid-item {
      background-color: rgba(202, 52, 52, 0.8);
      border: 1px solid rgba(0, 0, 0, 0.8);
      padding: 20px;
      font-size: 30px;
      text-align: center;
    }
  }
Now let’s add code for our custom angular directive called the color.directive.ts file.
import { Directive, ElementRef, HostListener, Input } from '@angular/core';

@Directive({
  selector: '[appColor]'
})
export class ColorDirective {

  @Input() bgColor: string;

  constructor(private elementRef: ElementRef) { }

  @HostListener('mouseenter') onMouseEnter() {
    this.applyBgColor(this.bgColor || 'royalGreen')
  }

  @HostListener('mouseleave') onMouseLeave() {
    this.applyBgColor(null)
  }

  private applyBgColor(color: string) {
    this.elementRef.nativeElement.style.backgroundColor = color;
    this.elementRef.nativeElement.style.color = '#000';
    this.elementRef.nativeElement.style.textShadow = color? `0 0 10px ${color}` : null;


}
We have used hostListener to listen to mouseEnter and mouseLeave events. When mouseEnter event occurs on one of our nine div it will change its background color, which we have passed from the bgColor @Input decorator. Learn more information on an angular directive.
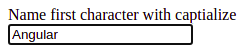
Angular custom directive to capital input type
In our second angular custom attribute directive example, we’ll create a directive to capitalize the first character of input. In the example below when we type any character, the first character will convert to capitalize as below.
Let’s first create capitalize custom directive by running the following command.
ng g directive directives/firstCapNow let’s implement our code for Angular capitalizes custom directives.
import { Directive, ElementRef, HostListener } from '@angular/core';

@Directive({
  selector: '[appFirstCap]'
})
export class FirstCapDirective {
  constructor(private ref: ElementRef) { }

  @HostListener('input', ['$event'])
  onInput(event: any): void {
    if (event.target.value.length === 1) {
      const inputValue = event.target.value;
      this.ref.nativeElement.value = inputValue.charAt(0).toUpperCase() + inputValue.substring(1);
    }
  }
}
Let’s now add our custom directive selector to our Angular input.
<div class="form-group">
  <label>Name first character with captialize</label>
   <input type="text" name="name" [(ngModel)]="name" ngModel appFirstCap>
</div>
We also need to define the name property variable in our typescript file.
export class AppComponent {
  name = '';
}
Here I have added an Angular custom directive to capitalize input in stackblitz.com.
Conclusion
In this article, we have explored details on Angular directives, the core of Angular applications. We learned different types of directives and an example of some of the built-in angular directives. I hope that this article was able to get you up and running with Angular directives.
- Detail example of the custom directive in an angular?
- Angular adds and removes classes using ngClass.
- Angular ngIf directive in details
- Angular ngSwitch directive in details