In this tutorial, we are learning Angular template driven form, how to use it, how to validate template form using ready-made validator and custom validator.
Angular forms are the most common and important for many web applications and are used for getting data from users. User input data are taken from form, we may need to validate it and at last, data in the form is saved to database at server.
Angular form types
There are two ways to build a form in angular, we can either use the template form or reactive form. Both these approaches are part of the core @angular/forms library, but they also have their own separate module
1. Template drive form (FormsModule)
2. Reactive form (ReactiveFormsModule)
Angular template driven form
In both types of form, we have common building blocks as FormControl, FormGroup, and FormArray. Now we might ask which is better, neither is truly better than the other, both have their own advantage and disadvantage. Based on our requirement we can use it, in the case of simple form, we can use a template, and more organized and complex form we can use the reactive form approach.
Angular template-driven forms are easy to build and the logic of the forms is controlled inside the component template. Angular Template form, where the form controls are defined in the template of the component, and all its validation errors are managed primarily through the template.
Template forms are simple, quick to get started, perfect for simple forms. But it has disadvantages that HTML and business rules are coupled, no unit testing can perform on it.
In Angular template-driven form, we can use only directives in a component’s templates to create, access, and validate form elements. The directives below the list, are the common building blocks of Angular template form. All these directives are part of FormsModule.
- NgModel
- NgModelGroup
- NgForm .
An Angular provides a way to use HTML native form elements like select, input, radio, etc, and add some power to them. Angular allows us to add additional control to the form through these directives like ngForm, ngModel, and ngModelGroup features.
How to create Angular template driven form
We’ll discuss each of these directives later, let first demonstrate an example of template form. So that we can understand better on forms directive to implement template form.
<form #userForm="ngForm">
   <div class="form-group">
     <label>Name</label>
     <input [(ngModel)]="name" name="name" #nameCtrl="ngModel">
   </div>
</form>

<p class="mt-5">User input: {{ nameCtrl.value }}</p>
<p class="mt-5">Form data: {{ userForm.value | json }}</p>
We had declared a local template variable userForm and binds it to ngForm. All form logic and validation are done in the component template only by using the above directives only.
- ngForm directive : Represent entire form, here we have bind ngForm object to local reference variable #userForm.
- ngModel: Allow two way data binding, we can attach individual form element to reference using ngModel. In our case we bind input name element to #nameCtrl and we can use this reference to access input element value. nameCtrl.value
- Using userForm local reference with value, we can display all input element value, but in our case we only have one input.
We have used Bootstrap for form UI, which is optional and if you want to add Bootstrap then you can add either CDN or ng-bootstrap library which we had already covered.
Directives needed to create Angular template-driven form.
In our first example, we have only one variable on form, so it is easy to figure out what’s the main ingredient needs to make an Angular template-driven form.
Step 1: Need to create a project
Let’s first create an angular project for our example.
ng new templateFormAppStep 2: Imports FormsModule in the app.module.ts file
These ngForm, ngModel, and ngModelGroup directives are the main ingredients for making template form, without them we can’t work on template form. All of that directives are part of the FormsModule, so we need to import and register this module in the app.module.ts file.
....
import { FormsModule } from '@angular/forms';

@NgModule({
   ...
  imports: [
    ...
    FormsModule
  ],
  ...
})
export class AppModule { }
The FormsModule has the required providers and directives for template-driven forms to work. Angular will automatically create a form that represents the JavaScript object of form when it detects a form element in a template of a component.
Step 3: Add form and its input element in component, template. We can validate and access form elements by using the ngForm directive. Add [(ngModel)] directive to add two-way data binding. We had added the basic template from the code above and here is a way to add email input.
<input type="email" name="email" [(ngModel)]="emailAddress">
{{ emailAddress }}
Directive used in Angular template form
In our above example, we have used a few template form directives to create a template form. Angular templates use the following directives.
| Name | Description |
| ngModel | Allow two-way data binding to form element and allow angular to create form control on an element. |
| name | Used in templates in form elements to specify its name in the form model. |
| ngForm | Used in component templates to bind the local variable to the form template element. In the above example, #loginForm add a local reference to the form. |
| NgForm | This is used inside the component typescript to represent the entire form. |
| ngSubmit | We have used this directive in the form element and it intercepts the HTML form submits event. |
| ngModelGroup | To create a sub-group of a form element and we used this directive in the template. |
ngModel:
Angular will not automatically detect this input in this form and we may also need to control the form element. In input, we have to add ngModel directive from the two-way data binding. This will tell angular that input is actually control of the form. The ngModel is a directive made available in the formModule.
Name attribute:
By using the name attribute we can specify the name of the control in a form. To recognize the input as a control in a form, we need to give angular the name of control by adding the name attribute on the input. The name is the default attribute you can add to any HTML control.
The ngForm Directive
The ngForm directive stores state information for the form, including the following:
- Values for all the controls element inside the form
- form groups fields in the form
- Validators
- Fields in the form
ngModelGroup Directive
The ngModelGroup, we can use this directive if we like to create a sub-group within a form. This can come in handy if you want to validate a sub-group of your form separately from the rest of your form, or if some values in your domain model make more sense to consume together in a nested object.
Example of Angular template-driven form
We can build almost any form with an Angular template-driven approach like login forms, contact forms, and pretty much any business form. Let demonstrate a template-driven approach by implementing an example. We have used ng-bootstrap for UI of angular form, which is optional and only for project UI. If you want to have the same UI then check our post on how to install ng-bootstrap in an Angular.
ng new templateFormApp
cd templateFormApp
Angular login form using template-driven approach
Let demonstrate the Angular login form example, where we used the Angular form directive that was needed to build the template form. We have also discussed we need to import FormsModule in the app module.

We have two fields, name and email and we have used ngModel directive to allow two-way data binding and turn input to Angular form control. We also used the button and ngSubmit directive to invoke the method when the user clicks on submit button. Let edit the component to add the login form.
<div class="container">
  <form #loginForm="ngForm" (ngSubmit)="onSubmit(loginForm.value)">
    <div class="form-group">
      <label for="exampleInputEmail1">Email address</label>
      <input [(ngModel)]="user.email" name="email" type="email" class="form-control">
    </div>
    <div class="form-group">
      <label for="exampleInputPassword1">Password</label>
      <input [(ngModel)]="user.password" type="password"
       name="password" class="form-control">
    </div>
    <button type="submit" class="btn btn-primary">Submit</button>
  </form>
</div>
<router-outlet></router-outlet>
We have used a user variable with two fields email and password, in need to define user variable inside the component typescript file.
import { Component } from '@angular/core';
import { NgForm } from '@angular/forms';

@Component({
  selector: 'app-root',
  templateUrl: './app.component.html',
  styleUrls: ['./app.component.scss']
})
export class AppComponent {
  user = { email: '', password: '' };

  onSubmit(form: NgForm) {
    console.log(form)
  }
}
Angular template-driven user details
We will create a simple user detail form to demonstrate the Angular template-driven forms example. We have a button in a form element where we called the form to submit the method directly. The default behavior of HTML will be triggered.
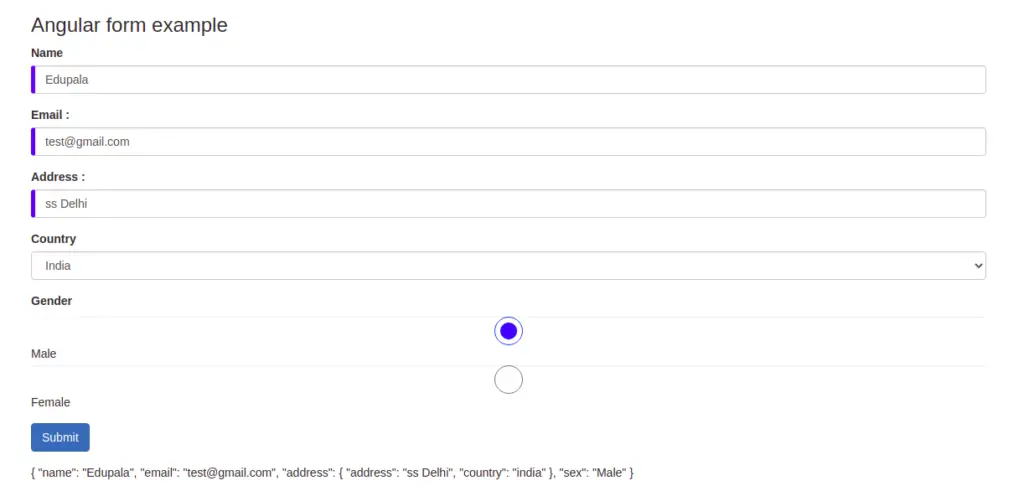
Let us demonstrate the third example of the template-driven approach, and we’ll add more form fields.
We can place ngSubmit directive on the form. The event made available by the ngSubmit directive will be fired whenever this form is submitted, so whenever this default behavior is triggered. The template reference variable on form #f=”profileForm”. It tells angular to give access to this form which we have created in our template component. This is how we get access to the form, to this javascript object created by Angular automatically.
This button will submit the form and it will also trigger a javascript submit an event built-in HTML. We can take advantage of using the angular ngSubmit directive, adding directly to the form element. This directive gives only one event in which we can listen whenever the form is submitted.
<div class="container">
  <h4> Angular form example</h4>
  <form #profileForm="ngForm" (ngSubmit)="onSubmit(profileForm.value)">
    <div class="form-group">
      <label>Name </label>
       <input type="text" name="name" class="form-control" ngModel>
    </div>
    <div class="form-group">
      <label>Email : </label>
      <input type="email" name="email" class="form-control" ngModel="email">
    </div>
    <div ngModelGroup="address">
      <div class="form-group">
        <label>Address : </label>
        <input type="text" name="address" class="form-control" ngModel>
      </div>
      <div class="form-group">
        <label>Country</label>
        <select class="form-control" name="country" ngModel>
          <option value="india">India</option>
          <option value="france">France</option>
          <option value="germany">Germany</option>
          <option value="japan">Japan</option>
          <option value="Mongolia">Mongolia</option>
        </select>
      </div>
    </div>
    <div class="form-group">
     <label>Gender</label>
     <input type="radio" name="sex" class="form-control" value="Male" ngModel>
       Male
     <input type="radio" name="sex" class="form-control" value="Female" ngModel>
        Female
    </div>
    <div class="form-group">
      <input class="btn btn-primary" type="submit">
    </div>
  </form>
  <div>{{profileForm.value | json }}</div>
</div>
We have one method in the app.component.ts typescript file to console log form object.
import { Component } from '@angular/core';
import { NgForm } from '@angular/forms';

@Component({
  selector: 'app-root',
  templateUrl: './app.component.html',
  styles: [`
     input.ng-invalid {
        border-left: 5px solid red;
     }
     input.ng-valid {
	border-left: 5px solid blue;
     }
`]
})
export class AppComponent {
  onSubmit(form: NgForm) {
    console.log(form);
  }
}
Angular template driven forms validation
In Angular template-driven form validation, we have two approaches to adding validation.
- Using built in form validation.
- Creating our own custom form validation.
The Angular Forms API, have built in form validation from Validators class, with static functions such as required() , minLength() , maxLength() , pattern() , email() , and others.
These built-in validators can be used in template form by specifying the directive’s name in the input element.
- required
- minLength
- maxLength
- pattern
The pattern validator enables us to specify a regular expression for Angular form validation on the input element.
Angular template driven form validation using built-in validator
Let demonstrate validation using a built-in validator, and here is a screenshot of our example. We have also used the Angular formgroup directive to group the address and country input element.
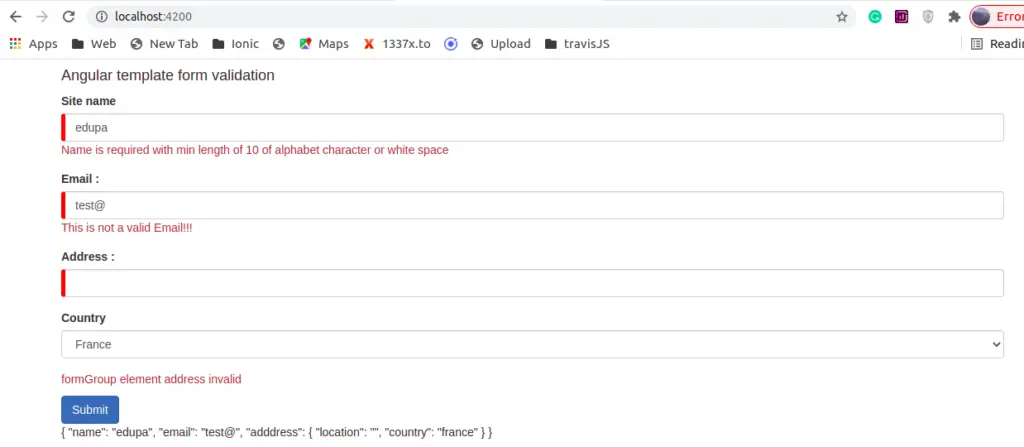
Edit an app.component.html to add form and validation code for angular template-driven approach.
<div class="container mt-4">

  <h4> Angular template form validation </h4>
  <form #profileForm="ngForm" (ngSubmit)="profileForm.form.valid && onSubmit(profileForm.value)">

    <div class="form-group">
      <label>Site name </label>
      <input type="text" name="name" class="form-control" [(ngModel)]="user.name" minlength="10" required>
      <div class="text-danger" *ngIf="profileForm.controls['name'].dirty && profileForm.controls['name'].invalid">
        <p *ngIf="profileForm.controls['name'].errors?.['required']">
          Name is required field!
        </p>
        <p *ngIf="profileForm.controls['name'].errors?.['minlength']">
          Name is required with min length of 10 of alphabet character or white space
        </p>
      </div>
    </div>

    <div class="form-group">
      <label>Email : </label>
      <input type="email" name="email" class="form-control" pattern="[a-z0-9._%+-]+@[a-z0-9.-]+\.[a-z]{2,4}$" [(ngModel)]="user.email" required>

     <div class="text-danger" *ngIf="profileForm.controls['email'].dirty && profileForm.controls['email'].invalid">
        <p *ngIf="profileForm.controls['email'].errors?.['required']">
          Email is a required field!
         </p>
        <p *ngIf="profileForm.controls['email'].errors?.['pattern']">
          This is not a valid Email!!!
        </p>
      </div>
    </div>

    <div ngModelGroup="address" ngModelGroup="adddress" #addressCtrl="ngModelGroup">
      <div class="form-group">
        <label>Address : </label>
        <input type="text" name="location" class="form-control" [(ngModel)]='user.address.location' required>
      </div>
      <div class="form-group">
        <label>Country</label>
        <select class="form-control" name="country" [(ngModel)]='user.address.country' required>
          <option value="india">India</option>
          <option value="france">France</option>
          <option value="germany">Germany</option>
          <option value="japan">Japan</option>
          <option value="Mongolia">Mongolia</option>
        </select>
      </div>
      <p *ngIf="addressCtrl.invalid && addressCtrl.touched" class="text-danger">
        formGroup element address invalid
      </p>
    </div>
    <button class="btn btn-primary float-right" type="submit">Submit</button>

  </form>

  <div *ngIf="profileForm.valid">{{profileForm.value | json }}</div>
</div>
We have template form reference #profileForm=”ngForm” in our template component. The ngForm gives access to form objects of javascript created by an Angular. It stores state information for the form, including the following.
- Values object containing all the controls inside the form.
- Groups of fields in the form.
- Fields in the form
- Validators value object like dirty, error, touched etc for Validation
We’ll demonstrate three validation, two for single form element and another for formGroup element called address which contains two-element location and country. The ngModelGroup directive creates and binds formGroup instance to a DOM element and can be used as a child of NgForm within form tags.
This directive will group inputs, and we need to set ngModelGroup equal to string to indicate group name. When we submit the form we have our group object in value object containing key-value pair of its all group elements. Use the ngModelGroup directive to validate a sub-group of forms separately from the rest of our form.
Edit app.component.ts file to create a profile data object, containing all information about users.
import { Component, OnInit } from '@angular/core';
import { NgForm } from '@angular/forms';

@Component({
  selector: 'app-root',
  templateUrl: './app.component.html',
  styleUrls: ['./app.component.scss']
})
export class AppComponent implements OnInit {
  user: any;

  constructor() {
  }

  ngOnInit() {
    this.user = {
      name: '',
      email: '',
      address: {
        location: '',
        country: ''
      }
    };
  }

  onSubmit(form: NgForm) {
    console.log(form);
  }
}
Angular custom validator Example
We may need to create our own custom validator if the built-in validator lacks the feature which we want. Creating our own Angular custom validator is easy, we have to use and implement the Validators interface from ‘@angular/forms’;
Here is the syntax of the Angular Validator interface.
interface ValidatorFn {
(c: AbstractControl): ValidationErrors | null;
}
We can determine errors based on the return value of this function. If the validator function returns null, then it means no error. Otherwise, it will return the ValidationError object containing key and value like this.
return { phoneNumberInvalid: 'Phone number must contain only number' };Where the phoneNumberInvalid is the key or error name, value is the error description of any type. To implement a custom validator, then we have to implement the Validator interface.
In our example, we are validating phone number input by allowing only integer number,s, and input number characters should contain ten characters. Otherwise, it will show errors.
Let create two directives inside the validators folder in the app by running the following command.
ng g directive validators/emailValidator
ng g directive validators/phoneValidator
We’ll implement a phone validator first, let add the following code in the phone-validator.directive.t file
import { Directive } from '@angular/core';
import { AbstractControl, Validator, NG_VALIDATORS } from '@angular/forms';

@Directive({
    selector: '[appPhoneValidator]',
    providers: [{
        provide: NG_VALIDATORS,
        useExisting: PhoneValidatorDirective,
        multi: true
    }]
})
export class PhoneValidatorDirective implements Validator {
   validate(control: AbstractControl): { [key: string]: any } | null {

     if (control.value && !control.value.toString().match(/^[0-9]+$/)) {
       return { phoneNumberInvalid: 'Phone number must contain only number' };
     }

     if (control.value && control.value.length != 10) {
       return { 'phoneNumberInvalid': 'Phone number must be 10 digits' };
     }

     return null; // No Error
    }
}
The code above is straight and easy to understand, the control.value have input value from form input phone. In the first, if condition we are checking if the input is number character if not then display an error message. In second if we are checking a total number of inputs should have 10 integer characters. If there is no error then return null.
The email validator, let add code to our email.validator.ts file following code to validate valid email.
import { Directive } from '@angular/core';
import { NG_VALIDATORS, Validator, AbstractControl } from '@angular/forms';
@Directive({
    selector: '[emailValidator]',
    providers: [{
        provide: NG_VALIDATORS,
        useExisting: EmailValidatorDirective,
        multi: true
    }]
})
export class EmailValidatorDirective implements Validator {
    validate(control: AbstractControl): { [key: string]: any } | null {
        if (control.value && !control.value.toString().match(/^\w+([\.-]?\w+)*@\w+([\.-]?\w+)*(\.\w{2,3})+$/)) {
            return { emailInvalid: 'Please enter valid email address'};
        }
        return null;
    }
}
Now we need to add the above two directive selectors inside our Angular form.
<div class="card" style="width: 600px;">
   <div class="card-body">
      <h5 class="card-title">Angular template form custom validator</h5>
      <form #userForm="ngForm">
        <div class="form-group">
          <label>Name</label>
          <input class="form-control user-name" placeholder="Enter your name" [(ngModel)]="student.name" name="name" #nameCtrl="ngModel">
        </div>

        <div class="form-group">
          <label>Phone number</label>
          <input type="text" class="form-control user-phone" name="phone" [(ngModel)]="user.phone" #phoneCtrl="ngModel"
            appPhoneValidator
            [class.is-invalid]="(phoneCtrl.touched || phoneCtrl.dirty) && phoneCtrl.errors?.['phoneNumberInvalid']">
        </div>


        <div *ngIf="(phoneCtrl.touched || phoneCtrl.dirty) && phoneCtrl.errors?.['phoneNumberInvalid']">
          <small class="text-danger">{{ phoneCtrl.errors?.['phoneNumberInvalid'] }}</small>
        </div>

        <div class="form-group">
          <label>Enter Email</label>
          <input type="email" class="form-control" name="email" [(ngModel)]="student.email" #emailCtrl="ngModel"
            emailValidator
            [class.is-invalid]="(emailCtrl.touched || emailCtrl.dirty) && emailCtrl.errors?.['emailInvalid']">
        </div>


        <div *ngIf="(emailCtrl.touched || emailCtrl.dirty) && emailCtrl.errors?.['emailInvalid']">
          <small class="text-danger">{{ emailCtrl.errors?.['emailInvalid'] }}</small>
        </div>
      </form>

      <p class="mt-5">Form data: {{ userForm.value | json }}</p>
    </div>
  </div>
</div>
We can use the Validator error name property to display an error message.
Angular validator CSS
HTML already provides some built-in form validations that can be put onto form elements, such as required or minlength . Angular works with these attributes and automatically will validate inputs based on them.
When we use ngModel directive on a form, it allows angular detection is form control input and tracks the state of the form fields. Angular adds a couple of classes on form elements to indicate form element validation status. Angular automatically mirrors many control properties onto the form control element as CSS classes.
We can use these classes to style form to show warnings or style the form elements according to the state of the form element. The following classes are currently supported.
| CSS class name | Angular form element status |
| ng-pristine | Data entry has not been touched |
| ng-dirty | The input field has been interacted with |
| ng-touched | The input field has received focus |
| ng-valid | Data entry has passed validation |
| ng-invalid | Data entry has not passed validation |
| ng-untouched | Set this CSS class if a user has not tabbed out from the input control. |
In this example, we apply the CSS style to input text through a form element class provided by an Angular. We can use an Angular ng-valid class to apply the CSS style to the input of the form and we can apply the style to the input text of firstName with the required attribute through an Angular ng-invalid class.
Angular form state
Like individual form field, we can validate, entire form using its states. Form also has states like valid, pristine, dirty, untouched, and touched also. In our template-driven approach, we have also applied valid states on our form using template references.
<div *ngIf="profileForm.valid">{{profileForm.value | json }}</div>Here we display only profileForm form value only when the form is valid, the same way we can enable or disable submit button using the form state value.
We have a complete tutorial on how to create and validate an angular reactive form in detail. As Angular form is a big concept and we can’t cover everything here. We have created two parts to cover the Angular form. If you want to create a more complex form then check our reactive form tutorial.
Conclusion
In this tutorial, we had learn how to implement an Angular template-driven form example with how to validate it. Angular template-driven forms are easier and quicker to build by taking leverage of ngModel for two-way data binding. The logic of the forms is controlled inside the component template only. I have uploaded custom form validation on template form on Github repository and if you want you can check it.
Related Articles