Creating Weather – Chart Application, With help of API from https://api.forecast.io our apps we are forecasting the weather in different part of the world and displaying weather information in chart form.
What are we learning?
- Use of forecast.io API to display current and forecast the weather.
- Use the tab view
- Forms, Form Fields, Form validations
- Integrate angular modules angular2-highcharts to display the chart in ionic
What We Will Build
“Weather App” that displays the current weather and a weather forecast in two tabs. The user can enter the location in a form, and the app will validate the location and retrieve the weather for that location via https://developer.forecast.io/ APIs (application programming interfaces). This app also fetches the forecast for the location and displays it in a chart format.
Prerequisite
To use the https://developer.forecast.io/ APIs you have to register with this site and get the API key. The API key is available from the Ionic Service Providers.
Important: Problem face while creating a chart in ionic.
- Problem: charts are taken more width in mobile. Solution: add chart { display: block; } in .scss or in style sheet.
- Problem: chart type not define, solution on we have to define chart module in app.module differently as, define all the highlight in app.module.ts file
import { BrowserModule } from '@angular/platform-browser'; .... import { ChartModule } from 'angular2-highcharts'; import * as highcharts from 'highcharts'; ... declare var require:any; @NgModule({ .. imports: [ .... ChartModule.forRoot(highcharts, require('highcharts/modules/map')), IonicModule.forRoot(MyApp) ], bootstrap: [IonicApp], entryComponents: [ ..... ], providers: [ ..... ] }) export class AppModule {}
Step 1: Create first the apps and add two tabs
ionic start weahteraAPI blank
ionic generate page weather-api
ionic generate tabs
How may tabs would you like? 2
Enter the first tab name: Weather
Enter the second tab name: Forecast
Set the weather-API as root page and put both the tab inside the app/pages/weather-api.ts.
import { Component } from '@angular/core';
import { NavController } from 'ionic-angular';
import { WeatherPage } from '../weather/weather';
import { ForcastPage} from '../forcast/forcast';

@Component({
  selector: 'page-weather-api',
  templateUrl: 'weather-api.html'
})
export class WeatherAPIPage {

  tab1Root: any = WeatherPage;
  tab2Root: any = ForcastPage;

  constructor(public navCtrl: NavController) {}

}
And add the app/pages/weather-api.html
<ion-tabs>
  <ion-tab [root]="tab1Root" tabTitle="Weather" tabIcon="home"></ion-tab>
  <ion-tab [root]="tab2Root" tabTitle="Forcast" tabIcon="text"></ion-tab>
</ion-tabs>
And add the following code in app/app.module.ts
import { ForcastPage} from '../pages/forcast/forcast';
import { WeatherPage } from '../pages/weather/weather';
import { WeatherAPIPage } from '../pages/weather-api/weather-api';
And add the following code in app/app.component.ts and set the rootPage to WeatherAPIPage.
import { Component } from '@angular/core';
...

import { WeatherAPIPage } from '../pages/weather-api/weather-api';
@Component({
  templateUrl: 'app.html'
})
export class MyApp {
  rootPage:any = WeatherAPIPage;
  ....
}
Step 2: Adding the service provider for data service
In the weather app, when you provide a location as input, the latitude and longitude of the location are required. You can retrieve this information using the Google API. Once you have those details you can retrieve the weather details of the location using the forecast API. We will implement both these calls as services. Using ionic generate to create a provider for the constants and name it AppConstants.
ionic generate provider AppConstantsAdd the following code in app/providers/app-constants.ts
import { Injectable } from '@angular/core';
import { Http } from '@angular/http';
import 'rxjs/add/operator/map';

@Injectable()
export class AppConstants {
  googleAPIURL: string;
  forecastURL: string;

  constructor(private http: Http) {
    this.googleAPIURL = "https://maps.googleapis.com/maps/api/geocode/json?address=";
    this.forecastURL = "https://api.darksky.net/forecast/2406c34530d2a00c982c99c4a4da62ab/";
  }
  getGoogleAPIURL() {
    return this.googleAPIURL;
  }
  getForecastURL() {
    return this.forecastURL;
  }
}
Step 3: Add the REST Service Provider
Create the REST service provider with the name WeatherApi
$ ionic generate provider WeatherAPIThe REST provider class needs to use the app-constants provider for the HTTP URL requests. So import app-constants into the WeatherAPI provider file src/providers/weather-api.ts,
import { Injectable } from '@angular/core';
import { Http } from '@angular/http';
import 'rxjs/add/operator/map';
import { AppConstants } from './app-constants';

@Injectable()
export class WeatherAPI {
  weatherURL: string;
  private constantVar: any;

  constructor(private http: Http, constantVar: AppConstants) {
    this.constantVar = constantVar;
    this.weatherURL = constantVar.getForecastURL();
  }

  getGeometry(googleAPIURL: any,location: any) {
    return this.http.get(googleAPIURL+"'"+location+"'")
    .map(res => res.json())
  }

  getCurrentWeather(longitude: any,latitude: any) {
    return this.http.get(this.weatherURL+latitude+","+longitude)
    .map(res => res.json())
  }

}
Notice the @Injectable() annotation in the provider classes. This marks the class to be available for the
component for instantiation
We have two methods in the above code.
- getGeometry is the method to retrieve the latitude and longitude for the provided location from Google.
- getCurrentWeather is another method that retrieves the weather information for the provided longitude and latitude of the location.
Step 4: Creating a user interface for Forcast and Weather Form
In the src/pages/forecast/forecast.html file include the code
<ion-header>
  <ion-navbar>
    <ion-title>Forcast</ion-title>
  </ion-navbar>
</ion-header>
<ion-content padding>
  <form [formGroup]="forecastForm" novalidate>
    <table width="100%">
      <tr>
        <td>
          <div class="list"> <br>
            <ion-label>Forecast Type</ion-label>
            <ion-list radio-group formControlName="forecastType" name="forecastType">
              <ion-item>
                <ion-label class="item item-radio">daily</ion-label>
                <ion-radio value="daily" checked></ion-radio>
              </ion-item>
              <ion-item>
                <ion-label class="item item-radio">hourly</ion-label>
                <ion-radio value="hourly"></ion-radio>
              </ion-item>
            </ion-list>
          </div>
        </td>
        <td>
          <ion-item>
            <ion-label floating>Location</ion-label>
            <ion-input type="text" formControlName="location" name="location"></ion-input>
          </ion-item>
          <p [hidden]="forecastForm.controls.location.valid" danger padding-left> Enter a valid location</p>
        </td>
      </tr>
      <tr>
        <td colspan="2">
          <button ion-button block [disabled]="!forecastForm.controls.location.valid" (click)="getForecast(forecastForm)">
          <ion-icon name="custom-button"></ion-icon>Get Weather</button>
        </td>
      </tr>
    </table>
  </form>
  <div class="container" *ngIf="weatherResult">
    <chart [options]="chartValue"></chart>
  </div>
</ion-content>

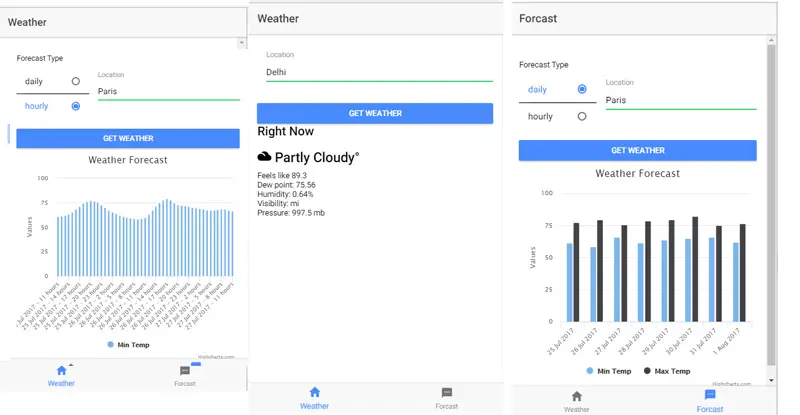
Here we are adding two radio buttons and we are formControlName=”forecastType” to control the forecasting daily and hourly. The highlight for displaying the chart on the forecast page.
A form is a type of FormGroup. A Control is tied to the input field; it has a value and a validation state. In the code forecastForm is a FormGroup. This form has two fields: a location text field and a radio button group for the forecast type.
In the src/pages/weather/weather.html file include the code
<ion-header>
  <ion-navbar>
    <ion-title>Weather</ion-title>
  </ion-navbar>
</ion-header>

<ion-content padding>
  <form [formGroup]="weatherForm" novalidate>
    <table width="100%">
      <tr>
        <td>
          <ion-item>
            <ion-label floating>Location</ion-label>
            <ion-input type="text" formControlName="location" name="location"></ion-input>
          </ion-item> <br>
          <p [hidden]="weatherForm.controls.location.valid" danger padding-left> Enter a valid location</p>
        </td>
      </tr>
      <tr>
        <td> <br>
          <button ion-button block [disabled]="!weatherForm.controls.location.valid" (click)="getWeather(weatherForm)">
          <ion-icon name="custom-button"></ion-icon>Get Weather</button>
        </td>
      </tr>
    </table>
  </form>

  <div *ngIf="weatherResult">
    <h3>Right Now</h3>
    <h2 class="current-temp">
      <ion-icon name="{{summaryIcon}}"></ion-icon>
      {{currentWeather.summary}}°
    </h2>
    <div>
      <div>
        <span>Feels like {{currentWeather.temperature}}</span><br>
        <span>Dew point: {{currentWeather.dewPoint}}</span><br>
        <span>Humidity: {{currentWeather.humidity}}%</span><br>
        <span>Visibility: {{currentWeather.visibility}} mi</span><br>
        <span>Pressure: {{currentWeather.pressure}} mb</span>
      </div>
    </div>
  </div>
</ion-content>
Step 5: Validation in the Weather Form
The Weather form uses four types of basic validation: required, minimum length, maximum length, and pattern. All four types of validation are applied to the location field. They are applied to the file src/pages/ weather/weather.ts via the constructor
import { Component } from '@angular/core';
import { NavController, NavParams } from 'ionic-angular';
import { FormBuilder, FormGroup, Validators } from '@angular/forms';
import {AppConstants} from '../../providers/app-constants';
import {WeatherAPI} from '../../providers/weather-api';

@Component({
  selector: 'page-weather',
  templateUrl: 'weather.html',
})
export class WeatherPage {
  weatherForm: FormGroup;
  private appConstants: any;
  private Weather: any;
  private geometry: any;
  private currentWeather: any;
  weatherResult: boolean;
  summaryIcon: string;

  constructor(private navController: NavController, private fb: FormBuilder, appConstants: AppConstants, WeatherApi: WeatherAPI) {
    this.weatherForm = fb.group({
      'location': ['', Validators.compose([Validators.required,Validators.pattern
      ('[a-zA-Z, ]*'),Validators.minLength(3),Validators.maxLength(100)])]
    });

    this.appConstants = appConstants;
    this.Weather = WeatherApi;
    this.geometry = { "longitude":"", "latitude":""};
    this.currentWeather = {};
    this.weatherResult = false;
    this.summaryIcon ="";
  }

  getWeather(formData: any) {
    this.Weather.getGeometry(this.appConstants.getGoogleAPIURL(), formData.value.location).
      subscribe((data: any) => {
        this.geometry.longitude = data.results[0].geometry.location.lng;
        this.geometry.latitude = data.results[0].geometry.location.lat;
        this.Weather.getCurrentWeather(this.geometry.longitude,this.geometry.latitude).
        subscribe((weatherData: any) => {
          this.currentWeather=weatherData.currently;
          this.weatherResult = true;
          if(this.currentWeather.summary.toLowerCase().indexOf("cloudy") > 0)
            this.summaryIcon = "cloudy";
          else if(this.currentWeather.summary.toLowerCase().indexOf("rainy") > 0)
            this.summaryIcon = "rainy";
          else if(this.currentWeather.summary.toLowerCase().indexOf("sunny") > 0)
            this.summaryIcon = "sunny";
          else if(this.currentWeather.summary.toLowerCase().indexOf("thunderstorm") > 0)
            this.summaryIcon = "thunderstorm";
        });
      });
  }
}
Retrieve Weather Data for Display through getWeather(formData: any) from weather-api service. We have getGeometry is called to retrieve the latitude and longitude. Once you have that information you call getCurrentWeather to retrieve the current weather. The current weather information is display in step 4 weather.html page.
Step 6: Display the Forecast as Chart
Here we will learn how other modules of angular2 can be integrated with Ionic. To understand this integration, we will use the chart display for the forecast. To display the forecast as a chart, we use the “CHART_DIRECTIVES” from “angular2-highcharts” module.
npm install angular2-highcharts --saveCharts are used for the forecast, so let’s import the charts into the src/app/app.module.ts
import { ChartModule } from 'angular2-highcharts';
import * as highcharts from 'highcharts';

declare var require:any;

@NgModule({
  declarations: [
   ...
  ],
  imports: [
    BrowserModule,
    ChartModule.forRoot(highcharts, require('highcharts/modules/map')),
    HttpModule,
    IonicModule.forRoot(MyApp)
  ],
Include the chart value variable in the src/pages/forecast/forecast.ts. Define the variable as part of all the other variable definitions as – chartValue: {};
Filtering of Forecast JSON in src/pages/forecast/forecast.ts
Filtering the JSON retrieved from the forecast API is required for the chart display. JSON filtration retrieves the date/hour details and the temperature details. Add the following code in src/pages/forecast/forecast.ts
import { Component } from '@angular/core';
import { NavController, NavParams } from 'ionic-angular';
import { FormBuilder, FormGroup, Validators } from '@angular/forms';
import {AppConstants} from '../../providers/app-constants';
import {WeatherAPI} from '../../providers/weather-api';

@Component({
  selector: 'page-forcast',
  templateUrl: 'forcast.html',
})
export class ForcastPage {
  forecastForm: FormGroup;
  private appConstants: any;
  private Weather: any;
  private geometry: any;
  private minWeather: number[][];
  private maxWeather: number[][];
  private weatherTime: any;
  weatherResult: boolean;
  summaryIcon: string;
  chartValue: {};

  constructor(private navController: NavController, private fb: FormBuilder, appConstants: AppConstants, WeatherApi: WeatherAPI) {
    this.forecastForm = fb.group({
      'location': ['', Validators.compose([Validators.required,Validators.pattern
      ('[a-zA-Z, ]*'),Validators.minLength(3),Validators.maxLength(100)])],
      'forecastType': 'daily'
    });

    this.appConstants = appConstants;
    this.Weather = WeatherApi;
    this.geometry = { "longitude":"", "latitude":""};
    this.minWeather = new Array();
    this.maxWeather = new Array();
    this.weatherTime = new Array();
    this.weatherResult = false;
    this.summaryIcon ="";
  }

  filterJson(json,forecastType){
    this.minWeather = new Array();
    this.maxWeather = new Array();
    this.weatherTime = new Array();
    for(var i=0;i<json.length;i++){
      var months = ['Jan','Feb','Mar','Apr','May','Jun','Jul','Aug','Sep','Oct','Nov','Dec'];
      var b: Date = new Date(json[i].time * 1000);

      if(forecastType == "daily"){
        this.weatherTime.push(b.getDate()+" "+months[b.getMonth()]+" "+b.getFullYear());
        this.maxWeather.push(json[i].temperatureMax);
        this.minWeather.push(json[i].temperatureMin);
      }
      else{
        this.weatherTime.push(b.getDate()+" "+months[b.getMonth()]+" "+b.getFullYear() +" - "+b.getHours() +" hours");
        this.minWeather.push(json[i].temperature);
      }
    }
  }

  getForecast(formData: any) {
    this.Weather.getGeometry(this.appConstants.getGoogleAPIURL(), formData.value.location).
    subscribe((data: any) => {
      this.geometry.longitude = data.results[0].geometry.location.lng;
      this.geometry.latitude = data.results[0].geometry.location.lat;
      this.Weather.getCurrentWeather(this.geometry.longitude,this.geometry.latitude).
      subscribe((weatherData: any) => {
      this.weatherResult = true;
      if(formData.value.forecastType == "daily"){
        this.filterJson(weatherData.daily.data,formData.value.forecastType);
        this.chartValue = {
          title : { text : 'Weather Forecast' },
          chart: { type: 'column' },
          xAxis: {
            categories: this.weatherTime
          },
          series: [
            { name : 'Min Temp', data: this.minWeather},
            { name : 'Max Temp', data: this.maxWeather}
          ]
        };
      }
      else{
        this.filterJson(weatherData.hourly.data,formData.value.forecastType);
        this.chartValue = {
          title : { text : 'Weather Forecast' },
          chart: { type: 'column' },
          xAxis: {
            categories: this.weatherTime
          },
          series: [ { name : 'Min Temp', data: this.minWeather},]
        };
      }
    });
  });
  }
}
Step 7: Include the required chart js file into the body of the src/index.html file
<body>
....
  <ion-app></ion-app>
  <!-- Chart.js -->

  <script src="https://cdnjs.cloudflare.com/ajax/libs/Chart.js/2.3.0/Chart.min.js"></script>

    <!-- The polyfills js is generated during the build process -->

  <script src="build/polyfills.js"></script>
Step 8: To display chart we have to add following code at the end of app/pages/forecast/forecast.html
<div class="container" *ngIf="weatherResult">
  <chart [options]="chartValue"></chart>
</div>
In app/app.module.ts add the following code
import { BrowserModule } from '@angular/platform-browser';
import { ErrorHandler, NgModule } from '@angular/core';
import { IonicApp, IonicErrorHandler, IonicModule } from 'ionic-angular';
import { SplashScreen } from '@ionic-native/splash-screen';
import { StatusBar } from '@ionic-native/status-bar';
import { HttpModule } from '@angular/http';

import { ChartModule } from 'angular2-highcharts';
import * as highcharts from 'highcharts';

import { MyApp } from './app.component';
import { ForcastPage} from '../pages/forcast/forcast';
import { WeatherPage } from '../pages/weather/weather';
import { WeatherAPIPage } from '../pages/weather-api/weather-api';
import { AppConstants} from '../providers/app-constants';
import { WeatherAPI } from '../providers/weather-api';


declare var require:any;


@NgModule({
  declarations: [
    MyApp,
    ForcastPage,
    WeatherPage,
    WeatherAPIPage
  ],
  imports: [
    BrowserModule,
    ChartModule.forRoot(highcharts, require('highcharts/modules/map')),
    HttpModule,
    IonicModule.forRoot(MyApp)
  ],
  bootstrap: [IonicApp],
  entryComponents: [
    MyApp,
    ForcastPage,
    WeatherPage,
    WeatherAPIPage
  ],
  providers: [
    StatusBar,
    SplashScreen,
    AppConstants,
    WeatherAPI,
    {
      provide: ErrorHandler,
      useClass: IonicErrorHandler
    }
  ]
})
export class AppModule {}