With the release of ionic version 4, no longer limited to angular, we can create the ionic projects in different front-end frameworks like Angular, Vue, and React. In these articles, we will learn Ionic routing based on Angular.
Navigation is very important for user experience. The user can move from one page to another page. What would happen when a user submits a form or after moving to another page with data. We have to ensure that data is reached at the intended page with the correct state of data without modifying. In these articles, we will learn following
- Navigation using routerLink directive to allow ionic routing in a template.
- Angular router module, to allow routing in a component. Add animation while routing in template and component.
- Routing using nav controller which is not recommended
- Routing to the same page or component with different parameters.
- Ionic 4 passes data between pages
Ionic cached navigation of page history in the stack controller. If we go forward to the new page Ionic pushes the page on top of the stack and when we go back to the previous page, Ionic will pop the page from the stack controller. But this is different from angular where, when you go to a new page or you go back, all these pages which are components are essentially destroyed when you leave them.
When we use the Angular router for navigation, Ionic basically watches the Angular router, it has a listener for routing actions. When we go forward, it basically pushes a new page onto that stack and when you go back or use that ion back button, it pops that topmost page off.
Step 1: Let’s create an ionic project
ionic start navigateApps blank --type=angular
cd navigateApps
Step 2: Add two more page rooms and room pages by running a command.
ionic generate page rooms
ionic generate page room
When we generate a page, ionic automatically will add the ionic routing configuration of pages in the app/app-routing.module.ts file. a
import { NgModule } from '@angular/core';
import { PreloadAllModules, RouterModule, Routes } from '@angular/router';

const routes: Routes = [
  { path: '', redirectTo: 'home', pathMatch: 'full' },
  { path: 'home', loadChildren: () => import('./home/home.module').then( m => m.HomePageModule)},
  { path: 'rooms', loadChildren: () => import('./rooms/rooms.module').then( m => m.RoomsPageModule)},
  { path: 'room', loadChildren: () => import('./room/room.module').then( m => m.RoomPageModule)},
];

@NgModule({
  imports: [
    RouterModule.forRoot(routes, { preloadingStrategy: PreloadAllModules })
  ],
  exports: [RouterModule]
})
export class AppRoutingModule { }
We will remove home page routing and set the rooms page as the root route in our Ionic 5 angular application and add another route item of a room with roomId. In ionic routing configuration replace routes object code in app/routing.module.ts
const routes: Routes = [
  { path: '', redirectTo: 'rooms', pathMatch: 'full' },
  { path: 'rooms', loadChildren: () => import('./rooms/rooms.module').then( m => m.RoomsPageModule)},
  { path: 'room', loadChildren: () => import('./room/room.module').then( m => m.RoomPageModule)},
  { path: 'room/:roomId', loadChildren: () => import('./room/room.module').then( m => m.RoomPageModule)},
];
Step 3: Add the routing concepts in our page rooms.
We will use three different ways of using routing in ionic angular. In this example, we will pass roomId as a static number for example.
<ion-header>
<ion-toolbar color="primary">
<ion-title>
Ionic Routing
</ion-title>
</ion-toolbar>
</ion-header>
<ion-content>
<div class="ion-padding">
<ion-card>
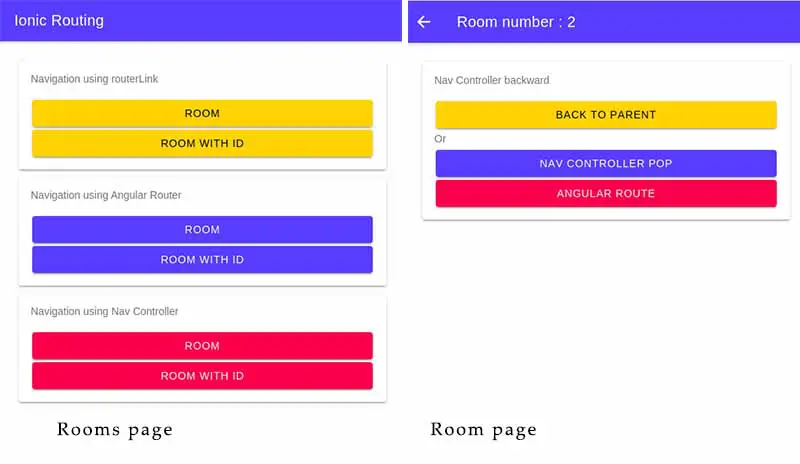
<ion-card-header>
Navigation using routerLink
</ion-card-header>
<ion-card-content>
<ion-button expand="block" color="warning" routerLink="/room" routerDirection="forward">Room</ion-button>
<ion-button expand="block" color="warning" [routerLink]="'/room/' + 2" routerDirection="forward">
Room with id
</ion-button>
</ion-card-content>
</ion-card>
<ion-card>
<ion-card-header>
Navigation using Angular Router
</ion-card-header>
<ion-card-content>
<ion-button expand="block" (click)="angularRoute()">Room</ion-button>
<ion-button expand="block" (click)="angularRouteWithID(2)">Room with id</ion-button>
</ion-card-content>
</ion-card>
<ion-card>
<ion-card-header>
Navigation using Nav Controller
</ion-card-header>
<ion-card-content>
<ion-button expand="block" color="danger" (click)="navigateRoom()">Room</ion-button>
<ion-button expand="block" color="danger" (click)="navigateRoomWithId(1)">Room with id</ion-button>
</ion-card-content>
</ion-card>
</div>
</ion-content>import { Component, OnInit } from '@angular/core';
import { NavController } from '@ionic/angular';
import { Router } from '@angular/router';
@Component({
selector: 'app-rooms',
templateUrl: './rooms.page.html',
styleUrls: ['./rooms.page.scss'],
})
export class RoomsPage {
constructor(
private navCtrl: NavController,
private router: Router
) { }
angularRoute() {
this.router.navigateByUrl('/room');
// or
// this.router.navigate(['/room']);
}
angularRouteWithID(roomId: string) {
this.router.navigate(['/room/' + roomId]);
}
navigateRoom() {
this.navCtrl.navigateForward('/room');
}
navigateRoomWithId(roomId: number) {
this.navCtrl.navigateForward('/room/' + roomId);
}
}We can use any of these approaches, if you are building an ionic angular project then it is recommended to use an approach of navigation using Angular methods.
- routerDirection: Determines the animation that takes place when the page changes. The routerDirection properties default value is forward and we have three options forward, back, and root.
- routerLink directive: We can pass the dynamic value in routerLink using string interpolation and dynamic data such as id.
<ion-button [routerLink]="'/room', room.id]">Edit</ion-button>
<ion-button routerLink]="{{ routerName }}">Edit </ion-button>
Step 4: Add the back button and retrieve the id from the URL.
In-room page template we have the ionic back button component to navigate back to the parent page. We also have to retrieve roomId from the router URL containing /room/roomId.
<ion-header>
  <ion-toolbar color="primary">
    <ion-buttons slot="start">
      <ion-back-button defaultHref="/"></ion-back-button>
    </ion-buttons>
    <ion-title>Room <span *ngIf="roomId">number : {{ roomId }}</span></ion-title>
  </ion-toolbar>
</ion-header>

<ion-content class="ion-padding">
  <ion-card>
    <ion-card-header>
      Nav Controller backward
    </ion-card-header>
    <ion-card-content>
      <ion-button expand="block" color="warning" routerLink="/">Back to Parent</ion-button>
      <span>Or </span>
      <ion-button expand="block" (click)="navigateParent()">Nav controller pop</ion-button>
      <ion-button expand="block" color="danger" (click)="navigateRootPage()">Angular route</ion-button>
    </ion-card-content>
  </ion-card>
</ion-content>
import { Component, OnInit } from '@angular/core';
import { ActivatedRoute, Router } from '@angular/router';
import { NavController } from '@ionic/angular';
@Component({
selector: 'app-room',
templateUrl: './room.page.html',
styleUrls: ['./room.page.scss'],
})
export class RoomPage implements OnInit {
roomId: number;
constructor(
private navCtrl: NavController,
private router: Router,
private activatedRoute: ActivatedRoute) { }
ngOnInit() {
this.activatedRoute.paramMap.subscribe(paramMap => {
if (!paramMap.has('roomId')) {
this.router.navigate(['/']);
}
this.roomId = +paramMap.get('roomId');
});
}
navigateParent() {
this.navCtrl.pop();
}
angularRoute() {
this.router.navigateByUrl('/');
}
}In-room page, we can get room id using ActivatedRoute interface from the angular/router module. The paramMap property on ActivatedObject is actually observable.
Ionic routing to the same page with different parameters.
Ionic routing the same page or component with different params will not reload the same page, in an Angular 8 we can use. We have set router module property onSameUrlNavigation = ‘reload’;
In route to same page in page or menu
<ion-item [routerLink]="['/notifications']" [queryParams]="{ type: 'birthday' }">
    Birthdays
  </ion-item>
  <ion-item [routerLink]="['/notifications']" [queryParams]="{ type: 'annivarsary' }" >
    Annivarsary | special
  </ion-item>


In component
  constructor(
    private activatedRoute: ActivatedRoute,
  ) {
    this.router.onSameUrlNavigation = 'reload';
  }

  ngOnInit() {
    this.activatedRoute.queryParams.subscribe(params => {
      if (params.type) {
        this.type = params.type;
      }
    });
  }
To check more information on the angular routing on the official documentation site.