http://edupala.com/angular-form/We’ll need to use the TypeScript transpiler to convert our TypeScript files into valid ES5 or ES6 JavaScript files.
Furthermore, since Angular is a front end framework, installing it requires the inclusion of JavaScript files in server or node application. This can be done in various ways and the easiest one, run ng build and copy the code of dist folder of angular and store them in the public folder.
First, install all the dependency.
We are using mongojs, which provide easy and familiar syntax.
Configure the way we want the TypeScript compiler to run
In order to configure the way TypeScript works, we’ll need to add a new file called tsconfig.json to our application’s root folder. In your new file, paste the following JSON:
{
	"compilerOptions": {
		"target": "es6",
		"module": "system",
		"moduleResolution": "node",
		"sourceMap": true,
		"emitDecoratorMetadata": true,
		"experimentalDecorators": true,
		"removeComments": false,
		"noImplicitAny": false
	},
	"exclude": [
		"node_modules",
		"typings/main",
		"typings/main.d.ts"
	]
}
This file is the root of the node folder. When we run our application, the TypeScript will use the tsconfig.json configuration file by default. Next, you’ll need to add a new file called typings.json to your application’s root folder. In your new file, paste the following JSON:
Step 1: Creating the backend server. First, we need to create Node backend.
mkdir clientKeeper
npm init
//Fill all the requirement and set server.js
npm install express body-parser mongojs --save
Now we will create our server.js code as
const express = require('express');
const path = require('path');
const bodyParser = require('body-parser');

const app = express();

const port = 3000;

//define db through mongojs

const mongojs = require('mongojs');
const db = mongojs('clientkeeper', ['clients']);

//set Static Folder
app.use(express.static(path.join(__dirname, 'public'))) ;
app.use(bodyParser.json());

app.get('/', (req, res) => {
    res.send('Please use /api/client');
});

app.listen(port, () => {
    console.log('Server start on port' +port);
});
Note in package.json we have to add “start”: “node server” and we need to run our apps like >> npm start
Step 2: Handling Backend
Here we are developing backend, RESTFUL API with complete CRUD functionality. We will now add code for routing and database. In server.js file add the following code for routing before app.listen
//Get Clients - GET request
app.get('/api/clients', (req, res, next) => {
    db.clients.find().sort({first_name:1}, (err, clients) => {
        if(err){
            res.send(err);
        }
        res.json(clients);
    });
});

//Add Client - POST
app.post('/api/clients', (req, res, next) => {
    db.clients.insert(req.body, (err, client) => {
        if(err){
            res.send(err);
        }
        res.json(client);
    });
});

//Update Client - POST
app.put('/api/clients/:id', (req, res, next) => {
    const id = req.params.id;
    db.clients.findAndModify({query: {_id: mongojs.ObjectId(id)},
        update: {
            $set: {
                first_name: req.body.first_name,
                last_name: req.body.last_name,
                email : req.body.email,
                phone: req.body.phone
            }
        },
        new: true
    },(err, client) => {
        res.json(client);
    });
});

//Add Client - DELETE
app.delete('/api/clients/:id', (req, res, next) => {
    const id = req.params.id;
    db.clients.remove({ _id: mongojs.ObjectId(id)}, (err, client) => {
        if(err){
            res.send(err);
        }
        res.json(client);
    });
});

app.listen(port, () => {
    console.log('Server start on port' +port);
});
Till now we didn’t set up the database, we can test the above code using chrome extension called RestEasy, we can make GET, POST, PUT and DELETE request. For requesting post we have to set header Content-type : application/json.


As what every we type in Rest Easy chrome extension will be inserted in the database, as we are posting data on behaving from the server by our chrome extension.
Step 3: Handling FrontEnd through Angular
We have to install angular cli as npm install -g angular-cli
We will create a project folder and put both node project client keeper and angular project both inside the project folder. In the project folder in the command line run following command.
>>ng new ckfrontend
>>cd ckfrontend
>>ng serve
By default angular run on port 4200

Once frontend is complete we will run ng build
copy dist folder of angular to our public folder of backend.
Inside the app folder in Angular frontend, we will create a folder called components in the app folder. Inside the components, the folder creates new folder clients. Inside the clients, folder adds two more file clients.component.ts and clients.component.html. Add the following code in clients.component.ts file
import { Component } from '@angular/core';

@Component({
  selector: 'clients',
  templateUrl: './clients.component.html'
})
export class ClientsComponent {}
and inside the clients.component.html add the following code.
Hello ClientsWe need to declare the clients.component.ts file inside the app.module.ts
Step 4: Creating a Service in FrontEnd to access/fetch data from Backend
Now we will create a services file, which will help us to make a request to the backend database for the list of clients and will display the client’s information in clients.component.html. Create services folder and add a new file called clients.service.ts. Add the following code in app/services/clients.service.ts .
import {Injectable} from '@angular/core';
import {Http, Headers} from '@angular/http';
import 'rxjs/add/operator/map';

@Injectable()
export class ClientService {
    constructor(private http: Http) {}

    getClients() {
        return this.http.get('http://localhost:3000/api/clients')
            .map(res => res.json());
    }
}
We are using HTTP to access the client data, we need to declare HttpModule and ClientService both in app.module.ts.
....
import { HttpModule } from '@angular/http';
......
import { ClientsComponent } from './components/clients/clients.component';
import { ClientService } from './services/clients.service';

@NgModule({
  declarations: [
    AppComponent,
    ClientsComponent
  ],
  imports: [
    BrowserModule,
    HttpModule
  ],
  providers: [ ClientService ],
  bootstrap: [AppComponent]
})
export class AppModule { }
In clients.component.ts we are using ClientService so we have to import service in clients.component.ts file.
Add the following code in app/components/clients.component.ts
import { Component, OnInit } from '@angular/core';
import { ClientService } from '../../services/clients.service';

@Component({
  selector: 'clients',
  templateUrl: './clients.component.html'
})

export class ClientsComponent implements OnInit {
  constructor(private clientService: ClientService) {
  }

  ngOnInit() {
    this.clientService.getClients().subscribe(clients => {
      console.log(clients);
    });
  }
}
Note:
- We want to run getClients method from ClientService immediately, we can put in the constructor but the best and recommended way to do it is used lifecycle method called OnInit. We have to import it in our clients.component.ts file and implement it in our class as in code and ngOnInit() will run immediately with the clients.component.ts class. Add the following code in app/components/clients.component.ts
- this.clientService.getClients().subscribe(clients=> { – the getClients will return Observable, we have to catch it through subscribing , it will give as data.
- We have to run both front and back end in command mode. Port 3000 for node and 4200 for angular. On access the client code on browser http://localhost:4200/ we get the error message.
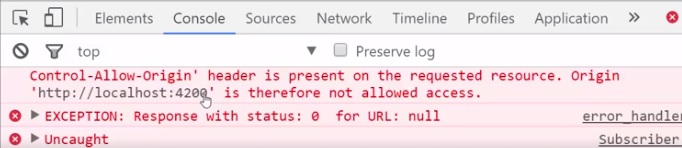
We are getting an error because we request from the different domain, so we have to add middleware in backend or node to allow access from localhost:4200 and add the following code in backend server.js file.
//Allow request from Angular
app.use((req, res, next) => {
    res.setHeader('Access-Control-Allow-Origin', 'http://localhost:4200');
    //Request methods u wish to allow

res.setHeader('Access-Control-Allow-Methods', 'GET, POST, PUT, DELETE');
    //Request header you widht to allow

res.setHeader('Access-Control-Allow-Headers', 'X-Requested-With, Content-Type');
    //Pass to next Layer of middleware

 next();
})
Step 5: Displaying the client list in the template.
We above code, the client will access the data from the backend and display the client information through console.log. Now instead of the log to the console, we will assign the client data to a variable in component the clients.component.ts file and we can access with the template and display the client in clients.component.html file.
We will modify the clients.component.ts file from log to
export class ClientsComponent implements OnInit {
  clients;

  constructor(private clientService: ClientService) {
  }

  ngOnInit() {
    this.clientService.getClients().subscribe(clients => {
      this.clients = clients;
    });
  }
}
Once we assign the client to the local variable we can easily access in the template and can loop client data through ngFor. Add the following code in app/components/clients.component.html
<div class="client-list">
    <table class="table table-striped">
        <tr>
            <th>First Name</th>
            <th>Last Name</th>
            <th>Email</th>
            <th>Phone</th>
            <th></th>
        </tr>
        <tr *ngFor="let client of clients">
            <td>{{clients.first_name}}</td>
            <td>{{clients.last_name}}</td>
            <td>{{clients.email}}</td>
            <td>{{clients.phone}}</td>
            <td><a href="" class="btn btn-default">Edit</a>
 <a href="" class="btn btn-danger">Delete</a></td>
        </tr>
    </table>
</div>
As till now we didn’t apply any style, we can use bootswatch theme spacelab and insert bootstrap link in client index.html as
........
  <base href="/">

  <link rel="stylesheet" href="https://bootswatch.com/spacelab/bootstrap.min.css">
  <meta name="viewport" content="width=device-width, initial-scale=1">
.....
In a client or angular side, we create a new component called navbar. Create a folder navbar in app/components and add two files as navbar.component.ts and navbar.component.html file. Inside the navbar.component.ts file add the following code
import { Component} from '@angular/core';

@Component({
  selector: 'navbar',
  templateUrl: './navbar.component.html'
})

export class NavbarComponent {
  constructor() {}
}
Add the following line of code in navbar.component.html file
<nav class="navbar navbar-inverse">
    <div class="container">
        <div class="navbar-header">
            <a class="navbar-brand" href="/">ClientKeeper</a>
        </div>
    </div>
</nav>
We also have to import our new navbarcomponent in app.module.ts file. Inside the app/app.component.html file add our new navbar tag.
<navbar></navbar>
<div class="container">
    <clients></clients>
</div>
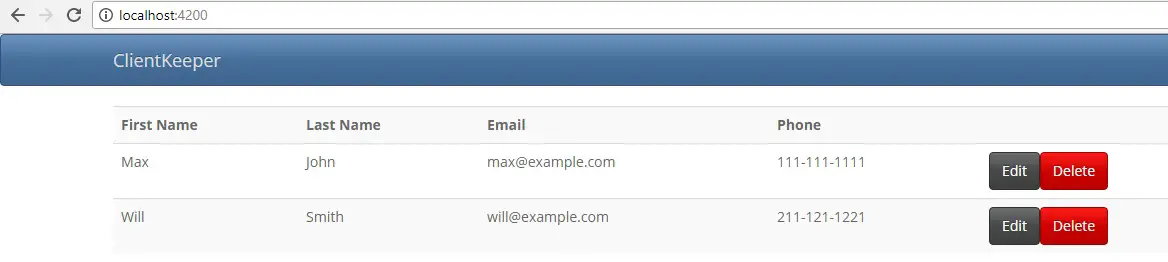
On accessing the client or angular on browser we will get
Step 6: Adding new Client information from the front end to the back end.
We will create a form in angular, so we can insert a new client from angular to the node. In app/components/clients/client.component.html add the following code for form for adding a new client.
<div class="client-form">
    <form (submit)="onAddSubmit()" class="well">
        <h3>Add Client</h3>
        <div class="form-group">
            <label>First Name</label>
            <input type="text" class="form-control" [(ngModel)]="first_name" name="first_name" placeholder="First Name">
        </div>
        <div class="form-group">
            <label>Last Name</label>
            <input type="text" class="form-control" [(ngModel)]="last_name" name="last_name" placeholder="Last Name">
        </div>
        <div class="form-group">
            <label>Email</label>
            <input type="text" class="form-control" [(ngModel)]="email" name="email" placeholder="Email">
        </div>
        <div class="form-group">
            <label>Phone Number</label>
            <input type="text" class="form-control" [(ngModel)]="phone" name="phone" placeholder="Phone Number">
        </div>
        <button type="submit" class="btn btn-primary">Submit</button>
    </form>
</div>
<div class="client-list">
    <table class="table table-striped">
        <tr>
            <th>First Name</th>
            <th>Last Name</th>
            <th>Email</th>
            <th>Phone</th>
            <th></th>
        </tr>
        <tr *ngFor="let client of clients">
            <td>{{client.first_name}}</td>
            <td>{{client.last_name}}</td>
            <td>{{client.email}}</td>
            <td>{{client.phone}}</td>
            <td><a href="" class="btn btn-default">Edit</a> <a href="" class="btn btn-danger">Delete</a></td>
        </tr>
    </table>
</div>
We have onAddSubmit() on form, this function is called when we click on submit button and we have to define definition for the onAddSubmit() function. Add the following code in app/components/clients/client.component.ts
export class ClientsComponent implements OnInit {
  clients;
    _id;
  first_name;
  last_name;
  email;
  phone;

  constructor(private clientService: ClientService) {
  }

  ngOnInit() {
	...
  }

   onAddSubmit() {
    let newClient = {
      first_name: this.first_name,
      last_name: this.last_name,
      email: this.email,
      phone: this.phone
    }

    this.clientService.saveClient(newClient).subscribe(client => {
     this.clients.push(client);
     this.first_name = '';
     this.last_name = '';
     this.email = '';
     this.phone = '';
   });
   }
}
Note:
- We have to define FormModule in app.module.ts and no need to import form module in client.component.ts
- We will create new client object in onAddSubmit() {…}
- Inside onAddSubmit(){ … we have this.clientService.saveClient(newClient).subscribe(client => { … here we are sending our new client to clientService in app/service folder. Where we will insert new user from client or angular to database in backend.
We need to add saveClient(newClient) method in services/client.service.ts at the end of file
saveClient(client){
let headers = new Headers();
headers.append('Content-Type', 'application/json');
return this.http.post('http://localhost:3000/api/clients', client, {headers: headers})
.map(res => res.json());
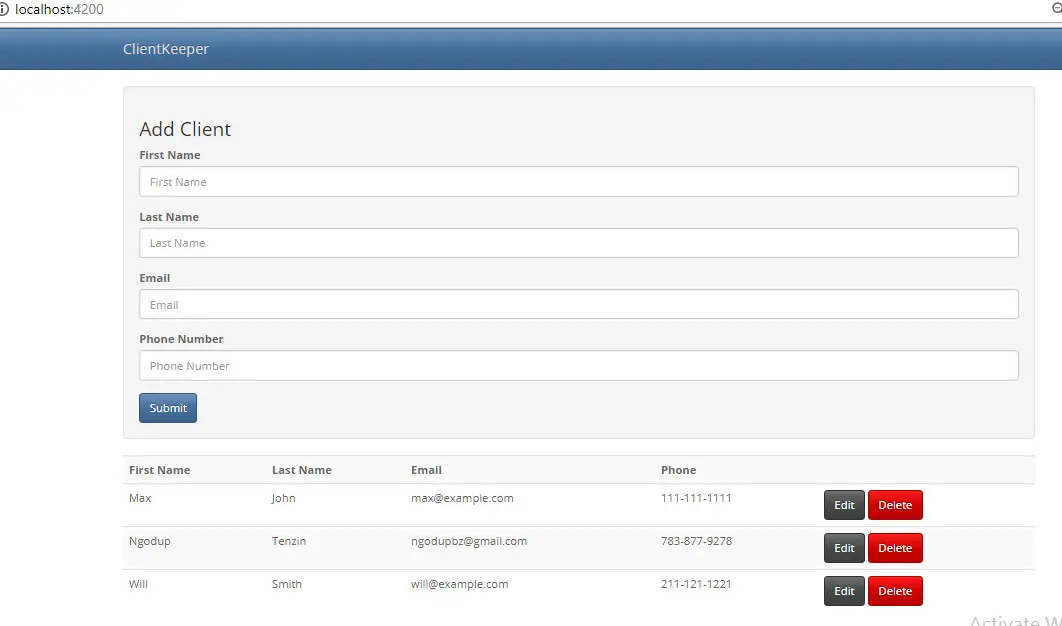
}We can insert new client from the front end as in screen shot
Step 7: Adding the edit functionality in FrontEnd
Now we will add edit functionality in client apps. We will create a separate form for adding and editing. We need a way to tell the apps when to use add and edit form. That can be achieved through setting is a variable called isEdit in our client.component.ts file. By default set isEdit to false. Add the following code in app/components/clients/clients.component.ts file.
import { Component, OnInit } from '@angular/core';
import {ClientService} from '../../services/client.service';

@Component({
  selector: 'clients',
  templateUrl: './clients.component.html'
})
export class ClientsComponent implements OnInit{
  clients;
  _id;
  first_name;
  last_name;
  email;
  phone;
  isEdit;
  constructor(private clientService: ClientService){

  }

 ngOnInit(){
   this.clientService.getClients().subscribe(clients => {
     this.clients = clients;
   });

   this.isEdit = false;
 }

 onAddSubmit(){
   let newClient = {
   ....
 }

 onEditSubmit(){
   let updClient = {
     first_name: this.first_name,
     last_name: this.last_name,
     email: this.email,
     phone: this.phone,
     _id: this._id
   }

   this.clientService.updateClient(updClient).subscribe(client => {
     for(let i = 0; i < this.clients.length;i++){
       if(client._id == this.clients[i]._id){
         this.clients.splice(i, 1);
       }
     }
     this.clients.push(client);
     this.first_name = '';
     this.last_name = '';
     this.email = '';
     this.phone = '';
   });
 }

 onEditClick(client){
   this.isEdit = true;
   this.first_name = client.first_name;
   this.last_name = client.last_name;
   this.email = client.email;
   this.phone = client.phone;
   this._id = client._id;
 }
}
- We will call onEditClick(client) method on clicking the edit button on client information in the page
- Will call on onEditSubmit() method on clicking on submit of the edit form.
- We have service function to update the client information as on this.clientService.updateClient(updClient).subscribe(client => we have to create corresponding function in ClientService.
In app/components/clients/clients.components.html. We have two ngIf
<div *ngIf="isEdit">
and
<div *ngIf="!isEdit">
The first ngIf will display the edit form only when isEdit variable value is true that can be set only by clicking on the edit button and the second ngIf will display add new client form as by default isEdit is false. Add the following code in app/components/clients/clients.component.htlm
<div class="client-form">
    <div *ngIf="isEdit">
        <form (submit)="onEditSubmit()" class="well">
            <h3>Edit Client</h3>
            <div class="form-group">
                <label>First Name</label>
                <input type="text" class="form-control" [(ngModel)]="first_name" name="first_name" placeholder="First Name">
            </div>
            <div class="form-group">
                <label>Last Name</label>
                <input type="text" class="form-control" [(ngModel)]="last_name" name="last_name" placeholder="Last Name">
            </div>
            <div class="form-group">
                <label>Email</label>
                <input type="text" class="form-control" [(ngModel)]="email" name="email" placeholder="Email">
            </div>
            <div class="form-group">
                <label>Phone Number</label>
                <input type="text" class="form-control" [(ngModel)]="phone" name="phone" placeholder="Phone Number">
            </div>
            <button type="submit" class="btn btn-primary">Submit</button>
        </form>
    </div>

    <div *ngIf="!isEdit">
        <form (submit)="onAddSubmit()" class="well">
            <h3>Add Client</h3>
            <div class="form-group">
                <label>First Name</label>
                <input type="text" class="form-control" [(ngModel)]="first_name" name="first_name" placeholder="First Name">
            </div>
            <div class="form-group">
                <label>Last Name</label>
                <input type="text" class="form-control" [(ngModel)]="last_name" name="last_name" placeholder="Last Name">
            </div>
            <div class="form-group">
                <label>Email</label>
                <input type="text" class="form-control" [(ngModel)]="email" name="email" placeholder="Email">
            </div>
            <div class="form-group">
                <label>Phone Number</label>
                <input type="text" class="form-control" [(ngModel)]="phone" name="phone" placeholder="Phone Number">
            </div>
            <button type="submit" class="btn btn-primary">Submit</button>
        </form>
    </div>
</div>
<div class="client-list">
    <table class="table table-striped">
        <tr>
            <th>First Name</th>
        ...
        </tr>
        <tr *ngFor="let client of clients">
            <td>{{client.first_name}}</td>
     ...
            <td>{{client.phone}}</td>
            <td><a (click)="onEditClick(client)" href="#" class="btn btn-default">Edit</a> <a href="" class="btn btn-danger">Delete</a></td>
        </tr>
    </table>
</div>
In template, we are creating click event (click)=“onEditClick(client) on anchor edit button.
In app/services/client.service.ts we will add the corresponding code of edit form. Add the following code client.service.ts
updateClient(client){
    let headers = new Headers();
    headers.append('Content-Type', 'application/json');
    return this.http.put('http://localhost:3000/api/clients/'+client._id, client, {headers: headers})
        .map(res => res.json());
}
Step 8: Adding Delete functionality in the front end.
In app/components/clients/clients.component.html add the following code for delete.
<div class="client-form">
    <div *ngIf="isEdit">
        <form (submit)="onEditSubmit()" class="well">
            <h3>Edit Client</h3>
        ....
    </div>

    <div *ngIf="!isEdit">
        <form (submit)="onAddSubmit()" class="well">
            <h3>Add Client</h3>
        .....
    </div>
</div>
<div class="client-list">
    <table class="table table-striped">
        <tr>
            <th>First Name</th>
...
            <th></th>
        </tr>
        <tr *ngFor="let client of clients">
            <td>{{client.first_name}}</td>
 ...
            <td>{{client.phone}}</td>
            <td><a (click)="onEditClick(client)" href="#" class="btn btn-default">Edit</a>
            <a (click)="onDeleteClick(client._id)" href="#" class="btn btn-danger">Delete</a></td>
        </tr>
    </table>
</div>
We have add method definition for <a (click)=”onDeleteClick(client._id) in app/components/cleints/clients.component.ts file.
onDeleteClick(id) {
 this.clientService.deleteClient(id).subscribe(client => {
    for(let i = 0; i < this.clients.length;i++){
      if(id == this.clients[i]._id){
        this.clients.splice(i, 1);
      }
    }
  });
}
In app/services/client.service.ts we will add the corresponding code of delete. Add the following code client.service.ts
deleteClient(id){
    return this.http.delete('http://localhost:3000/api/clients/'+id)
        .map(res => res.json());
}
Important: We have complete all the front end code, now we add our angular code in Node. For that, we have run following command at angular cli
>>ng build
The command will build our front end application in the dist folder, which we will copy and past in public folder of server or node js. Now run the node server as
>>npm start
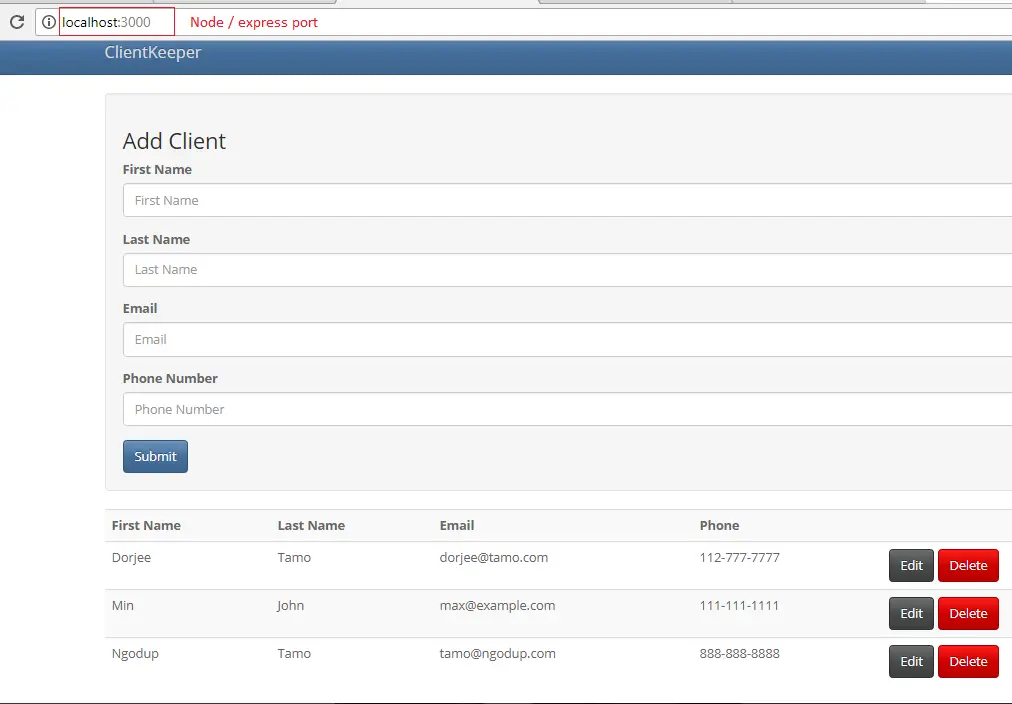
We can use our angular in node server as screenshot.
NOW WE HAVE COMPLETE INTEGRATE FROM ANGULAR TO NODE
As above code are the chunk of the different file, now we will add combine all code in its corresponding file.
Adding all the server code
In Node, we have server.js file in root add all it code as
const express = require('express');
const path = require('path');
const bodyParser = require('body-parser');

const app = express();

const port = 3000;

//define db through mongojs

const mongojs = require('mongojs');
const db = mongojs('clientkeeper', ['clients']);

//set Static Folder
app.use(express.static(path.join(__dirname, 'public'))) ;
app.use(bodyParser.json());

//Allow request from Angular
app.use((req, res, next) => {
    res.setHeader('Access-Control-Allow-Origin', 'http://localhost:4200');
    //Request methods u wish to allow
    res.setHeader('Access-Control-Allow-Methods', 'GET, POST, PUT, DELETE');
    //Request header you widht to allow
    res.setHeader('Access-Control-Allow-Headers', 'X-Requested-With, Content-Type');
    //Pass to next Layer of middleware
    next();

})


app.get('/', (req, res) => {
    res.send('Please use /api/client');
});

//Get Clients - GET request
app.get('/api/clients', (req, res, next) => {
    db.clients.find().sort({first_name:1}, (err, clients) => {
        if(err){
            res.send(err);
        }
        res.json(clients);
    });
});

//Add Client - POST
app.post('/api/clients', (req, res, next) => {
    db.clients.insert(req.body, (err, client) => {
        if(err){
            res.send(err);
        }
        res.json(client);
    });
});

//Update Client - POST
app.put('/api/clients/:id', (req, res, next) => {
    const id = req.params.id;
    db.clients.findAndModify({query: {_id: mongojs.ObjectId(id)},
        update: {
            $set: {
                first_name: req.body.first_name,
                last_name: req.body.last_name,
                email : req.body.email,
                phone: req.body.phone
            }
        },
        new: true
    },(err, client) => {
        res.json(client);
    });
});

//Add Client - DELETE
app.delete('/api/clients/:id', (req, res, next) => {
    const id = req.params.id;
    db.clients.remove({ _id: mongojs.ObjectId(id)}, (err, client) => {
        if(err){
            res.send(err);
        }
        res.json(client);
    });
});

app.listen(port, () => {
    console.log('Server start on port' +port);
});
Adding all the Client code
First we will add all the code on client component, add the complete code of app/components/clients/clients.component.ts file
import {Injectable} from '@angular/core';
import {Http, Headers} from '@angular/http';
import 'rxjs/add/operator/map';

@Injectable()
export class ClientService{
    constructor(private http: Http){

    }

    getClients(){
        return this.http.get('http://localhost:3000/api/clients')
            .map(res => res.json());
    }

    saveClient(client){
        let headers = new Headers();
        headers.append('Content-Type', 'application/json');
        return this.http.post('http://localhost:3000/api/clients', client, {headers: headers})
            .map(res => res.json());
    }

    updateClient(client){
        let headers = new Headers();
        headers.append('Content-Type', 'application/json');
        return this.http.put('http://localhost:3000/api/clients/'+client._id, client, {headers: headers})
            .map(res => res.json());
    }

    deleteClient(id){
        return this.http.delete('http://localhost:3000/api/clients/'+id)
            .map(res => res.json());
    }

}
Now we will add the complete code of app/components/clients/clients.component.html file
<div class="client-form">
    <div *ngIf="isEdit">
        <form (submit)="onEditSubmit()" class="well">
            <h3>Edit Client</h3>
            <div class="form-group">
                <label>First Name</label>
                <input type="text" class="form-control" [(ngModel)]="first_name" name="first_name" placeholder="First Name">
            </div>
            <div class="form-group">
                <label>Last Name</label>
                <input type="text" class="form-control" [(ngModel)]="last_name" name="last_name" placeholder="Last Name">
            </div>
            <div class="form-group">
                <label>Email</label>
                <input type="text" class="form-control" [(ngModel)]="email" name="email" placeholder="Email">
            </div>
            <div class="form-group">
                <label>Phone Number</label>
                <input type="text" class="form-control" [(ngModel)]="phone" name="phone" placeholder="Phone Number">
            </div>
            <button type="submit" class="btn btn-primary">Submit</button>
        </form>
    </div>

    <div *ngIf="!isEdit">
        <form (submit)="onAddSubmit()" class="well">
            <h3>Add Client</h3>
            <div class="form-group">
                <label>First Name</label>
                <input type="text" class="form-control" [(ngModel)]="first_name" name="first_name" placeholder="First Name">
            </div>
            <div class="form-group">
                <label>Last Name</label>
                <input type="text" class="form-control" [(ngModel)]="last_name" name="last_name" placeholder="Last Name">
            </div>
            <div class="form-group">
                <label>Email</label>
                <input type="text" class="form-control" [(ngModel)]="email" name="email" placeholder="Email">
            </div>
            <div class="form-group">
                <label>Phone Number</label>
                <input type="text" class="form-control" [(ngModel)]="phone" name="phone" placeholder="Phone Number">
            </div>
            <button type="submit" class="btn btn-primary">Submit</button>
        </form>
    </div>
</div>
<div class="client-list">
    <table class="table table-striped">
        <tr>
            <th>First Name</th>
            <th>Last Name</th>
            <th>Email</th>
            <th>Phone</th>
            <th></th>
        </tr>
        <tr *ngFor="let client of clients">
            <td>{{client.first_name}}</td>
            <td>{{client.last_name}}</td>
            <td>{{client.email}}</td>
            <td>{{client.phone}}</td>
            <td><a (click)="onEditClick(client)" href="#" class="btn btn-default">Edit</a>
            <a (click)="onDeleteClick(client._id)" href="#" class="btn btn-danger">Delete</a></td>
        </tr>
    </table>
</div>
As app/components/navbar and app/app.component.html we are not adding any data as it already added the complete data.
We have to add complete code for app/services/client.service.ts
import {Injectable} from '@angular/core';
import {Http, Headers} from '@angular/http';
import 'rxjs/add/operator/map';

@Injectable()
export class ClientService{
    constructor(private http: Http){

    }

    getClients(){
        return this.http.get('http://localhost:3000/api/clients')
            .map(res => res.json());
    }

    saveClient(client){
        let headers = new Headers();
        headers.append('Content-Type', 'application/json');
        return this.http.post('http://localhost:3000/api/clients', client, {headers: headers})
            .map(res => res.json());
    }

    updateClient(client){
        let headers = new Headers();
        headers.append('Content-Type', 'application/json');
        return this.http.put('http://localhost:3000/api/clients/'+client._id, client, {headers: headers})
            .map(res => res.json());
    }

    deleteClient(id){
        return this.http.delete('http://localhost:3000/api/clients/'+id)
            .map(res => res.json());
    }

}