This tutorial guides you through implementing push notifications in your React Native Expo app, incorporating best practices and using the latest code. We will implement push notifications in an Expo React Native application. We need to used Expo Go for a real device rather than an Android and IOS emulator.
Here is example screenshot of expo push notification.
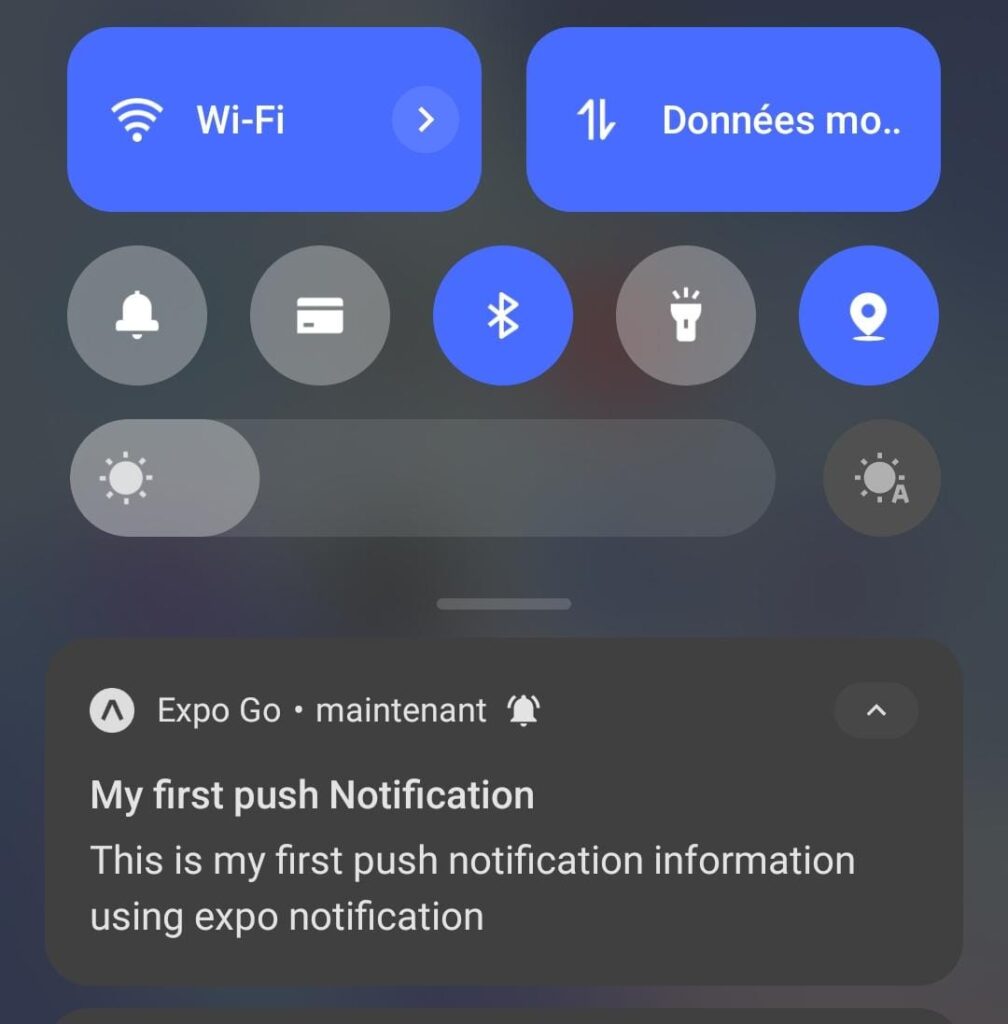
Table of Contents
Step for using Expo Push Notifications in react natives
Step 1: We need to create our project and install required package to implement push notification.
expo install expo-notifications expo-deviceWe need to set notification handler at top of our component, we just add here to learn what we are doing and at the end of the configuration step we will add all code together.
handleNotification: async () => ({
    shouldShowAlert: true,
    shouldPlaySound: true,
    shouldSetBadge: false,
  }),
})
This code sets the notification handler for the app, which determines how the app responds to incoming notifications. The handleNotification function is called when a notification is received, and it returns an object that specifies whether to show an alert, play a sound, and/or set a badge on the app icon.
Step 2 Registering for push notification for Expo Push Notifications
In the useEffect we need to register for push notification when component is mount. This step is only relevant if you want to request permission at runtime and we can also configure permissions directly in the app manifest. However, requesting permission dynamically provides a better user experience.
  async function registerForPushNotificationsAsync() {
    let token;

    if (Platform.OS === "android") {
      Notifications.setNotificationChannelAsync("default", {
        name: "default",
        importance: Notifications.AndroidImportance.MAX,
        vibrationPattern: [0, 250, 250, 250],
        lightColor: "#FF231F7C",
      });
    }

    if (Device.isDevice) {
      const { status: existingStatus } =
        await Notifications.getPermissionsAsync();
      let finalStatus = existingStatus;
      if (existingStatus !== "granted") {
        const { status } = await Notifications.requestPermissionsAsync();
        finalStatus = status;
      }
      if (finalStatus !== "granted") {
        alert("Failed to get push token for push notification!");
        return;
      }
      token = await Notifications.getExpoPushTokenAsync({
        // projectId: Constants.expoConfig.extra.eas.projectId,
        projectId: "f1ba7buuuuuuu",
      });
      console.log(token);
    } else {
      Alert.alert("Must use physical device for Push Notifications");
    }

    return token.data;
  }
In Android we need to set notification channel that we had discuss in our previous articles of local notification.
The requestPushPermissionsAsync function first checks the existing permission status using Notifications.getPermissionsAsync.
Step 3: Getting Token from Device
To send push notifications using Expo’s Push API, we need to obtain a push token for each user’s device. The push token is a unique identifier that allows the Push API to target specific devices with push notifications.
We can obtain the push token using the Expo Notifications API. The Expo Notifications API provides methods for requesting push notification permissions, registering for push notifications, and obtaining the push token.
To use the Expo Notifications API, we first need to set up our project with Expo and obtain a project ID. We can create a new project on the Expo Dev website and get the project ID from there.
Once we have the project ID, we can use the Expo Notifications API to register for push notifications and obtain the push token. In our example, we are using the client-side app to send push notifications, but in general, it is recommended to use a server to send push notifications.
To send a push notification, we can use the Expo Push API. The Expo Push API is accessible via a RESTful interface, and we can use it to send notifications with custom data to specific devices or groups of devices.
In our example, we have a button in our component that invokes the sendNotification function when pressed. The sendNotification function sends a push notification to the device associated with the stored Expo push token.
Here is the code for the sendNotification function
  const sendNotification = async () => {
    console.log("Sending push");
    // notification message

    const message = {
      to: expoPushToken,
      sound: "default",
      title: "My first push Notification",
      body: "This is my first push notification information using expo notification",
    };

    await fetch("https://exp.host/--/api/v2/push/send", {
      method: "POST",
      headers: {
        host: "exp.host",
        accept: "application/json",
        "accept-encoding": "gzip, deflate",
        "content-type": "application/json",
      },
      body: JSON.stringify(message),
    });
  };
We have button in our component, When the user presses this button, the sendNotification function is invoked, which sends a push notification to the stored Expo push token.
In this code, we are using the fetch API to send a POST request to the Expo Push API. The request includes the push token, a default sound, a title, and a body for the notification message.
We can also customize the sound of the notification by specifying a different sound file or by using one of the built-in sound options provided by the Expo Notifications API.
Expo Push Notifications example
Here is the complete code of expo push notification example.
import { useState, useEffect } from "react";
import { StyleSheet, Text, View, Button, Platform } from "react-native";
import * as Device from "expo-device";
import * as Notifications from "expo-notifications";

Notifications.setNotificationHandler({
  handleNotification: async () => ({
    shouldShowAlert: true,
    shouldPlaySound: true,
    shouldSetBadge: false,
  }),
});

const Home = () => {
  const [expoPushToken, setExpoPushToken] = useState("");

  useEffect(() => {
    // console.log("Registering for push notification");
    registerForPushNotificationsAsync()
      .then((token) => {
        console.log(token);
        setExpoPushToken(token);
      })
      .catch((err) => console.log(err));
  }, []);

// Registering for push notifications
  async function registerForPushNotificationsAsync() {
    let token;

    if (Platform.OS === "android") {
      Notifications.setNotificationChannelAsync("default", {
        name: "default",
        importance: Notifications.AndroidImportance.MAX,
        vibrationPattern: [0, 250, 250, 250],
        lightColor: "#FF231F7C",
      });
    }

    if (Device.isDevice) {
      const { status: existingStatus } =
        await Notifications.getPermissionsAsync();
      let finalStatus = existingStatus;
      if (existingStatus !== "granted") {
        const { status } = await Notifications.requestPermissionsAsync();
        finalStatus = status;
      }
      if (finalStatus !== "granted") {
        Alert.alert("Failed to get push token for push notification!");
        return;
      }
      // Obtaining the token
      token = await Notifications.getExpoPushTokenAsync({
        // projectId: Constants.expoConfig.extra.eas.projectId,
        projectId: "f1ba7bd0-57aa-4ea8-932f-ec7a103a3ca7",
      });
      console.log(token);
    } else {
      Alert.alert("Must use physical device for Push Notifications");
    }
    // You can return the token here if you need to use it in the part of your app
    return token.data;
  }

  const sendNotification = async () => {
    console.log("Sending push notification");

    const message = {
      to: expoPushToken,
      sound: "default",
      title: "My first push Notification",
      body: "This is my first push notification using Expo Notification API",
    };

    try {
        const response = await fetch("https://exp.host/--/api/v2/push/send", {
            method: "POST",
            headers: {
                "accept": "application/json",
                "accept-encoding": "gzip, deflate",
                "content-type": "application/json",
            },
            body: JSON.stringify(message),
        });

        const data = await response.json(); // Assuming the API returns JSON data

        // Log the response from the server for debugging purposes
        console.log("Push notification sent successfully:", data);

        // Optionally, you can check the response status
        if (!response.ok) {
            throw new Error(`Server responded with ${response.status}: ${JSON.stringify(data)}`);
        }
    } catch (error) {
        console.error("Error sending push notification:", error);
        // Optionally, display an alert or execute other error handling logic
        Alert.alert("An error occurred while sending the push notification.");
    }
};

  return (
    <View style={styles.container}>
      <Text style={{}}>Expo push notification</Text>
      <Button title="Send push notification" onPress={sendNotification} />
    </View>
  );
};

const styles = StyleSheet.create({
  container: {
    marginTop: 100;
    alignItems: "center"
  },
  text: {
    marginVertical: 30
  }
});
export default Home;
Push notification useHook for Expo Push Notifications
It is generally considered a good practice to create custom hooks for handling push notifications in React Native it provide lots of advantages like code reusability and many more. Here is code but it is not complete just to get idea.
import { useState, useEffect } from "react";
import * as Notifications from "expo-notifications";

// Hook for registering for push notifications
export const useRegisterForPushNotifications = () => {
  const [expoPushToken, setExpoPushToken] = useState("");

  useEffect(() => {
    const register = async () => {
      try {
        const token = await registerForPushNotificationsAsync();
        setExpoPushToken(token);
      } catch (error) {
        // Handle errors here
      }
    };

    register();
  }, []);

  return expoPushToken;
};

// Hook for sending push notifications
export const useSendNotification = () => {
  const send = async (message) => {
    try {
      await sendNotification(message);
    } catch (error) {
      // Handle errors here
    }
  };

  return send;
};
How to use this hooks
import React from "react";
import { useRegisterForPushNotifications, useSendNotification } from "./notificationHooks";

const Home = () => {
  const expoPushToken = useRegisterForPushNotifications();
  const sendNotification = useSendNotification();

  // ... rest of the component code
};
Supabase push notification using Expo’s Push API
Here’s a step-by-step guide in short notes for setting up push notifications with Supabase and Expo:
Setting Up Supabase
- Create a Supabase Project: Sign up or log in to Supabase and create a new project.
- Obtain API Credentials: In your project’s settings, find your API URL and API Key (Secret).
- Database Setup: Create a table in Supabase to store user push tokens. Include fields for user identifiers and push tokens.
Integrating Expo Notifications
- Request Permissions: Use Expo Notifications API in your app to request push notification permissions from the user.
- Obtain Push Token: If permission is granted, use the Expo API to obtain the user’s push token.
- Update Supabase: Send the obtained push token to your Supabase database, associating it with the user’s account.
Sending Notifications
- Token Retrieval: When ready to send a notification, query the Supabase database to retrieve the push token associated with the intended user.
- Send Notification: Use the Expo Push API with the retrieved push token to send a notification. Include any relevant message, title, and data in the notification payload.
Implementation Notes
- Ensure your app handles the possibility of users not granting push notification permissions.
- Store the Supabase API Key securely and ensure it is not exposed in client-side code.
- Consider user privacy and security when storing and managing push tokens.
- Test your push notification flow thoroughly with different devices and user scenarios.
- Keep track of users’ preferences and opt-outs for notifications to respect their choices.
Here is some sample code to give you an idea of how to use the Expo Push API with Supabase:
const sendPushNotification = async (user, message) => {
  // Retrieve the user's push token from the Supabase database
  const { data: userData, error: userError } = await supabase
    .from('users')
    .select('push_token')
    .eq('id', user.id)
    .single()

  if (userError) {
    console.error(userError)
    return
  }

  // Send the push notification using the Expo Push API
  const { data: pushData, error: pushError } = await fetch(
    'https://exp.host/--/api/v2/push/send',
    {
      method: 'POST',
      headers: {
        Accept: 'application/json',
        'Accept-Encoding': 'gzip, deflate',
        'Content-Type': 'application/json',
        Host: 'exp.host',
      },
      body: JSON.stringify({
        to: userData.push_token,
        title: message.title,
        body: message.body,
      }),
    }
  )

  if (pushError) {
    console.error(pushError)
    return
  }

  console.log(pushData)
}