We can control the UI in angular and handle user interaction such as input text and mouse event. We will be learning control input through two example
- Through component
- Handle user input through service
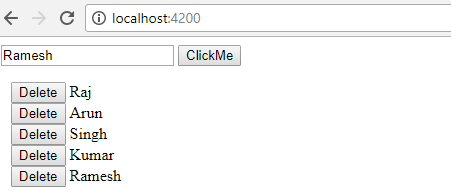
Case 1: In this example, we are handling input of angular through component. we are performing following task.
- Taking input type text called fname
- When clicking on a button that invokes a function called clickMe will display the text input on the screen.
- Clicking on the delete button will delete the item name from the list in angular.
import { Component } from '@angular/core';

@Component({
  selector: 'app-root',
  template: `
    <div>
      <input #fname>
      <button (click) = "clickMe(fname.value)">ClickMe</button>
      <ul>
        <li *ngFor="let user of users">
          <button (click)="deleteMe(user)">Delete</button>
          {{user}}
        </li>
      </ul>
    </div>`,
  styleUrls: ['./app.component.css']
})
export class AppComponent {
  users = ["Raj", "Arun", "Singh", "Kumar"];

  clickMe(user){
    console.log("new user = " +user);
    this.users.push(user);
  }

  deleteMe(user){
    console.log("delete user = " +user);
    var index = this.users.indexOf(user);

    if( index >= 0 ){
      this.users.splice(index, 1);
    }
  }
}
Notice the use of the #fname syntax as an identifier for an element, which in this case is an <input> element. Thus, The #fname syntax creates a reference to the <input> element that enables you to reference {{fname.value}} to see its value, or {{user.type}} to see the type of the input.
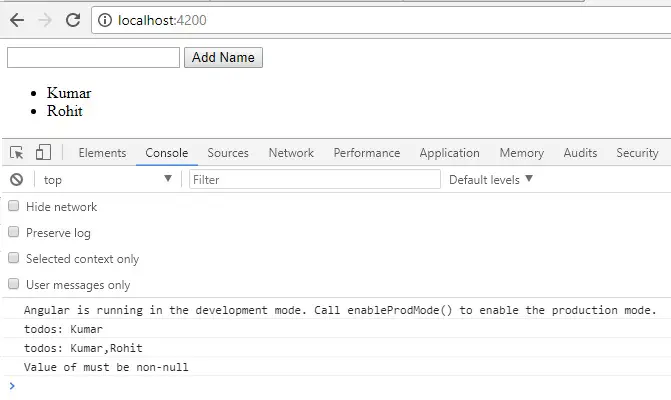
Case 2: Handling the user input through service in Angular.
In second example we will make two component <todo-input></todo-input><todo-list></todo-list> and one service file name called TodoService.ts
Add the following code in app.component.ts file
import { Component } from '@angular/core';

@Component({
  selector: 'app-root',
  template: `<div>
              <todo-input></todo-input>
              <todo-list></todo-list>
            </div>`
})
export class AppComponent {
}
Add the following code in app/todoinput.ts
import { Component } from '@angular/core';
import { TodoService } from './todoservice';

@Component({
  selector: 'todo-input',
  template: `
    <div>
      <input type="text" #myInput>
      <button (click)="mouseEvent(myInput.value)">Add Name</button>
    </div>`
})
export class TodoInput {

  constructor(public todoService: TodoService ){}

  mouseEvent(value){
    if((value != null) && (value.length > 0 )){
      this.todoService.todos.push(value);
      console.log("todos: " + this.todoService.todos);
    } else {
      console.log("Value of must be non-null");
    }
  }
}
Add the following code in app/todolist.ts
import { Component } from '@angular/core';
import { TodoService } from './todoservice';

@Component({
  selector: 'todo-list',
  template: `
    <div>
        <ul>
            <li *ngFor="let todo of todoService.todos">
                {{todo}}
            </li>
        </ul>
    </div>`
})
export class TodoList {

  constructor(public todoService: TodoService ){}

  mouseEvent(value){
    if((value != null) && (value.length > 0 )){
      this.todoService.todos.push(value);
      console.log("todos: " + this.todoService.todos);
    } else {
      console.log("Value of must be non-null");
    }
  }
}
We need to create service app/todoservice.ts, this file will contain a todos array that is updated with new to-do items when users click the <button> element in the root component.export class TodoService { todos= [];} At last, we need to register the component and service in app.module.ts file
import { BrowserModule } from '@angular/platform-browser';
import { NgModule } from '@angular/core';

import { AppComponent } from './app.component';
import { TodoInput } from './todoinput';
import { TodoList } from './todolist';
import { TodoService } from './todoservice';

@NgModule({
  declarations: [
    AppComponent,
    TodoInput,
    TodoList
  ],
  imports: [
    BrowserModule
  ],
  providers: [ TodoService ],
  bootstrap: [AppComponent]
})
export class AppModule { }