The introduction of the App Router has reshaped how developers perform data mutations in modern Next.js applications. Traditional API routes and client-side fetch calls are no longer the recommended default. Instead, Server Actions now provide a more secure, efficient, and native approach to handling Create, Update, and Delete operations that is nextjs crud operation.
This guide walks through the current best practices for building production-ready CRUD flows in Next.js using Server Actions, Zod validation, and optional Client Components for enhanced UX.
Table of Contents
Why Next.js Now Recommends Server Actions for Mutations
Server Actions are server-only functions that can be invoked directly from components—without exposing any database logic or secrets to the client.
Key Benefits
✔ Stronger Security: Database operations, environment variables, and business logic stay on the server.
No exposure through client bundles.
✔ Tight Integration with Caching: Server Actions work seamlessly with:
revalidatePath()revalidateTag()
This allows you to automatically refresh server-rendered pages after any mutation.
✔ Minimal JavaScript: Server Actions make HTML forms first-class citizens again:
<form action={serverAction}>No custom fetch calls or event handlers required unless you want additional UI feedback.
✔ Better Developer Experience: You can write server code next to your components, use FormData directly, and reuse validations across server and client.
When to Use Server Actions vs TanStack Query ?
Next.js embraces a hybrid architecture—just because Server Actions exist doesn’t mean client-side tools are obsolete.
Use Server Actions When:
- Submitting forms (Create, Update, Delete)
- Handling secure data mutations
- Working with simple or moderate UI flows
- You want minimal client-side JS
Use TanStack Query When: We will learn and explore how to used TanStack Query later.
- You need optimistic updates
- You want background refetching
- You’re building infinite lists or pagination-heavy UIs
- The UI depends heavily on client-side state
In many apps, both tools complement each other.
Recommended Folder Structure for CRUD with Server Actions
A clean, scalable structure might look like:
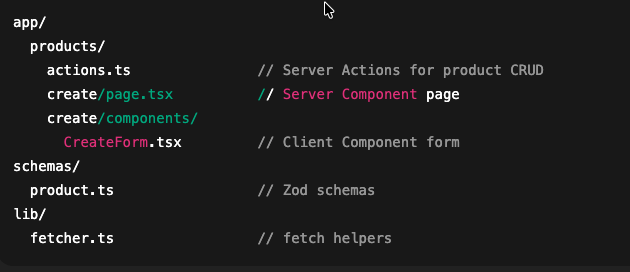
This keeps server logic consolidated, while Client Components handle interactivity.
Building a Production-Ready “Create Product” Flow
The example below follows the recommended pattern:
- Server Component page
- Client Component form
- Form submits directly to Server Action
- Server-side validation using Zod
- Cache invalidation after write
- Optional redirect after creation
Step 1 — Server Component Page (Create)
Server Components are ideal for wrapper pages because they load quickly and don’t ship JS to the client.
// app/products/create/page.tsx
import CreateForm from "./components/CreateForm";

export default function CreatePage() {
  return (
    <div className="container mx-auto max-w-2xl mt-10">
      <h2 className="text-2xl font-semibold mb-6">Add Product</h2>
      <CreateForm />
    </div>
  );
}
Step 2 — Client Component Form (Interactivity Only Where Needed)
We use:
useFormStatus()→ Built-in loading stateFormData→ Automatically collected by the browser- Uncontrolled inputs → Less client JS, more native behavior
// app/products/create/components/CreateForm.tsx
"use client";

import { useState } from "react";
import { useRouter } from "next/navigation";
import { useFormStatus } from "react-dom";
import { createProductAction } from "../../actions";

function SubmitButton() {
  const { pending } = useFormStatus();

  return (
    <button
      type="submit"
      disabled={pending}
      className="w-full bg-indigo-600 disabled:opacity-50 text-white py-2 rounded"
    >
      {pending ? "Submitting..." : "Submit"}
    </button>
  );
}

export default function CreateForm() {
  const router = useRouter();
  const [errors, setErrors] = useState<Record<string, string[]>>({});

  async function clientAction(formData: FormData) {
    const result = await createProductAction(formData);

    if (!result.ok) {
      setErrors(result.errors ?? {});
      return;
    }

    router.push("/products");
  }

  return (
    <form action={clientAction} className="space-y-6">
      {/* NAME */}
      <div>
        <label className="block text-sm text-gray-600">Name</label>
        <input
          name="name"
          type="text"
          className="w-full mt-2 border px-3 py-2 rounded"
          placeholder="Product name"
        />
        {errors.name && <p className="text-red-600 text-sm">{errors.name[0]}</p>}
      </div>

      {/* PRICE */}
      <div>
        <label className="block text-sm text-gray-600">Price</label>
        <input
          name="price"
          type="number"
          step="0.01"
          className="w-full mt-2 border px-3 py-2 rounded"
          placeholder="0.00"
        />
        {errors.price && <p className="text-red-600 text-sm">{errors.price[0]}</p>}
      </div>

      {/* QUANTITY */}
      <div>
        <label className="block text-sm text-gray-600">Quantity</label>
        <input
          name="quantity"
          type="number"
          className="w-full mt-2 border px-3 py-2 rounded"
          placeholder="Quantity"
        />
        {errors.quantity && (
          <p className="text-red-600 text-sm">{errors.quantity[0]}</p>
        )}
      </div>

      {errors.server && (
        <p className="text-red-600 text-sm">{errors.server[0]}</p>
      )}

      <SubmitButton />
    </form>
  );
}
Step 3 — Server Validation with Zod
Validating on the server ensures no invalid data ever reaches your database—even if someone bypasses the UI.
// schemas/product.ts
import { z } from "zod";

export const ProductSchema = z.object({
  name: z.string().min(1, "Name is required"),
  price: z.coerce.number().positive("Price must be positive"),
  quantity: z.coerce.number().int().min(0, "Quantity cannot be negative"),
});
Step 4 — Production-Ready Server Action
This action performs validation, sends the API request, and invalidates caches.
// app/products/actions.ts
"use server";

import { revalidatePath } from "next/cache";
import { ProductSchema } from "@/schemas/product";
import { env } from "@/lib/env";

export async function createProductAction(formData: FormData) {
  const parsed = ProductSchema.safeParse({
    name: formData.get("name"),
    price: formData.get("price"),
    quantity: formData.get("quantity"),
  });

  if (!parsed.success) {
    return { ok: false, errors: parsed.error.flatten().fieldErrors };
  }

  const product = parsed.data;

  const res = await fetch(`${env.API_BASE}/products`, {
    method: "POST",
    headers: { "Content-Type": "application/json" },
    body: JSON.stringify(product),
  });

  if (!res.ok) {
    return { ok: false, errors: { server: ["Failed to create product"] } };
  }

  // Refresh server-rendered pages
  revalidatePath("/products");

  return { ok: true };
}
Server Actions vs Controlled Inputs — Correct Guidance
Use Uncontrolled Inputs (Recommended) When:
- Data is only needed on submit
- You want minimal JS
- You prefer native browser behavior
- You rely on FormData for Server Actions
Use Controlled Inputs When:
- You need live validation
- You need real-time UI calculations
- You show dynamic previews
- You require advanced client-side UX
Server Actions do not depend on controlled inputs.
Uncontrolled inputs keep forms faster and more accessible.
Security Best Practices
Protect your application with these principles:
✔ Validate all data on the server (Zod or similar)
✔ Keep database and business logic inside Server Actions
✔ Protect pages with Authentication Middleware
✔ Never trust client values—sanitize on the server
✔ Use environment variable validation inside a typed env.ts
Server Actions automatically reduce your attack surface because logic never leaves the backend.
Delete Operation in Nextjs
Here is the client component for DeleteProductButton.tsx as it was imported in our server component Product page.
"use client";

import { useTransition } from "react";
import { deleteProductAction } from "../actions";

interface DeleteProductButtonProps {
  productId: string;
  productName: string;
}

export default function DeleteProductButton({
  productId,
  productName,
}: DeleteProductButtonProps) {
  const [isPending, startTransition] = useTransition();

  const handleDelete = () => {
    if (!confirm(`Are you sure you want to delete ${productName}?`)) return;

    startTransition(async () => {
      try {
        await deleteProductAction(productId);
      } catch (err) {
        console.error("Delete failed:", err);
        alert("Failed to delete product. Please try again.");
      }
    });
  };

  return (
    <button
      onClick={handleDelete}
      disabled={isPending}
      className="inline-flex items-center px-3 py-1 text-sm font-medium text-red-600 bg-red-50 border border-red-200 rounded hover:bg-red-100 focus:outline-none focus:ring-2 focus:ring-offset-2 focus:ring-red-500 transition-colors duration-200 disabled:opacity-50 disabled:cursor-not-allowed"
    >
      {isPending ? "Deleting..." : "Delete"}
    </button>
  );
}
The server action delete.
export async function deleteProductAction(id: string) {
  const res = await fetch(`${env.API_BASE}/products/${id}`, {
    method: "DELETE",
  });

  if (!res.ok) throw new Error("Failed to delete");

  revalidatePath("/products");
  return { ok: true };
}
Simple UPDATE Example (Client Form + Server Action)
Update Form (Client Component)
Works exactly like your Create form, but includes a hidden id field and loads initial values.
// app/products/[id]/components/EditForm.tsx
"use client";

import { useState } from "react";
import { useRouter } from "next/navigation";
import { useFormStatus } from "react-dom";
import { updateProductAction } from "../../actions";

function SubmitButton() {
  const { pending } = useFormStatus();
  return (
    <button
      type="submit"
      disabled={pending}
      className="w-full bg-indigo-600 text-white py-2 rounded disabled:opacity-50"
    >
      {pending ? "Updating..." : "Update"}
    </button>
  );
}

export default function EditForm({ product }: { product: any }) {
  const router = useRouter();
  const [errors, setErrors] = useState<Record<string, string[]>>({});

  async function clientAction(formData: FormData) {
    const result = await updateProductAction(formData);

    if (!result.ok) {
      setErrors(result.errors || {});
      return;
    }

    router.push("/products");
  }

  return (
    <form action={clientAction} className="space-y-6">
      <input type="hidden" name="id" value={product.id} />

      {/* NAME */}
      <div>
        <label>Name</label>
        <input
          name="name"
          defaultValue={product.name}
          className="w-full border px-3 py-2 mt-2 rounded"
        />
        {errors.name && <p className="text-red-600 text-sm">{errors.name[0]}</p>}
      </div>

      {/* PRICE */}
      <div>
        <label>Price</label>
        <input
          name="price"
          type="number"
          step="0.01"
          defaultValue={product.price}
          className="w-full border px-3 py-2 mt-2 rounded"
        />
        {errors.price && <p className="text-red-600 text-sm">{errors.price[0]}</p>}
      </div>

      {/* QUANTITY */}
      <div>
        <label>Quantity</label>
        <input
          name="quantity"
          type="number"
          defaultValue={product.quantity}
          className="w-full border px-3 py-2 mt-2 rounded"
        />
        {errors.quantity && <p className="text-red-600 text-sm">{errors.quantity[0]}</p>}
      </div>

      {errors.server && (
        <p className="text-red-600 text-sm">{errors.server[0]}</p>
      )}

      <SubmitButton />
    </form>
  );
}
Server Action (Update)
Simple, clear, minimal.
// app/products/actions.ts
"use server";

import { revalidatePath } from "next/cache";
import { ProductSchema } from "@/schemas/product";
import { env } from "@/lib/env";

export async function updateProductAction(formData: FormData) {
  const parsed = ProductSchema.safeParse({
    id: formData.get("id"),
    name: formData.get("name"),
    price: formData.get("price"),
    quantity: formData.get("quantity"),
  });

  if (!parsed.success) {
    return { ok: false, errors: parsed.error.flatten().fieldErrors };
  }

  const product = parsed.data;

  const res = await fetch(`${env.API_BASE}/products/${product.id}`, {
    method: "PUT",
    headers: { "Content-Type": "application/json" },
    body: JSON.stringify(product),
  });

  if (!res.ok) {
    return { ok: false, errors: { server: ["Failed to update product"] } };
  }

  revalidatePath("/products");
  return { ok: true };
}
Conclusion
Next.js has fully embraced a server-first architecture for handling mutations. By using Server Actions for Create, Update, and Delete operations, you gain:
✔ Stronger security
✔ Reduced client-side JavaScript
✔ Better cache integration
✔ Cleaner developer experience
✔ Progressive enhancement for accessibility
When combined with Zod validation and optional Client Components, Server Actions unlock a powerful, scalable pattern for building modern, production-grade CRUD workflows.
If you’re building new Next.js applications today, this approach represents the current, recommended best practice.
Related articles