In the previous lesson, we implemented a token maker interface using both JWT and PASETO, with methods to create and verify tokens.
In this tutorial, we’ll build the Login User API:
- Clients send username + password.
- Server verifies credentials.
- If correct → returns an access token (JWT or PASETO) along with user info.
This tutorial will guide you through implementing a secure login API in Go. The API will authenticate users based on their username and password and return a PASETO or JWT access token upon successful authentication.
Table of Contents
Step 1: Add the Token Maker to the API Server
First, we need to integrate the token.Maker interface we built previously tutorial into our API server.
- Modify the Server Struct: Open
api/server.goand add thetokenMakerandconfigfields to theServerstruct. - Update the
NewServerConstructor: Modify theNewServerfunction to accept aconfigobject and initialize the newtokenMaker. We’ll use PASETO, which is a secure alternative to JWT.
Open api/server.go: all the code with green background are what we had added for this tutorial.
- Add a new field in the
Serverstruct:
type Server struct {
        config     util.Config //Add later
	store      db.Store
	tokenMaker token.Maker
	router     *gin.Engine
}
2. Update NewServer function:
- Create a new token maker (
PasetoMakerorJWTMaker). - Use a symmetric key from environment variables.
- If creation fails → return error.
Example (using PASETO): Open api/server.go
...
// NewServer creates a new HTTP server and setup routing
func NewServer(config util.Config, store db.Store) (*Server, error) {
	tokenMaker, err := token.NewPasetoMaker(config.TokenSymmetricKey)
	if err != nil {
		return nil, fmt.Errorf("cannot create token maker: %w", err)
	}

	server := &Server{
                config:     config,
		store:      store,
		tokenMaker: tokenMaker,
	}

	if v, ok := binding.Validator.Engine().(*validator.Validate); ok {
		v.RegisterValidation("currency", validCurrency)
	}

	// In this stage this is not finished yet we had individual router inside it instead of server.setupRouter()
	return server, nil
}
The config.TokenSymmetricKey is not yet finished yet, i added the code before so that we can shorten our tutorial and let implement it.
We should also add a config field to the Server struct, and store it here when initialize the Server object. As from this step we had not added the config as it need to complete after the update server config and Step 2: Add New Configuration Variables.
We will use the token duration in this config object later when creating the tokens.
Update Server Configuration
First, we need to add the necessary configuration values for token generation.
1. Update app.env:
We need to add the symmetric key for the token and the token’s duration to our project configuration.
# Database
DB_DRIVER=postgres
DB_SOURCE=postgresql://postgres:mysecretpassword@localhost:5432/simple_bank?sslmode=disable

# Server
SERVER_ADDRESS=0.0.0.0:8080

# Token configuration
TOKEN_SYMMETRIC_KEY=12345678901234567890123456789012
ACCESS_TOKEN_DURATION=15m
Key Requirements:
TOKEN_SYMMETRIC_KEY: Must be exactly 32 characters for PASETO v2ACCESS_TOKEN_DURATION: Short duration for security (15 minutes recommended)
Step 2: Add New Configuration Variables
For the two new environment variable, now we need to update our config struct to include the 2 new variables that we’ve just added.
Update Config Struct: Open util/conif.go and add the new variables to the Config struct.
package util

import ("time" "github.com/spf13/viper")

// Config stores all configuration of the application.
// The values are read by viper from a config file or environment variables.
type Config struct {
    DBDriver             string        `mapstructure:"DB_DRIVER"`
    DBSource             string        `mapstructure:"DB_SOURCE"`
    ServerAddress        string        `mapstructure:"SERVER_ADDRESS"`
    TokenSymmetricKey    string        `mapstructure:"TOKEN_SYMMETRIC_KEY"`
    AccessTokenDuration  time.Duration `mapstructure:"ACCESS_TOKEN_DURATION"`
}

// LoadConfig reads configuration from file or environment variables.
func LoadConfig(path string) (config Config, err error) {
    viper.AddConfigPath(path)
    viper.SetConfigName("app")
    viper.SetConfigType("env")

    viper.AutomaticEnv()

    err = viper.ReadInConfig()
    if err != nil {
        return
    }

    err = viper.Unmarshal(&config)
    return
}
Integration Benefits
Human-Readable Duration: Viper automatically parses “15m” to time.Duration Environment Variable
Support: Easy deployment configuration Type Safety: Compile-time checking for configuration fields
Step 3: Fix Broken Unit Tests
Since we changed the NewServer function signature, our existing unit tests we wrote before are broken. Since NewServer now requires config, update tests.However, as we added a new config parameter to the NewServer function,
In the main_test.go file, Let’s fix them by creating a test server helper.
- Create
newTestServerHelper: Inapi/main_test.go, create a helper function to set up a server for testing. The function newTestServer() that will create a new server for test. - Update Test Files: Replace all calls to
NewServerwithnewTestServerin your test files - Run Tests: Verify that all tests pass.
go test ./api
...existig code
func newTestServer(t *testing.T, store db.Store) *Server {
    config := util.Config{
        TokenSymmetricKey:  util.RandomString(32),
        AccessTokenDuration: time.Minute,
    }
    server, err := NewServer(config, store)
    require.NoError(t, err)
    return server
}
Step 4: Update main.go
Update the main() function to pass the loaded configuration to the NewServer function and handle the returned error.
package api

import ("os" "testing" "time"
	"github.com/gin-gonic/gin"
	db "github.com/yourname/simplebank/db/sqlc"
	"github.com/ngodup/simplebank/util"
	"github.com/stretchr/testify/require"
)

func newTestServer(t *testing.T, store db.Store) *Server {
    config := util.Config{
        TokenSymmetricKey:   util.RandomString(32),
        AccessTokenDuration: time.Minute,
    }

    server, err := NewServer(config, store)
    if err != nil {
        t.Fatal("cannot create test server:", err)
    }

    return server
}

func TestMain(m *testing.M) {
    gin.SetMode(gin.TestMode)
    os.Exit(m.Run())
}
Fix Existing Tests
Update all test files to use the new helper, And finally return the created server. We had existing unit test like transfer_test.go file,
Here we need to replace, instead of NewServer, we will call newTestServer, and pass in the testing.T object and the mock store.
We do the same for the server inside user_test.go file and the server inside account_test.go file as well.
// In account_test.go, user_test.go, transfer_test.go
// Replace: server := NewServer(mockStore)
// With:    server := newTestServer(t, mockStore)
Replace calls to NewServer with newTestServer in:
transfer_test.gouser_test.goaccount_test.go
Run all tests: ✅ Passed!
Step 5: Implement the Login API
Now we’ll create the request/response structs and the handler for the login endpoint. Create the Login Request/Response DTOs Define the structures for the incoming login request and the successful response.
In api/user.go (or a dedicated file like api/login.go):
- Define Request/Response Structs: In
api/user.go, add the structs for the login request and response.// api/user.go type loginUserRequest struct - Create the
loginUserHandler: Add theloginUsermethod to theServer. This handler will process the login request, verify credentials, and issue a token.// api/user.go func (server *Server) loginUser(ctx *gin.Context) {
In api/Update api/user.go:
...existing code
func (server *Server) createUser(ctx *gin.Context) {
	var req createUserRequest
	if err := ctx.ShouldBindJSON(&req); err != nil {
		log.Println(err)
		ctx.JSON(http.StatusBadRequest, errorResponse(err))
		return
	}

	// generate hashed password
	hashedPassword, err := util.HashPassword(req.Password)
	if err != nil {
		ctx.JSON(http.StatusInternalServerError, errorResponse(err))
		return
	}
	arg := db.CreateUserParams{
		Username:       req.Username,
		HashedPassword: hashedPassword,
		FullName:       req.FullName,
		Email:          req.Email,
	}

	// arg = db.CreateUserParams{} this pass the user create test because of CreateUser(gomock.Any(), gomock.Any()).
	// the second argument make it week or failing matcher

	user, err := server.store.CreateUser(ctx, arg)
	if err != nil {
		if pqErr, ok := err.(*pq.Error); ok {
			switch pqErr.Code.Name() {
			case "unique_violation":
				ctx.JSON(http.StatusForbidden, errorResponse(err))
				return
			}
		}
		ctx.JSON(http.StatusInternalServerError, errorResponse(err))
		return
	}

	// return user without password
	rsp := newUserResponse(user)

	ctx.JSON(http.StatusOK, rsp)

}

type loginUserRequest struct {
    Username string `json:"username" binding:"required,alphanum"`
    Password string `json:"password" binding:"required,min=6"`
}

type loginUserResponse struct {
    AccessToken string       `json:"access_token"`
    User        userResponse `json:"user"`
}

// change name from createUserResponse to userResponse as we can see it in above type struct loginUserResponse User type
type userResponse struct {
    Username          string    `json:"username"`
    FullName          string    `json:"full_name"`
    Email             string    `json:"email"`
    PasswordChangedAt time.Time `json:"password_changed_at"`
    CreatedAt         time.Time `json:"created_at"`
}

func newUserResponse(user db.User) userResponse {
    return userResponse{
        Username:          user.Username,
        FullName:          user.FullName,
        Email:             user.Email,
        PasswordChangedAt: user.PasswordChangedAt,
        CreatedAt:         user.CreatedAt,
    }
}
The most important field that should be returned to the client is AccessToken string.
This is the token that we will create using the token maker interface. Beside the access token, we might also want to return some information of the logged in user, just like the one we returned in the create user API.
The newUserResponse function takes a db.User object as input and returns a userResponse object. The userResponse struct includes the fields Username, FullName, Email, PasswordChangedAt, and CreatedAt.
This function copies the corresponding fields from the db.User object but excludes sensitive data like hashed_password, which should not be exposed to the client.
We can use newUserResponse in the createUser() handler to build the response object, and it will also be useful for the loginUser() handler.
In the existing the createUser() handler, we can have rsp := replace it with the newUserResponse() function to create the response object. This function will be useful for our new loginUser() handler as well.
Login Handler Implementation
The loginUser handler function for a login API endpoint in a Go web application. It receives a request from a client, binds the JSON data from the request body to a loginUserRequest struct, and then performs the following steps:
- It retrieves a user from the database based on the provided username.
- It checks if the provided password matches the hashed password of the user.
- If the password is correct, it generates an access token using the
tokenMakerand the user’s username and duration. - It constructs a response object with the access token and a user object.
- It sends the response back to the client with a status code of
200 OK.
If any error occurs during these steps, the appropriate error response is sent back to the client with the corresponding status code.
func (server *Server) loginUser(ctx *gin.Context) {
	var req loginUserRequest
    // 1. Bind the incoming JSON to the request struct
	if err := ctx.ShouldBindJSON(&req); err != nil {
		ctx.JSON(http.StatusBadRequest, errorResponse(err))
		return
	}

    // 2. Fetch the user from the database
	user, err := server.store.GetUser(ctx, req.Username)
	if err != nil {
		if err == sql.ErrNoRows {
			ctx.JSON(http.StatusNotFound, errorResponse(err))
			return
		}
		ctx.JSON(http.StatusInternalServerError, errorResponse(err))
		return
	}

    // 3. Check if the provided password is correct
	err = util.CheckPassword(req.Password, user.HashedPassword)
	if err != nil {
		ctx.JSON(http.StatusUnauthorized, errorResponse(err))
		return
	}

    // 4. Create an access token (Authentication successful!)
	accessToken, err := server.tokenMaker.CreateToken(user.Username, server.config.AccessTokenDuration)
	if err != nil {
		ctx.JSON(http.StatusInternalServerError, errorResponse(err))
		return
	}

    // 5. Build and send the response
	rsp := loginUserResponse{
		AccessToken: accessToken,
		User:        newUserResponse(user),
	}

	ctx.JSON(http.StatusOK, rsp)
}
Step 6: Refactor Routing and Add Login Route
Let’s move the routing logic to a separate method and add our new login route in api/server.go and create separate function for routing in api/server.go file.
func NewServer(config util.Config, store db.Store) (*Server, error) {
	tokenMaker, err :=
   //... existing code

	server.setupRouter()
	return server, nil
}

func (server *Server) setupRouter() {
	router := gin.Default()
	// add routes to server
	router.POST("/users", server.createUser)
	router.POST("/users/login", server.loginUser)

	authRoutes.POST("/accounts", server.createAccount)
	authRoutes.GET("/accounts/:id", server.getAccount)
	authRoutes.GET("/accounts", server.listAccount)
	authRoutes.POST("/transfers", server.createTransfer)

	server.router = router

}
Call setupRouter from NewServer: Ensure server.setupRouter() is called within the NewServer function. Let run the server by running make server in terminal and send some requests to check how it was working.
Step 7: Test The API
Run the server and use a tool like Postman to test the new endpoint.
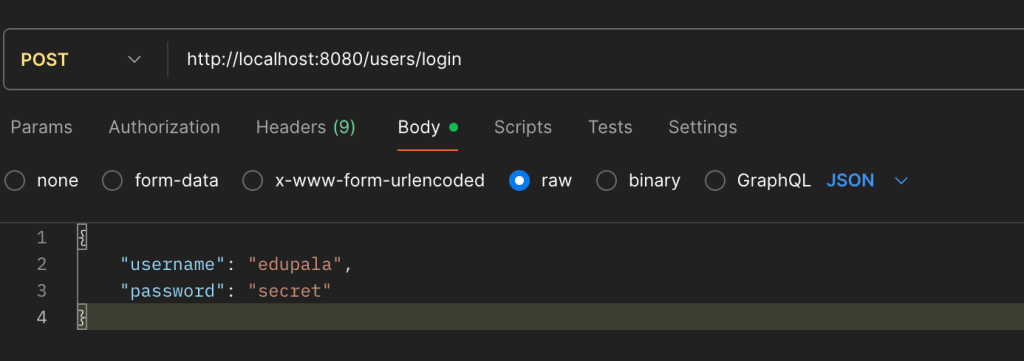
- Start the server:
make server - Send a POST request to
http://localhost:8080/users/loginwith a JSON body:json { "username": "your_username", "password": "your_password" }
Expected Response:
HTTP/1.1 200 OK
{
    "access_token": "v2.local.E6nPM0LFVkEWavLDlN0RjLiJJnpuiKjCq_Wvs",
    "user": {
        "username": "john_doe",
        "full_name": "John Doe",
        "email": "[email protected]",
        "password_changed_at": "0001-01-01T00:00:00Z",
        "created_at": "2023-01-01T12:00:00Z"
    }
}- Successful Login: You should receive a
200 OKstatus with an access token and user data. - Incorrect Password: You should receive a
401 Unauthorizedstatus. - User Not Found: You should receive a
404 Not Foundstatus.
Bonus: Switching to JWT
Because we used an interface for our token maker, switching from PASETO to JWT is trivial. To switch from PASETO to JWT, simply change one line in NewServer:
// PASETO (recommended)
tokenMaker, err := token.NewPasetoMaker(config.TokenSymmetricKey)

// JWT (alternative)
tokenMaker, err := token.NewJWTMaker(config.TokenSymmetricKey)
And that’s it! You have successfully implemented a secure login API that issues access tokens.
Configuration-Based Switching
For production flexibility, add environment variable:
env
TOKEN_TYPE=PASETO  # or JWT
Update config and server, we can easily switch between jwt and Paseto
type Config struct {
    // ... other fields
    TokenType           string        `mapstructure:"TOKEN_TYPE"`
    TokenSymmetricKey   string        `mapstructure:"TOKEN_SYMMETRIC_KEY"`
    AccessTokenDuration time.Duration `mapstructure:"ACCESS_TOKEN_DURATION"`
}

func NewServer(config util.Config, store db.Store) (*Server, error) {
    var tokenMaker token.Maker
    var err error

    switch config.TokenType {
    case "JWT":
        tokenMaker, err = token.NewJWTMaker(config.TokenSymmetricKey)
    case "PASETO":
        tokenMaker, err = token.NewPasetoMaker(config.TokenSymmetricKey)
    default:
        tokenMaker, err = token.NewPasetoMaker(config.TokenSymmetricKey)
    }

    if err != nil {
        return nil, fmt.Errorf("cannot create token maker: %w", err)
    }

    // ... rest of implementation
}