In the previous lesson 25, we learned how to build a minimal Docker image for our Go (Golang) application.
The image was very small—just 35.3 MB—but we hadn’t tested it yet.
Introduction
Tutorial: Connecting Two Stand-Alone Containers with Docker Networks. When working with multiple Docker containers—like a web application and a database—you often need them to communicate. By default, containers run in isolation. You can connect them using Docker’s networking features.
Main objective of this tutorial
The goal is to create a Docker image for our Go application and run it as a container. We will then connect it to a separate Postgres container. We’ll explore different networking solutions in Docker to achieve this.
This tutorial provides a complete walkthrough for establishing reliable communication between Docker containers using custom networks instead of simple IP-based. We’ll cover the limitations of default networking, demonstrate practical solutions, and explain key Docker networking concepts.
In prevous lesson we learn Creating a Minimal Docker Image for the Go App:
First, we’ll create a `Dockerfile` to build a minimal Docker image for our Go application. We’ll use a multi-stage build to keep the final image size small.
# Build stage
FROM golang:1.24.6-alpine3.22 AS builder
WORKDIR /app
COPY . .
RUN go build -o main main.go

# Run stage
FROM alpine:3.22
WORKDIR /app
COPY --from=builder /app/main .
EXPOSE 8080
CMD ["/app/main"]
Part 1: Initial Setup and Problem Identification
In previous section we have learned how to build a minimal docker image for our golang application. As image build was very prettty small just 35.3MB and we dont know whether it is working or not, we didnt test it.
1. Testing the Built Image
Let run our previous created docker
docker run --name simplebank -p 8080:8080 simplebank:latest When you build and run this image, you’ll encounter an error: `cannot load config:Config File “app” Not Found`.
This error is expected. In an earlier lecture, we used Viper to load app.env from our application directory. However, this app.env file wasn’t copied into the final runtime stage of the Docker image in Lesson 25. We only copied the binary executable, so Docker couldn’t find the configuration file.
2. Fixing Missing Configuration
We update our multi-stage Dockerfile to include the configuration file, by copying the `app.env` file into the final image and let edit Dockerfile
#Build stage
FROM golang:1.24.6-alpine3.22 AS builder
WORKDIR /app
COPY . .
RUN go build -o main main.go

#Run stage
FROM alpine:3.22
WORKDIR /app
COPY --from=builder /app/main .
#Add this config file
COPY app.env .

EXPOSE 8080
CMD ["/app/main"]
Now, rebuild the image:
docker build -t simplebank:latest .Development Configuration (app.env) in our root folder we have
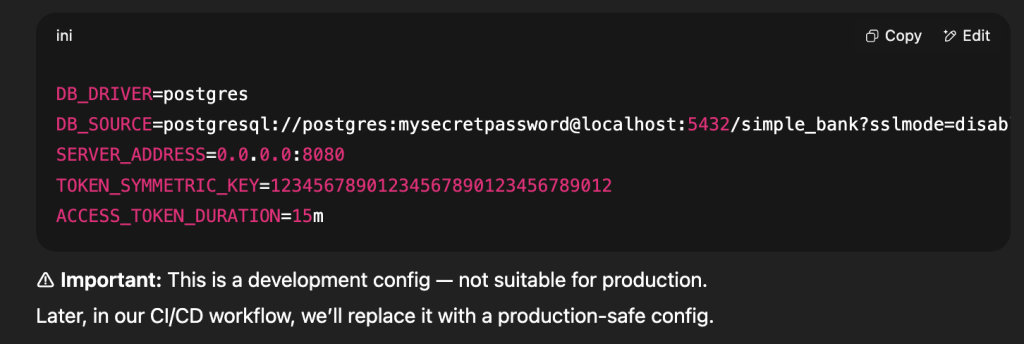
Important Note: While we use app.env for development, in production you should:
- Use environment variables
- Use Docker secrets
- Use a proper configuration management system
For now w’ll used this development config to test our docker image first. As last docker run failed, now run docker ps – a
Now before we rebuild the docker image and let run docker rmi to remove old simplebank image allows
docker rmi 6c63c2f2726c this is simplebank:latest
3. Cleaning Up Old Containers and Images
Remove the old, exited container:
#Remove simplebank container for golang web
docker rm simplebank
#Remove the old image
docker rmi simplebank:latest
#Rebuild the image:
docker build -t simplebank:latest .
Now we have latest docker image of simplebank and let run it
docker run –name simplebank -p 8080:8080 simplebank:latest
4. Setting Production Mode
The golang server is running successful but we see warning the GIN is Running in “debug” mode.
Switch to “release” mode in production. In production we need to set this GIN_MODE environment variable to release, to instruct gin that it should run the sever in release mode instead. Let do it by removing simplebank container.
docker rm simplebankBy default, Gin runs in debug mode. To run in release mode, set the GIN_MODE environment variable
Start a new one with same docker run command with -e option to set GIN_MODE=release environment this tilmes
docker run --name simplebank -p 8080:8080 -e GIN_MODE=release simplebank:latestWe can check docker ps to verify the new simplebank container works
Part 2: Understanding Container Networking
The Localhost Misconception, in production we cant run localhost to communicate with inter docker container.
Now that we have a working image, let’s run it:
docker run --name simplebank -p 8080:8080 -e GIN_MODE=release simplebank:latestRunning the Container and Database Connection Issues
The application will start, but when you try to log in or calling API via Postman, we’ll get a `connection refused` error.
dial tcp [::1]:5432: connect: connection refusedThis is because the application container cannot reach the Postgres container at `localhost`. Each container has its own network namespace, and `localhost` refers to the container itself, not the host machine where the Postgres container might be running.
Reason for failed:
- In
app.env, we connect to PostgreSQL vialocalhost. - But
simplebankandpostgresare in different containers with different IPs. - Each container has its own network namespace
localhostinside a container refers only to that container- Containers need to communicate via their own IP addresses or names
Inspecting Container Networks:
Check PostgreSQL container IP:
docker container inspect pg-root-container
"IPAddress": "172.17.0.3"
Check simplebank container IP:
docker container inspect simplebank
"IPAddress": "172.17.0.2"
(Shows different IP, e.g., 172.17.0.2)
Solutions for Inter-Container Communication
Solution 1 — Hardcode PostgreSQL IP in Config
Update app.env with the Postgres container IP and rebuild the image.
DB_SOURCE=postgresql://postgres:mysecretpassword@localhost:5432/simple_bank?sslmode=disable
#replace it with postgress ip address
DB_SOURCE=postgresql://postgres:mysecretpassword@172.17.0.3:5432/simple_bank?sslmode=disable
Replace localhost with real IP address of the Postgres16 container in the app.env config file and rebuild the docker image. But this approach is not convenient and not flexiable.
❌ Downside: IP changes if the container restarts → requires rebuild.
Solution 2 — Override Config via Environment Variable
Since we use Viper, we can override DB_SOURCE without rebuilding.
docker run --name simplebank -p 8080:8080 \
  -e GIN_MODE=release \
  -e DB_SOURCE="postgresql://postgres:[email protected]:5432/simple_bank?sslmode=disable" \
  simplebank:latest
✅ Works without rebuild. ❌ Still tied to changing IPs.
Part 3: Solutions for Inter Container Communication
Using IP Address (Not Recommended) as each time when we start the server it might generate new IP address.
Problems:
- IP addresses change when containers restart
- Requires manual updates
- Not maintainable
Solution 3: User-Defined Networks (Recommended)
The best way to enable communication between containers is to use a user-defined Docker network. This allows containers to resolve each other by their names. Let use User-Defined Network to connect inter container communication.
Step 1. Create a Docker Network:
Let first create docker network called bank-network, we will add both postgres and golang web container to this network.
docker network create bank-networkStep 2. Connect PostgreSQL Container to bank-network
If your Postgres container is already running, stop and remove it. Then, run it again, but this time, connect it to the `bank-network`.
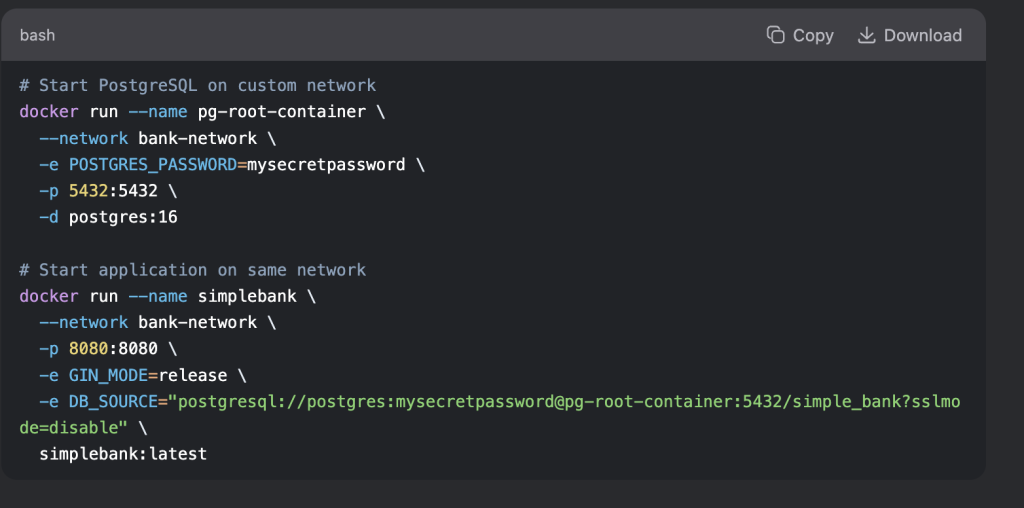
docker run --name pg-root-container --network bank-network -e POSTGRES_USER=postgres -e POSTGRES_PASSWORD=mysecretpassword -p 5432:5432 -d postgres:16We can verify it by running this command
docker network inspect bank-networkStep 3: Run Golang web application on the same network as postgres
Now, run the Go application container on the same network. We’ll also update the `DB_SOURCE` environment variable to use the Postgres container’s name (`pg-root-container`) as the hostname instead of IP address.
docker run --name simplebank --network bank-network -p 8080:8080 -e GIN_MODE=release -e DB_SOURCE="postgresql://postgres:mysecretpassword@pg-root-container:5432/simple_bank?sslmode=disable" simplebank:latestAt last let push all the changes to github to ft/docker branch, check github site we can see new commit int this pull-request. When you works on a team and your team can go to this PR to review the codes and we can also add comment and add author name, and once code is properly reviewed and unit test is passed and we can merge it to the our main branch.
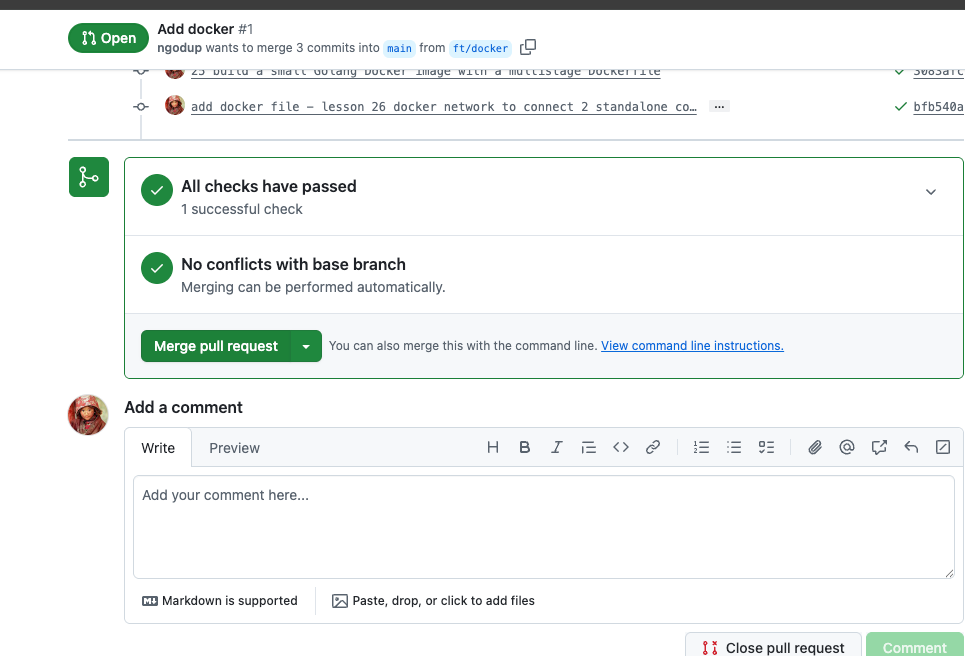
And finnaly delete the ft/branch in github.com
Advantages of a User-Defined Network
- Still allows multiple network memberships for a container.
- Containers can resolve each other by name, automatic DNS resolution between containers (Docker DNS).
- No dependency on changing IPs.
- Better isolation and organization.
- Stable communication using container names
Now, your Go application can connect to the Postgres database, and the API calls should work as expected.
The Default Bridge Network vs. User-Defined Networks
- Default Bridge Network:
- All containers run on this network by default unless specified otherwise.
- Containers on this network can communicate with each other using their IP addresses.
- Limitation: Does not provide automatic DNS resolution between containers. This means you cannot use container names as hostnames for communication.
- User-Defined Networks:
- You can create your own custom bridge networks.
- Key Advantage: Provides automatic DNS resolution. Containers on the same user-defined network can resolve each other by their container name.
- Provides better isolation and organization for your containers.
Part 4: Best Practices and Advanced Configuration
Starting Containers on Custom Network Immediately. Better approach than connecting after creation:
Network Inspection Commands
# List all networks
docker network ls

# Inspect a specific network
docker network inspect bank-network
#We see both container on bank-network

# See a container's network connections
docker inspect pg-root-container | grep -A 10 "Networks"
5: Updating the Makefile
To make this setup permanent, update the `postgres` command in your `Makefile` to automatically connect the Postgres container to the `bank-network`. **Updated `Makefile`:**
postgres:
docker run --name pg-root-container --network bank-network -e POSTGRES_USER=postgres -e POSTGRES_PASSWORD=mysecretpassword -p 5432:5432 -d postgres:16
Optional Tips : Production Considerations
1. Environment Variables Management
For better security and maintainability:
# Create environment file
echo "DB_SOURCE=postgresql://postgres:mysecretpassword@pg-root-container:5432/simple_bank?sslmode=disable" > .env
echo "GIN_MODE=release" >> .env

# Run with env file
docker run --name simplebank \
  --network bank-network \
  -p 8080:8080 \
  --env-file .env \
  simplebank:latest
### Conclusion ###
You have successfully containerized your Go application and connected it to a Postgres database container. You’ve learned:
- How to create a minimal Docker image using a multi-stage build.
- Why `localhost` doesn’t work for inter-container communication.
- How to use a user-defined Docker network to enable communication between containers by name.
- Default bridge network doesn’t allow container name resolution.
- User-defined networks allow DNS-based container discovery.
- Always prefer container names over IPs for reliability.
- Use
docker network create+--networkto link stand-alone containers.