User authentication is one of the most important tasks, in this article we’ll learn express js passport authentication in our project. Passport is a robust piece of Node.js authentication middleware that helps us to authenticate and access control our Express apps. The Passport middleware allows developers
to offer various authentication methods using a mechanism called strategies, which allows you to
implement a complex authentication layer while keeping your code clean and simple.
Passport middleware or passport.js allow us to define different strategy. Passport uses strategies to utilize both local authentication and OAuth authentication providers, such as Facebook, Twitter, and Google. Using Passport strategies,
you’ll be able to seamlessly offer different authentication options to your users while maintaining a
unified User model.
What are we learning?
- Integrating passport Js in our apps.
- Using both local and OAuth authentication strategies.
- Understand the serialization to maintain the session.
- Integrating Password the Bcrypt
Express js passport setup and configuration
First, we will learn the passport-local strategy and will learn OAuth authentication later.
Step 1: Installing our project, as we have a lot of dependencies, and is better to type all dependencies once in the package.JSON and install altogether.
npm init Type all the dependencies directly in the package.JSON and use npm install. Add the following code in package.JSON and add the line number 8 code also.
{
  "name": "passportlogin",
  "version": "1.0.0",
  "description": "User authentication app",
  "main": "app.js",
  "scripts": {
    "test": "echo \"Error: no test specified\" && exit 1",
    "start": "node app"
  },
  "author": "",
  "license": "ISC",
  "dependencies": {
    "express":"*",
    "body-parser":"*",
    "express-handlebars":"*",
    "express-messages":"*",
    "express-session":"*",
    "express-validator":"*",
    "connect-flash":"*",
    "mongoose":"*",
    "passport":"*",
    "passport-http":"*",
    "passport-local":"*",
    "bcryptjs":"*"
  }
}
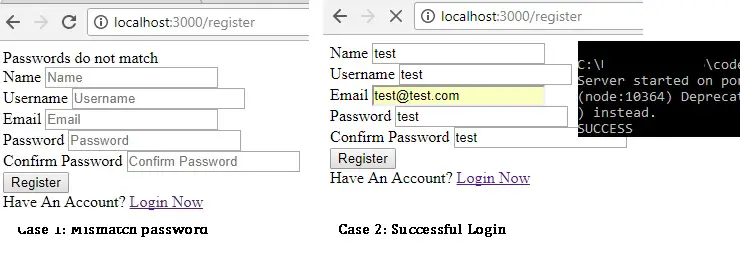
Step 2: We will create login register functionality first, we will make the user interface through bootstrap later. Inside the views/register.handlebars add the following code for the logged-in, and registration form. When we fail to logged-in successfully, the express validator will display an error message and on successful login, we will display a success message at the console.
<form method="post" action="/register">
  <div>
    <label>Name</label>
    <input type="text" name="name" placeholder="Name">
  </div>
  <div>
    <label>Username</label>
    <input type="text" name="username" placeholder="Username">
  </div>
  <div>
    <label>Email</label>
    <input type="email" name="email" placeholder="Email">
  </div>
  <div>
    <label>Password</label>
    <input type="text" name="password" placeholder="Password">
  </div>
  <div>
    <label>Confirm Password</label>
    <input type="text" name="password2" placeholder="Confirm Password">
  </div>
  <button type="submit">Register</button>
  <br>
  Have An Account? <a href="/">Login Now</a>
</form>
Step 3: We have to add code for routes to /register of registration and apply the express validator in routes/index.js as
var express = require('express');
var router = express.Router();

// Home Page
router.get('/', (req, res, next) => {
  res.render('index');
});

// Register Form

router.get('/register', (req, res, next) => {
  res.render('register');
});

// Process Register
router.post('/register', (req, res, next) => {
  const { name, username, email, password, password2 } = req.body;


  req.checkBody('name', 'Name field is required').notEmpty();
  req.checkBody('email', 'Email field is required').notEmpty();
  req.checkBody('email', 'Email must be a valid email address').isEmail();
  req.checkBody('username', 'Username field is required').notEmpty();
  req.checkBody('password', 'Password field is required').notEmpty();
  req.checkBody('password2', 'Passwords do not match').equals(req.body.password);

  let errors = req.validationErrors();

  if(errors){
    res.render('register', {
      errors: errors
    });
  } else {
    console.log('SUCCESS');
    return;
  }
});

module.exports = router;
Step 4: Create a user model, in the root folder add models/user.js and add the following code in user.js, Here we are exporting a new model name called User and we are adding hash or encryption of Bcrypt to our password with the salt of 10 characters.
const mongoose = require('mongoose');
mongoose.connect('mongodb://localhost/passportapp');
const bcrypt = require('bcryptjs');

// User Schema
const UserSchema = mongoose.Schema({
  name: {
    type: String
  },
  username: {
    type: String
  },
  email: {
    type: String
  },
  password: {
    type: String
  }
});

const User = module.exports = mongoose.model('User', UserSchema);

module.exports.registerUser = function(newUser, callback){
  bcrypt.genSalt(10, (err, salt) => {
    bcrypt.hash(newUser.password, salt, (err, hash) => {
      if(err){
        console.log(err);
      }
      newUser.password = hash;
      newUser.save(callback);
    });
  });
}
Step 5: In the index.js in routes, we will add two new code
1. Add let User = require(‘../models/user’); at line number 3 of routes/index.js
2. Replace the code of console.log(success) of the route.post(‘/register’, with a new code for the creating new user, add route code for the login page and once the successful new user is created then we will redirect to /login page.
// Login Form
router.get('/login', (req, res, next) => {
  res.render('login');
});

// Process Register
router.post('/register', (req, res, next) => {
  const { name, username, email, password, password2 } = req.body;


  req.checkBody('name', 'Name field is required').notEmpty();
  req.checkBody('email', 'Email field is required').notEmpty();
  req.checkBody('email', 'Email must be a valid email address').isEmail();
  req.checkBody('username', 'Username field is required').notEmpty();
  req.checkBody('password', 'Password field is required').notEmpty();
  req.checkBody('password2', 'Passwords do not match').equals(req.body.password);

  let errors = req.validationErrors();

  if(errors){
    res.render('register', {
      errors: errors
    });
  } else {
    const newUser = new User({
      name: name,
      username: username,
      email: email,
      password: password
    });

    User.registerUser(newUser, (err, user) => {
      if(err) throw err;
      req.flash('success_msg', 'You are registered and can log in');
      res.redirect('/login');
    });
  }
});

module.exports = router;
Step 5: Inside the views, the folder adds a new file login.handlebars with code LOGIN for testing only, when successful adding of the new user will redirect to the login page. Add a new user test as a new user on localhost:3000/register. Check the local MongoDB database for a new user as we didn’t create any mongo database, it will create automatically. Check the local MongoDB database for a new user as we didn’t create any mongo database, it will create automatically. Check-in local mongo shell >show dbs , > use passportapp >> show collection >> db.users.find().pretty()
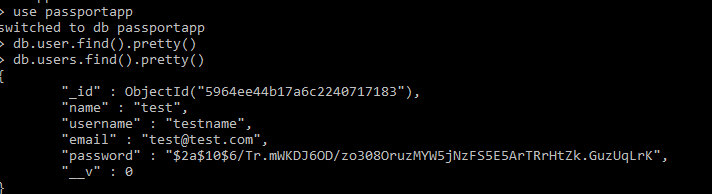
We can see new user information on the local database.
Note: If we are using the handlebar as a template, the middleware Express messages in app.js didn’t work because we can’t write Javascript within the handlebar. So we have to write the code different from the usual and will create a different message for each variable. In the app.js replace the express message of
// Express messages
app.use(require('connect-flash')());
app.use((req, res, next) => {
  res.locals.messages = require('express-messages')(req, res);
  next();
});
Replace with new code as
// Express messages
app.use(flash());
app.use((req, res, next) => {
  res.locals.success_msg = req.flash('success_msg');
  res.locals.error_msg = req.flash('error_msg');
  next();
});
Step 6: We will add the code for express messages middleware in views/layouts/main.handlebars to display any message like when login didn’t work. As we have two types of errors message, one with highlight is from express messages middleware and the other without the highlighted is the from the express validator for form.
<!DOCTYPE html>
<html>
  <head>
    <meta charset="utf-8">
    <title>Passport App</title>
    <link rel="stylesheet" href="/css/style.css">
  </head>
  <body>
    {{#if success_msg}}
      <div class="alert alert-success">{{success_msg}}</div>
    {{/if}}
    {{#if error_msg}}
      <div class="alert alert-danger">{{error_msg}}</div>
    {{/if}}
    {{#if errors}}
      {{#each errors}}
        <div class="alert alert-danger">{{msg}}</div>
      {{/each}}
    {{/if}}
    {{{body}}}
  </body>
</html>
Step 7: Inside the routes/index.js we will replace the code of the process register for a new user with the new code and all other codes are the same.
var express = require('express');
var router = express.Router();

let User = require('../models/user');

// Home Page
router.get('/', (req, res, next) => {
  res.render('index');
});

// Login Form
router.get('/login', (req, res, next) => {
  res.render('login');
});

// Register Form
router.get('/register', (req, res, next) => {
  res.render('register');
});

// Process Register
router.post('/register', (req, res, next) => {
  const { name, username, email, password, password2 } = req.body;


  req.checkBody('name', 'Name field is required').notEmpty();
  req.checkBody('email', 'Email field is required').notEmpty();
  req.checkBody('email', 'Email must be a valid email address').isEmail();
  req.checkBody('username', 'Username field is required').notEmpty();
  req.checkBody('password', 'Password field is required').notEmpty();
  req.checkBody('password2', 'Passwords do not match').equals(req.body.password);

  let errors = req.validationErrors();

  if(errors){
    res.render('register', {
      errors: errors
    });
  } else
    const newUser = new User({
      name: name,
      username: username,
      email: email,
      password: password
    });

    User.registerUser(newUser, (err, user) => {
      if(err) throw err;
      req.flash('success_msg', 'You are registered and can log in');
      res.redirect('/login');
    });
  }
});

module.exports = router; 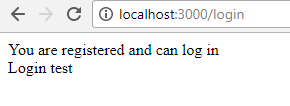
Step 8: We are able to create a new user or register for the new user from the above step, now we are adding login form and applying the local strategy. Add the following code for login in views/login.handlebars
<form method="post" action="/login">
  <div>
    <label>Username</label>
    <input type="text" name="username" placeholder="Username">
  </div>
  <div>
    <label>Password</label>
    <input type="text" name="password" placeholder="Password">
  </div>
  <button type="submit">Login</button>
  <br>
  Don't Have An Account? <a href="/register">Register</a>
</form>
In views/register.handlebars we replace all one code from
Have An Account? <a href="/">Login Now</a>
To
Have An Account? <a href="/login">Login Now</a>
We have to add code for the login post and local strategy, inside routes/index.js. We will add the following code in two place
- At the top of routes/index.js
const express = require('express'); const router = express.Router(); const passport = require('passport'); const LocalStrategy = require('passport-local').Strategy; - at the end or before the module.exports = router;
// Local Strategy
passport.use(new LocalStrategy((username, password, done) => {
  User.getUserByUsername(username, (err, user) => {
    if(err) throw err;
    if(!user){
      return done(null, false, {message: 'No user found'});
    }

    User.comparePassword(password, user.password, (err, isMatch) => {
      if(err) throw err;
      if(isMatch){
        return done(null, user);
      } else {
        return done(null, false, {message: 'Wrong Password'});
      }
    });
  });
}));

passport.serializeUser((user, done) => {
  done(null, user.id);
});

passport.deserializeUser((id, done) => {
  User.getUserById(id, (err, user) => {
    done(err, user);
  });
});

// Login Processing
router.post('/login', (req, res, next) => {
  passport.authenticate('local', {
    successRedirect:'/',
    failureRedirect:'/login',
    failureFlash: true
  }, (req, res) => {
    res.redirect('/');
  });
});

module.exports = router;
Here we are defining what we will redirect if successful/ unsuccessful login, here in our case we will redirect to a home page on successful user login. On the above code of highlight, we have to define the corresponding function in our model user.
Now we will define login functionality, we will define the highlight function at the end in the models/user.js.
module.exports.getUserByUsername = function(username, callback){
  const query = {username: username}
  User.findOne(query, callback);
}

module.exports.getUserById = function(id, callback){
  User.findById(id, callback);
}

module.exports.comparePassword = function(candidatePassword, hash, callback){
  bcrypt.compare(candidatePassword, hash, (err, isMatch) => {
    if(err) throw err;
    callback(null, isMatch);
  });
}
In app.js we have to add two lines of code for password middleware and at below the express session middleware in app.js.
const express = require('express');
const path = require('path');
const bodyParser = require('body-parser');
const exphbs = require('express-handlebars');
const expressValidator = require('express-validator');
const flash = require('connect-flash');
const session = require('express-session');
const passport = require('passport');
const mongoose = require('mongoose');

const app = express();
const port = 3000;

const index = require('./routes/index');

// View Engine
app.engine('handlebars', exphbs({defaultLayout:'main'}));
app.set('view engine', 'handlebars');

// Static Folder
app.use(express.static(path.join(__dirname, 'public')));

// Body Parser Middleware
app.use(bodyParser.json());
app.use(bodyParser.urlencoded({ extended: false }));

// Express Session
app.use(session({
    secret: 'secret',
    saveUninitialized: true,
    resave: true
}));

// Init passport
app.use(passport.initialize());
app.use(passport.session());

// Express messages
app.use(flash());
app.use((req, res, next) => {
  res.locals.success_msg = req.flash('success_msg');
  res.locals.error_msg = req.flash('error_msg');
  next();
});


// Express Validator
app.use(expressValidator({
  errorFormatter: (param, msg, value) => {
      let namespace = param.split('.')
      , root    = namespace.shift()
      , formParam = root;

    while(namespace.length) {
      formParam += '[' + namespace.shift() + ']';
    }
    return {
      param : formParam,
      msg   : msg,
      value : value
    };
  }
}));

app.use('/', index);

// Start Server
app.listen(port, () => {
  console.log('Server started on port '+port);
});
We will define the flash message as a global variable in app.js to display the message of login success or failure in views/layouts/main.handlebar. Append the highlighted code on the express message in app.js
// Express messages
app.use(flash());
app.use((req, res, next) => {
  res.locals.success_msg = req.flash('success_msg');
  res.locals.error_msg = req.flash('error_msg');
  res.locals.error = req.flash('error');
  res.locals.user = req.user || null;
  next();
});
In the views/layout/main.handlebars append highlight code on existing code.
!DOCTYPE html>
<html>
  <head>
    <meta charset="utf-8">
    <title>Passport App</title>
    <link rel="stylesheet" href="/css/style.css">
  </head>
  <body>
<!-- New user registeration msg -->
    {{#if success_msg}}
      <div class="alert alert-success">{{success_msg}}</div>
    {{/if}}
    {{#if error_msg}}
      <div class="alert alert-danger">{{error_msg}}</div>
    {{/if}}
<!-- For login success or failure msg -->
    {{#if error}}
      <div class="alert alert-danger">{{error}}</div>
<!-- Form validation msg -->
    {{/if}}
    {{#if errors}}
      {{#each errors}}
        <div class="alert alert-danger">{{msg}}</div>
      {{/each}}
    {{/if}}
    {{{body}}}
  </body>
</html> 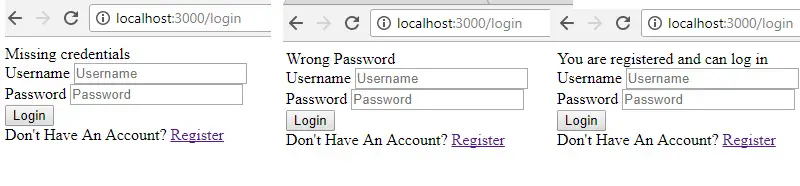
Note: Successful login will take you to the root or home page.
Step 9: We have to add a logout code and access control on the login. First, we will add the logout code in routes/index.js after the Register form code.
// Register Form
......
// Logout
router.get('/logout', (req, res, next) => {
  req.logout();
  req.flash('success_msg', 'You are logged out');
  res.redirect('/login');
}); 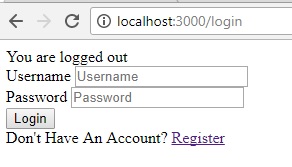
Test log out in URL, the first login with validate user login and then type localhost:3000/logout will redirect to the login page with the message as below.
Now we will apply the access control on login, as for the above code till now we can access the home page directly without login. We can control the access as two-step
- Add the following code at the end of routes/index.js
// Access Control
function ensureAuthenticated(req, res, next){
  if(req.isAuthenticated()){
    return next();
  } else {
    req.flash('error_msg', 'You are not authorized to view that page');
    res.redirect('/login');
  }
}

module.exports = router;
2. Apply the access control on the dashboard or home page. Edit the code of home in routes/index.js
To new code as
// Home Page - Dashboard
router.get('/', ensureAuthenticated, (req, res, next) => {
  res.render('index');
});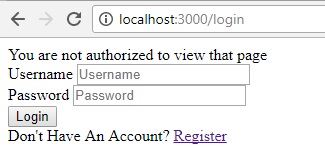
We will get messages while access the dashboard or home page as

Step 10: Now we will apply the user interface through bootstrap, as
We will add the nav bar code from the bootstrap example theme, and the bootstrap theme link from bootswatch.com Flatly theme copy its URL and the past in views/layouts/main.handlebars
<!DOCTYPE html>
<html>
  <head>
    <meta charset="utf-8">
    <title>Passport App</title>
    <link rel="stylesheet" href="https://bootswatch.com/flatly/bootstrap.min.css">
    <link rel="stylesheet" href="/css/style.css">
  </head>
  <body>

    <nav class="navbar navbar-inverse">
      <div class="container">
        <div class="navbar-header">
          <button type="button" class="navbar-toggle collapsed" data-toggle="collapse" data-target="#navbar" aria-expanded="false" aria-controls="navbar">
            <span class="sr-only">Toggle navigation</span>
            <span class="icon-bar"></span>
            <span class="icon-bar"></span>
            <span class="icon-bar"></span>
          </button>
          <a class="navbar-brand" href="#">Passport App</a>
        </div>
        <div id="navbar" class="collapse navbar-collapse">
          <ul class="nav navbar-nav navbar-left">
            <li><a href="/">Dashboard</a></li>
          </ul>

          <ul class="nav navbar-nav navbar-right">
            {{#if user}}
              <li><a href="/logout">Logout</a></li>
            {{else}}
              <li><a href="/login">Login</a></li>
              <li><a href="/register">Register</a></li>
            {{/if}}
          </ul>
        </div><!--/.nav-collapse -->
      </div>
    </nav>
  <div class="container">
    {{#if success_msg}}
      <div class="alert alert-success">{{success_msg}}</div>
    {{/if}}
    {{#if error_msg}}
      <div class="alert alert-danger">{{error_msg}}</div>
    {{/if}}
    {{#if error}}
      <div class="alert alert-danger">{{error}}</div>
    {{/if}}
    {{#if errors}}
      {{#each errors}}
        <div class="alert alert-danger">{{msg}}</div>
      {{/each}}
    {{/if}}
    {{{body}}}
  </div>
  </body>
</html>
Apply the div container class to the error message as in the highlighted code above. As we can easily access the user variable anywhere, which defines global in app.js add the following code in views/index.handlebars or dashboard as
<h1>Dashboard</h1>
<p>Welcome {{user.name}}</p>
Last, apply the bootstrap class in views/login.handlebars and register. handlebars. First, we will apply the bootstrap class on the login view
<form method="post" action="/login">
  <div class="form-group">
    <label>Username</label>
    <input class="form-control" type="text" name="username" placeholder="Username">
  </div>
  <div class="form-group">
    <label>Password</label>
    <input class="form-control" type="password" name="password" placeholder="Password">
  </div>
  <button class="btn btn-primary" type="submit">Login</button>
  <br>
  Don't Have An Account? <a class="btn btn-default btn-sm" href="/register">Register</a>
</form>
and also apply it to the register view as
<form method="post" action="/register">
  <div class="form-group">
    <label>Name</label>
    <input class="form-control" type="text" name="name" placeholder="Name">
  </div>
  <div class="form-group">
    <label>Username</label>
    <input class="form-control" type="text" name="username" placeholder="Username">
  </div>
  <div class="form-group">
    <label>Email</label>
    <input class="form-control" type="email" name="email" placeholder="Email">
  </div>
  <div class="form-group">
    <label>Password</label>
    <input class="form-control" type="text" name="password" placeholder="Password">
  </div>
  <div class="form-group">
    <label>Confirm Password</label>
    <input class="form-control" type="text" name="password2" placeholder="Confirm Password">
  </div>
  <button class="btn btn-primary"type="submit">Register</button>
  <br>
  Have An Account? <a class="btn btn-default btn-sm" href="/login">Login Now</a>
</form>
Related Post